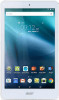
Acer Iconia A1-860 User Manual
Acer Iconia A1-860 Manual
 |
View all Acer Iconia A1-860 manuals
Add to My Manuals
Save this manual to your list of manuals |
Acer Iconia A1-860 manual content summary:
- Acer Iconia A1-860 | User Manual - Page 1
User's Manual - Acer Iconia A1-860 | User Manual - Page 2
All Rights Reserved Acer Iconia Tab 8 User's Manual Covers: A1-860 Regulatory Model Number (RMN): A5001 This revision: June 2015 Sign up for an Acer ID and enjoy great benefits Open the Acer Portal app from the Start screen to sign up for an Acer ID or sign in if you already have an Acer ID. There - Acer Iconia A1-860 | User Manual - Page 3
38 Taking a photo 38 Shooting a video 39 Supported formats 39 Advanced settings 40 Wireless & Networks 40 Device 42 Personal 43 System 44 Updating your tablet's operating system 45 Resetting your tablet 45 FAQ and troubleshooting 47 Other sources of help 49 Specifications 50 - Acer Iconia A1-860 | User Manual - Page 4
contents. If any of the following items are missing or damaged, contact your dealer immediately: • Acer Iconia tablet • Product setup and safety information • USB cable • AC adapter • Warranty card Note Before using your tablet for the first time, you need to charge it for at least four hours. After - Acer Iconia A1-860 | User Manual - Page 5
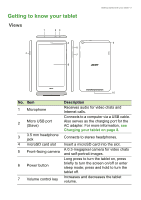
calls. Connects to a computer via a USB cable. Also serves as the charging port for the AC adapter. For more information, see Charging your tablet on page 8. Connects to stereo headphones. Insert a microSD card into the slot. A 0.3-megapixel camera for video chats and self-portrait images. Long - Acer Iconia A1-860 | User Manual - Page 6
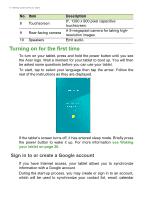
hold the power button until you see the Acer logo. Wait a moment for your tablet to boot up. You will then be asked some questions before you can use your tablet. To start, tap to select your language then tap the arrow. Follow the rest of the instructions as they are displayed. If the - Acer Iconia A1-860 | User Manual - Page 7
other Google Apps; to download APPs from Google Play; to back up your settings to Google servers; and to take advantage of other Google services on your tablet. If you want to restore existing settings from another device with Android 2.0 (or later) installed, you must sign in to your Google account - Acer Iconia A1-860 | User Manual - Page 8
8 - Charging your tablet CHARGING YOUR TABLET Assembling the power adapter Your tablet is bundled with one of two types of USB power adapters: a fixed-prong type or a removable-prong type. Both types are described in this manual. Fixed-prong type The prongs and power adapter body form a complete - Acer Iconia A1-860 | User Manual - Page 9
Charging your tablet - 9 Connecting power Connect the power connector to your tablet and plug the AC adapter into any AC outlet. Warning Only use an Acer-approved adapter to charge your device. Note It is normal for the tablet surface to become warm during charging or long periods of use. - Acer Iconia A1-860 | User Manual - Page 10
screen, simply drag your finger up or down the screen in the direction that you want to scroll. The Home screen When you start your tablet, or wake it from power saving, it will display the Home screen. This screen gives you quick access to information and simple controls with widgets - Acer Iconia A1-860 | User Manual - Page 11
Using your tablet - 11 The Home screen information. Search already features some useful controls and Status and notification area Application dock Application menu Navigation Note Bundled APPs differ - Acer Iconia A1-860 | User Manual - Page 12
of the results screen. The filter list also has an option called Tablet that searches your tablet for the term/s you searched for. You can also choose what Tablet searches for. After searching for something, tap the Menu icon > Settings > Tablet search. Select the items you want to be included in - Acer Iconia A1-860 | User Manual - Page 13
well. The Application menu To access the Application menu, tap in the center of the application dock. The Application menu displays APPs available on your tablet. APPs are displayed in alphabetical order. Swipe to the left to see more APPs. See Personalizing the Home screen on page 16. Tap the Play - Acer Iconia A1-860 | User Manual - Page 14
14 - Using your tablet Adding an application to a Home screen Open the Application menu and tap and hold an APP you'd like to have on the Home screen. Release - Acer Iconia A1-860 | User Manual - Page 15
Using your tablet - 15 To access Quick Settings with one swipe, swipe down with two fingers. Priority notifications With priority notifications turned on, the types of notifications you' - Acer Iconia A1-860 | User Manual - Page 16
16 - Using your tablet Quick Settings icons Note Many Quick Settings icons turn green (button always remains green). Tap to toggle your device's location services on and off. Tap and hold to display location service settings. Connects to wireless display-enabled displays or devices (such as - Acer Iconia A1-860 | User Manual - Page 17
Using your tablet - 17 You may personalize your Home screen by adding or removing application shortcuts or widgets, and by changing the wallpaper. Adding or removing shortcuts or - Acer Iconia A1-860 | User Manual - Page 18
18 - Using your tablet locations where you might have images stored, such as Google Drive, Gallery, Dropbox, and others. The onscreen keyboard When you tap a text box to enter - Acer Iconia A1-860 | User Manual - Page 19
Using your tablet - 19 Tap the ?123 button to see numbers and special characters, and then one of the options to set the keyboard's auto correction level. Note Predictive text and auto correction not supported in all APPs. Editing text You can select and edit text in certain APPs, such as text you - Acer Iconia A1-860 | User Manual - Page 20
tablet Selecting text To select text that you want to cut, copy, delete or replace: 1. Tap the text you want to select. If you can select this text, a cursor is inserted below the text. 2. Tap and hold the text or word you want to select. The selected text is highlighted, with a tab - Acer Iconia A1-860 | User Manual - Page 21
, you may set a code or number that must be entered to access the tablet, such as an unlock pattern (a set of dots that must be tapped in please refer to Unlock pattern on page 48. Shutting down your tablet If you won't use your tablet for an extended period of time, turn it off to save battery power. - Acer Iconia A1-860 | User Manual - Page 22
a microSD card to expand your device's storage space. Ensure that the microSD card is inserted all the way into the card slot. Note Your tablet only supports microSD cards that use the FAT, FAT32, exFAT, and NFTS file systems. To check card capacity, open the Application menu and tap Settings - Acer Iconia A1-860 | User Manual - Page 23
networks tap Bluetooth. 2. Turn Bluetooth on and the tablet instantly starts scanning for nearby Bluetooth devices. 3. Tap the device you want to connect to and follow any on-screen instructions. After the initial pairing, you only need to ensure your tablet's Bluetooth is on and the device is on to - Acer Iconia A1-860 | User Manual - Page 24
connecting to another Bluetooth device, see the device's operating instructions. Only A2DP stereo headsets (playback only, no microphone) are supported. Note Please check for updates to the tablet's software which may add support for additional Bluetooth devices (open the Application menu and tap - Acer Iconia A1-860 | User Manual - Page 25
connection. If Wi-Fi is not on, tap the Wi-Fi switch to On and wait for your tablet to detect nearby networks. Tap the name of your network and enter a security password, if needed. Browsing tasks, tap the Menu icon. Chrome enables you to open multiple tabs. When a page is open, tap the small New - Acer Iconia A1-860 | User Manual - Page 26
tabs across the top of the screen to switch pages. New tab Manual setup to enter the parameters manually or simply tap Next to finish the setup process. The combined inbox feature of your tablet allows you to view emails from multiple accounts in a single inbox. Google services your tablet is - Acer Iconia A1-860 | User Manual - Page 27
Composing an email 1. Make sure your tablet is connected to the internet. 2. Open the Application menu and tap Gmail. 3. Tap . 4. Enter the recipient's email address, the subject and message. 5. When you are - Acer Iconia A1-860 | User Manual - Page 28
a variety of add-on programs and APPs to enhance the functionality of your tablet. You can browse Google Play by category or tap the search icon to download and install the application. You will be told which services (contact information, wireless access, GPS, etc.) the application requires access - Acer Iconia A1-860 | User Manual - Page 29
Going online - 29 You may keep track of the download progress from both the APP's page and your device's notification area. Important Some APPs may require payment before you can download them. You will need to have a Google Wallet account in order to pay for these APPs. Using downloaded APPs Once - Acer Iconia A1-860 | User Manual - Page 30
30 - Going online Google Hangouts Tap Hangouts from the Application menu to open Google Hangouts. Here you can see a list of your contacts connected to Google Hangouts services. Tap on a contact to open a chat session. After you have connected, you can open a video chat session. - Acer Iconia A1-860 | User Manual - Page 31
PLAYING MUSIC Playing music - 31 Multimedia playback Your tablet comes supplied with a variety of programs that you can use to enjoy multimedia content. Note The available option of Google Play Music varies by region. - Acer Iconia A1-860 | User Manual - Page 32
32 - Playing music Swipe in from the left side to display the menu, which contains a list of views, such as Listen Now, My Library, and Playlists as well as Settings, Help, and Send feedback. Albums and invidividual tracks have their own playback options. You can access these by tapping the Menu - Acer Iconia A1-860 | User Manual - Page 33
internal memory or your Google account. Tap Contacts from the Application menu to view your contacts. If you don't have any contacts stored on your tablet, you can sync with your Google account contacts, import contacts from a contact data file (vCard or csv) or add a new contact. If you have - Acer Iconia A1-860 | User Manual - Page 34
34 - Managing people and contacts Adding a new contact Tap to add a new contact. If you have multiple accounts, you will be asked which account you want to use to store the contact. The contact will be synchonized with that account. You may now edit the new contact entry. Storing contacts to - Acer Iconia A1-860 | User Manual - Page 35
.google.com. Sign in to your account then select and edit contacts from the list; the next time your tablet synchronizes with your computer, these changes will also be made to your tablet's contact list. Important Back up your contacts before making any changes. Tap the Menu button and select Import - Acer Iconia A1-860 | User Manual - Page 36
features a front- and rear-facing camera. This section will take you through all the steps in taking photos and videos with your tablet. Note It is recommended that you insert a microSD card into the microSD slot before using the camera. You can only save photos and videos to - Acer Iconia A1-860 | User Manual - Page 37
Using the camera and camcorder - 37 In the camera window, swipe in from the left to display the mode buttons: Lens Blur, Camera, and Camcorder. With any of these options selected (and while the mode buttons are visible) tap the Settings button to display settings for the selected item. The Settings - Acer Iconia A1-860 | User Manual - Page 38
you to over- or under-expose the image. Quick Settings Description Camera • Manual exposure: Tap to toggle the exposure quick settings button on or off (in above are set to your preferences. 2. Frame your subject and steady your tablet. 3. Zoom in or out as needed. Note When zooming, the image on - Acer Iconia A1-860 | User Manual - Page 39
described above are set to your preferences. 2. Frame your subject and steady your tablet and zoom in or out as needed. 3. Tap to begin recording. 4. Tap play symbol). From the Gallery you can share the file using various services and edit the image using various options. Tap to see which sharing - Acer Iconia A1-860 | User Manual - Page 40
. Adjusting Bluetooth settings Displays all available devices you can use Bluetooth to exchange information with. Here you can switch Bluetooth on or off, rename the tablet, and show received files. Tap Refresh to scan for nearby devices. - Acer Iconia A1-860 | User Manual - Page 41
software which may add support for additional Bluetooth devices. Data Usage The Data Usage section shows how much data has been transmitted to your tablet, either in total or for each APP. This information is useful if you are using a metered service. More... Putting your tablet in Airplane mode You - Acer Iconia A1-860 | User Manual - Page 42
down from the top of the screen and tapping the Auto-rotate button. Cast screen Mirrors your tablets display on a compatible monitor or display. Pairing your tablet to the display is required before use and may require a dongle. See the instructions that came with your display or dongle to pair. - Acer Iconia A1-860 | User Manual - Page 43
Apps. Swipe over to the RUNNING tab, then tap the program you wish to close. Select Stop to close the program. Uninstalling an application You can remove programs installed on your tablet to free up extra storage memory. account. Select the type of account and then follow the onscreen instructions. - Acer Iconia A1-860 | User Manual - Page 44
the item you would like to have auto-sync. Tap again to uncheck any for manual synchronization. To manually synchronize an item, make sure the item is checked, tap the Menu icon and time zone from this menu. Your tablet will set the date and time based on information it receives from the network. - Acer Iconia A1-860 | User Manual - Page 45
Set a ringtone. You can delete an alarm by tapping . This action can be undone by tapping UNDO. Updating your tablet's operating system Your tablet can download and install system updates, adding support for new devices or expanding software options. To check for updates, tap APPs > Settings > About - Acer Iconia A1-860 | User Manual - Page 46
46 - Advanced settings To perform a clean boot, open Settings from the Application menu, then tap Backup & reset > Factory data reset; click Reset tablet and then Erase everything to format your tablet. - Acer Iconia A1-860 | User Manual - Page 47
troubleshooting - 47 FAQ AND TROUBLESHOOTING This section lists frequently asked questions that may arise during the use of your tablet, picture files? You may be trying to view an image that is not supported. See Supported formats on page 50 for more information. Multimedia files Why can't I - Acer Iconia A1-860 | User Manual - Page 48
48 - FAQ and troubleshooting Aspect Question Answer Open the Application menu and How do I check tap Settings > About tablet to System information and Google account on the tablet and an Internet connection. If this option is not available, please contact your local Acer service center. - Acer Iconia A1-860 | User Manual - Page 49
a heat up during long periods of long period. use, such as watching a video or playing a game. All Acer tablets are factory-tested before release. Other sources of help For information on: Up-to-date information regarding your tablet Service enquiries Refer to: www.acer.com support.acer.com - Acer Iconia A1-860 | User Manual - Page 50
operating system Display • 8" TFT-LCD capacitive multi-touch screen • 1280 x 800 resolution Multimedia • Two built-in stereo speakers • Built-in microphone Supported formats Type Formats Image JPEG Audio recording AAC-LC, AMR-WB Audio playback AAC-LC, AAC, AAC+ (not raw AAC), AMR-NB, AMR - Acer Iconia A1-860 | User Manual - Page 51
Specifications - 51 Power • DC power-in (5.2 V, 1.35 A) Connectivity • Bluetooth 4.0 • 802.11b/g/n wireless LAN • GPS • GLONASS support Camera • Front camera • 0.3-megapixel • Fixed focus • Rear camera • 5-megapixel • 1080p Full HD audio/video recording • 88-degree wide-angle lens Expansion • - Acer Iconia A1-860 | User Manual - Page 52
52 - Specifications Dimensions Height Width Thickness Weight 213.9 mm 127.7 mm 9.5 mm 355 g Environment Temperature Operating: 0° C to 35° C Non-operating: -20° C to 60° C Humidity (non-condensing) Operating: 20% to 80% Non-operating: 20% to 80% - Acer Iconia A1-860 | User Manual - Page 53
NEITHER INTENDED NOR SHOULD THEY BE IMPLIED. BY INSTALLING THE ACCOMPANYING SOFTWARE OR ANY PORTION THEREOF, YOU AGREE TO BE GRANT OF LICENSE Acer grants to you the following non-exclusive and non-transferable rights with respect to the Software. Under this Agreement, you may: 1. Install and - Acer Iconia A1-860 | User Manual - Page 54
, AND OF LACK OF NEGLIGENCE, ALL WITH REGARD TO THE SOFTWARE AND THE PROVISION OF OR FAILURE TO PROVIDE SUPPORT SERVICES. ALSO, prohibited by the laws or regulations of the United States. Acer (or its licensors) may automatically check the version of such software that you are using on your device - Acer Iconia A1-860 | User Manual - Page 55
TO USE THE SOFTWARE, THE PROVISION OF OR FAILURE TO PROVIDE SUPPORT SERVICES, OR OTHERWISE UNDER OR IN CONNECTION WITH ANY PROVISION OF THIS AGREEMENT must: 1. Cease all use of the Software; 2. Destroy or return to Acer the original and all copies of the Software; and 3. Delete the Software - Acer Iconia A1-860 | User Manual - Page 56
the Third Party Software and Third Party Services is also Privacy policy During registration you will be asked to submit some information to Acer. Please refer to Acer's privacy policy at www.acer.com/ worldwide/support/swa.htm or your local Acer website. subject to additional terms and conditions
-
 1
1 -
 2
2 -
 3
3 -
 4
4 -
 5
5 -
 6
6 -
 7
7 -
8
-
9
-
10
-
11
-
12
-
13
-
14
-
15
-
16
-
17
-
18
-
19
-
20
-
21
-
22
-
23
-
24
-
25
-
26
-
27
-
28
-
29
-
30
-
31
-
32
-
33
-
34
-
35
-
36
-
37
-
38
-
39
-
40
-
41
-
42
-
43
-
44
-
45
-
46
-
47
-
48
-
49
-
50
-
51
-
52
-
53
-
54
-
55
-
56
 |
 |
User’s Manual