Acer TravelMate 3220 TravelMate 3210 / 2400 / 3220 Service Guide
Acer TravelMate 3220 Manual
 |
View all Acer TravelMate 3220 manuals
Add to My Manuals
Save this manual to your list of manuals |
Acer TravelMate 3220 manual content summary:
- Acer TravelMate 3220 | TravelMate 3210 / 2400 / 3220 Service Guide - Page 1
Acer TravelMate 2400/3210/3220 Series Service Guide Service guide files and updates are available on the ACER/CSD web; for more information, please refer to http://csd.acer.com.tw PRINTED IN TAIWAN - Acer TravelMate 3220 | TravelMate 3210 / 2400 / 3220 Service Guide - Page 2
Revision History Please refer to the table below for the updates made on TravelMate 2400/3210 service guide. Date Chapter Updates II - Acer TravelMate 3220 | TravelMate 3210 / 2400 / 3220 Service Guide - Page 3
, manual or otherwise, without the prior written permission of Acer Incorporated. Disclaimer The information in this guide is subject to change without notice. Acer Incorporated makes no representations or warranties, either expressed or implied, with respect to the contents hereof and specifically - Acer TravelMate 3220 | TravelMate 3210 / 2400 / 3220 Service Guide - Page 4
are used in this manual: SCREEN MESSAGES Denotes actual messages that appear on screen. NOTE WARNING CAUTION IMPORTANT Gives bits and pieces of additional information related to the current topic. Alerts you to any damage that might result from doing or not doing specific actions. Gives - Acer TravelMate 3220 | TravelMate 3210 / 2400 / 3220 Service Guide - Page 5
supports, please read the following general information. 1. This Service Guide provides you with all technical information relating to the BASIC CONFIGURATION decided for Acer modem, or extra memory capability). These LOCALIZED FEATURES will NOT be covered in this generic service guide. In such cases - Acer TravelMate 3220 | TravelMate 3210 / 2400 / 3220 Service Guide - Page 6
VI - Acer TravelMate 3220 | TravelMate 3210 / 2400 / 3220 Service Guide - Page 7
(dual-band 802.11b/g) Wi-Fi® CERTIFIEDTM solution, supporting Acer SignalUp wireless technology T Intel® 915GM/PM (for TravelMate 3210)/Intel® 910GML (for TravelMate 2400)+Intel ICH6-M (Mobile Intel 82801FB) T 256/512 MB of DDR2 400/533 MHz memory, upgradeable to 2 GB using two soDIMM modules (dual - Acer TravelMate 3220 | TravelMate 3210 / 2400 / 3220 Service Guide - Page 8
802.11b/g) Wi-Fi® CERTIFIEDTM solution (TravelMate 3210/TravelMate 3220) T Acer SignalUp wireless technology support T WPAN: integrated Bluetooth® Human-centric design and ergonomics T Rugged, yet extremely portable design T Stylish appearance T Full-size keyboard with four programmable launch keys - Acer TravelMate 3220 | TravelMate 3210 / 2400 / 3220 Service Guide - Page 9
T DC-in jack for AC adaptor T Acer ezDock (TravelMate 3220 only) Chapter 1 3 - Acer TravelMate 3220 | TravelMate 3210 / 2400 / 3220 Service Guide - Page 10
System Block Diagram CRT & TV-Out Conn. Daughter Card (M26P) PCI-Express x16 KBC) DC/ DC Interface Circuit RTC Circuit Power DC/DC Circuit Power-OK Circuit Thermal Sensor Clock Generator DDR II SODIMM 2 DDR II SODIMM 1 USB Conn. x3 USB Conn. x1 for BlueTooth Audio Codec Amplifier MDC Conn. - Acer TravelMate 3220 | TravelMate 3210 / 2400 / 3220 Service Guide - Page 11
Layout Top View SW3 SW2 SW4 SW5 SW6 SW1 JP1 2 2 JP7 2 2 JP4 JP5 2 2 KQ: 2 JP42 JP102 2 SW3 JP1 SW2 SW4 SW5 SW6 Power Switch Bluetooth Connector E-mail Switch Internet Browser Switch Emanager Switch User Programmable Switch SW1 JP5 JP4 JP42 JP7 JP10 Lid Swtich Touchpad Connector - Acer TravelMate 3220 | TravelMate 3210 / 2400 / 3220 Service Guide - Page 12
Port RJ11/RJ45 Modem Cable Connector JP41 JP28 JP35 U42 JP26 JP31 JP39 6 USB Port USB Port IEEE 1394 Port Card Reader Connector Infrared Receiver Headphone out/line-out Jack (support SPDIF) Mic-in Jack HDD Connector Wireless LAN Card Connector BIOS DDR2 Socket DDR2 Socket ODD Connector Chapter 1 - Acer TravelMate 3220 | TravelMate 3210 / 2400 / 3220 Service Guide - Page 13
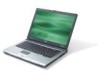
TravelMate computer. Front View # Icon Item Description 1 Display screen Also called LCD (liquid-crystal display), displays computer output. 2 Power and components. 6 Palmrest Comfortable support area for our hands when you Keyboard For entering data into your computer. Chapter 1 - Acer TravelMate 3220 | TravelMate 3210 / 2400 / 3220 Service Guide - Page 14
(option only available for TravelMate 3210). 5 Wireless Press to enable/disable Wireless function. communication button/ Lights to indicate the status of wireless indicator LAN communications. 6 Power indicator Lights when the computer is on. 7 Battery indicator Lights when the - Acer TravelMate 3220 | TravelMate 3210 / 2400 / 3220 Service Guide - Page 15
television or display device with S-video input (TravelMate 3210 only). 3 Network jack Connects to an Ethernet 10/100/1000- based network. 4 Modem jack Connects to a phone line. 5 Two USB 2.0 ports Connects to USB 2.0 devices (e.g., USB mouse, USB camera). 6 IEEE 1394 port Connects to - Acer TravelMate 3220 | TravelMate 3210 / 2400 / 3220 Service Guide - Page 16
Right View # Icon Item Description 1 Optical drive Internal optical drive; accepts CDs or DVDs depending on the optical drive type. 2 LED indicator Lights up when the optical drive is active. 3 Optical drive eject Ejects the opotical drive tray from the drive. button 4 Emergency - Acer TravelMate 3220 | TravelMate 3210 / 2400 / 3220 Service Guide - Page 17
to USB 2.0 devices (e.g., USB mouse, USB camera). This is TravelMate 3220 rear view: # Icon Item Description 1 Battery bay Houses the computer's battery pack. 2 Power jack Connects to an AC adaptor. 3 Connect to USB 2.0 devices (e.g., USB mouse, USB camera). 4 Acer ezDock port - Acer TravelMate 3220 | TravelMate 3210 / 2400 / 3220 Service Guide - Page 18
or obstruct the opening of the fan. 4 Memory compartment Houses the computer's main memory. 5 Hard disk bay Houses the computer's hard disk (secured by two screws). 6 Battery release latch Releases the battery for removal. 7 Wireless LAN card Houses the computer's mini PCI. compartment - Acer TravelMate 3220 | TravelMate 3210 / 2400 / 3220 Service Guide - Page 19
. Media Activity Bluetooth Wireless LAN Power Indicates when the hard disc or optical drive is active. Indicates the status of Bluetooth communication. Indicates the status of wireless LAN communication. Lights up when the computer is on. Battery Lights up when the battery is being charged - Acer TravelMate 3220 | TravelMate 3210 / 2400 / 3220 Service Guide - Page 20
Launch Keys Located at the upper-right, above the keyboard are four buttons. These buttons are called launch keys. The are: mail, Web browser, Acer Empowering key " " and one user-programmable button. Press " " to ru the Acer eManager. Please see "Acer eManager". The mail and Web buttons are pre-set - Acer TravelMate 3220 | TravelMate 3210 / 2400 / 3220 Service Guide - Page 21
touchpad. The central location on the palmrest provides optimum comfort and support. Touchpad Basics The following teaches you how to use the touchpad button mimics your cursor pressing on the right scroll bar of Windows applications. Function Execute Select Left Button (1) Click twice quickly - Acer TravelMate 3220 | TravelMate 3210 / 2400 / 3220 Service Guide - Page 22
Function Drag Access context menu Scroll Left Button (1) Click and hold, then use finger to drag the cursor on the touchpad Right Button (4) Click once Main touchpad (2) Tap twice (at the same speed as doubleclicking a mouse button) then hold finger to the touchpad on the second tap to drag the - Acer TravelMate 3220 | TravelMate 3210 / 2400 / 3220 Service Guide - Page 23
Windows keys and twelve function keys. Lock Keys and embedded mumeric keypad The keyboard . When Scroll Lock is on, the screen moves one line up or down when you control keys on embedded keypad Main keyboard keys Num Lock On Type numbers in a normal manner. Hold while using cursor-control - Acer TravelMate 3220 | TravelMate 3210 / 2400 / 3220 Service Guide - Page 24
keyboard has two keys that perform Windows-specific functions. Key Windows key Application key Icon Description Pressed alone, this key has the same effect as clicking on the Windows button. + Opens the My Computer window + Opens Help and Support. + Opens the Find: All Files - Acer TravelMate 3220 | TravelMate 3210 / 2400 / 3220 Service Guide - Page 25
to access most of the computer's controls like sreen brightness, volume output and the BIOS utility. To activate hot keys, Screen blank Touchpad toggle Switches display output between the display screen, external monitor (if connected) and both. Turns the display screen backlight off to save power - Acer TravelMate 3220 | TravelMate 3210 / 2400 / 3220 Service Guide - Page 26
Hot Key Fn-y Icon Function Volume down Description Decreases the speaker volume. Fn-x Brightness up Increases the screen brightness. Fn-z Brightness down Decreases the screen brightness 20 Chapter 1 - Acer TravelMate 3220 | TravelMate 3210 / 2400 / 3220 Service Guide - Page 27
, or hold and then press the key at the upper-center of the keyboard. NOTE: This function varies by the operating system version. NOTE: Some fonts and software do not support the Euro symbol. Please refer to www.microsoft.com/ typography/faq/faq12.htm for more information. Chapter - Acer TravelMate 3220 | TravelMate 3210 / 2400 / 3220 Service Guide - Page 28
Supports maximum memory size Supports DIMM type Supports DIMM Speed Supports DIMM voltage Specification Phoenix 3A03 SST 39SF040A, 512KX8 CMOS Boot Block Flash Memory 512KB 32-pin PLCC ACPI 1.0b, PC Card 95, SM BIOS 2.3, IEEE1284-ECP/EPP, PCI 2.2, PnP 1.0a, DMI 2.0, PS/2 keyboard and mouse, USB - Acer TravelMate 3220 | TravelMate 3210 / 2400 / 3220 Service Guide - Page 29
memory configurations. You may combine DIMMs with various capacities to form other combinations. On above table, the configuration of slot 1 and slot 2 could be reversed. LAN Interface Item Chipset Supports LAN protocol LAN connector type LAN connector location Features Specification BroadCOM - Acer TravelMate 3220 | TravelMate 3210 / 2400 / 3220 Service Guide - Page 30
1.1 56K V.90/V.92 RJ11 Left side Specification Specification Specification built-in Mobile Intel® 82801FB (ICH6-M) 723 bps (full speed data rate) Bluetooth 1.1 (Upgradeable to Bluetooth 1.2 when SIG specification is ratified). USB 1.1 Mini-USB Wireless Module 802.11b/g (optional device) Item - Acer TravelMate 3220 | TravelMate 3210 / 2400 / 3220 Service Guide - Page 31
Specification Transfer rate (KB/sec) Buffer Memory Interface Applicable disc format Loading mechanism Power Requirement Input Voltage Specification RW, DVD+R, DVD+RW, Multi-Border DVD-R/DVD-RW, MultiSession DVD+R, DVD+RW and DVD-RAM (optional) CD: CD-DA, CD-ROM Mode-1, CD-ROM/XA Mode-2 Form-1 and - Acer TravelMate 3220 | TravelMate 3210 / 2400 / 3220 Service Guide - Page 32
KB/sec) Buffer Memory Interface Applicable disc format for LiteOn SOSW-833S Applicable disc format for Panasonic UJ-845 Applicable disc format for Pioneer DVR-K15RA Applicable disc format for Pioneer DVR-K05RA Loading mechanism Power Requirement Input Voltage Specification Sustained: Max 3.6Mbytes - Acer TravelMate 3220 | TravelMate 3210 / 2400 / 3220 Service Guide - Page 33
Interface Supports ZV (Zoomed Video) port Video Memory Item Chipset Memory size Interface USB Port Item Chipset USB Compliancy Level OHCI Number of USB port Location Serial port function control IEEE 1394 Port Item Chipset Number of IEEE 1394 port Location Connector type Specification ALC250 - Acer TravelMate 3220 | TravelMate 3210 / 2400 / 3220 Service Guide - Page 34
Bluetooth Wireless 802.11 b+g PCMCIA Audio 5-in-1 card reader Keyboard Item Keyboard controller Total number of keypads Windows logo key Internal & external keyboard work simultaneously Battery Item Vendor & model name 28 ENE CB712 Type-II One type-II Left panel No ZV support Yes Specification - Acer TravelMate 3220 | TravelMate 3210 / 2400 / 3220 Service Guide - Page 35
53.3W 6cell and 79.9W 9cell for TravelMate 3210 44.6W 6cell for TravelMate 2400 3 cells in series, 2 series in parallel for 6-cell battery 2 cells in series, 3 series in parallel for 9-cell battery 11.1V 12.6+-0.1v LCD 14.1 inch Item Vendor & model name Screen Diagonal (mm) Active Area (mm) Display - Acer TravelMate 3220 | TravelMate 3210 / 2400 / 3220 Service Guide - Page 36
to RAM (S3) Save to Disk (S4) Delta DAC-07B037 B YEC YNV-C01 SumidaTWS-442-125 Vadj=3.3V 9~21 350 (max) 1600 (starting voltage) 6.2~6.8 (DAC=0) 45~65K Hz Specification Specification 90V AC to 264V AC, 47Hz to 63Hz 1.7A 240A@115VAC 240A@230VAC 83% min. @115VAC input full load Power Management - Acer TravelMate 3220 | TravelMate 3210 / 2400 / 3220 Service Guide - Page 37
run Setup. Please also refer to Chapter 4 Troubleshooting when problem arises. To activate the BIOS Utility, press m during POST (when "Press to enter Setup" message is prompted on the bottom of screen). Press m to enter setup. The default parameter of F12 Boot Menu is set to "disabled". If you - Acer TravelMate 3220 | TravelMate 3210 / 2400 / 3220 Service Guide - Page 38
, 2003 5:40:09 AM Boot Exit ----Devices Product Name = TravelMate 3210 Manufacture Name = Acer BIOS Version = V1.00 VGA Version = (16 bytes) ----Memory System Memory = 640 KB Extended Memory = 256MB VGA Memory = 128 MB Setup system date, time. Enable boot logo and get system information - Acer TravelMate 3220 | TravelMate 3210 / 2400 / 3220 Service Guide - Page 39
2005 5:40:09 AM Boot Exit ----Devices Product Name = TravelMate 3210 Manufacturer Name = Acer BIOS Version = V1.00 VGA ) ----Memory System Memory = 640 KB Extended Memory = 256MB VGA Memory = 128 MB Setup system date, time. Enable boot logo LAN device is presenting. UUID=32bytes This field shows the - Acer TravelMate 3220 | TravelMate 3210 / 2400 / 3220 Service Guide - Page 40
size. It varies in CPU type. This field reports the memory size of system base memory. The size is fixed to 640 KB. This field reports the memory size of the extended memory in the system. Extended memory size = Total memory size - 2MB VGA Memory size: Discrete = 64 or 128MB (depends on actual VRAM - Acer TravelMate 3220 | TravelMate 3210 / 2400 / 3220 Service Guide - Page 41
Advanced Security May 20, 2005 5:40:09 AM Boot Exit Date and Time Power On Display Power On Display ˇ Quiet Boot ˇ LCD Auto DIM (˙ ) Auto ( ) Both ˇ Network Boot _ F12 Boot Menu OK ˇ D2D Recovery Cancel Press key to select a control. button or key accept entries - Acer TravelMate 3220 | TravelMate 3210 / 2400 / 3220 Service Guide - Page 42
LCD brightness in order to save power when AC is not present. The system will support an automatic dimming of the LCD backlight when the AC power is NOT available (running on battery power). Option: Enabled or Disabled Enables, disables the system boot from LAN (remote server). Option: Enabled or - Acer TravelMate 3220 | TravelMate 3210 / 2400 / 3220 Service Guide - Page 43
Memory Legacy USB support Description Enables or disables the infrared port. This option is only available on Intel (R) 915 UMA system. This feature allows you to USB keyboard entering BIOS Setup. This feature also allows you to use a USB keyboard in DOS without additional driver. USB floppy boot - Acer TravelMate 3220 | TravelMate 3210 / 2400 / 3220 Service Guide - Page 44
screen. Settings in boldface are the default and suggested parameter settings. Set Supervisor/User Password If password on boot password. When set, this password protects the BIOS Setup Utility from unauthorized access. Press Enter to notebook computer to your dealer to reset it. 38 Chapter 2 - Acer TravelMate 3220 | TravelMate 3210 / 2400 / 3220 Service Guide - Page 45
in module bay. Insyde Software SCU Main Advanced Security May 20, 2005 5:40:09 Boot Exit Boot Device ` ----- Boot Device ---Hard Drive CD-ROM/DVD Drive Floppy Device Network Boot Press key to select a control. button or key accept entries. button or key - Acer TravelMate 3220 | TravelMate 3210 / 2400 / 3220 Service Guide - Page 46
Software SCU Main Advanced Security Nov 26, 2005 5:40:09 Boot Exit Exit Saving Changes Exit Saving Changes Exit Discarding Changes Press to save the current Load Setup Defaults Setup parameters to CMOS RAM. Discard Changes The system will reboot!!! OK Cancel - Acer TravelMate 3220 | TravelMate 3210 / 2400 / 3220 Service Guide - Page 47
Do not install memory-related drivers (XMS, EMS, DPMI) when you use the Phlash. NOTE: Please use the AC adaptor power supply when you run the Phlash utility. If the battery pack does not contain enough power to finish BIOS flash, you may not boot the system because the BIOS is not completely loaded - Acer TravelMate 3220 | TravelMate 3210 / 2400 / 3220 Service Guide - Page 48
42 Chapter 2 - Acer TravelMate 3220 | TravelMate 3210 / 2400 / 3220 Service Guide - Page 49
the notebook computer for maintenance and troubleshooting. To disassemble the computer, you need the following tools: T Wrist grounding strap and conductive mat for preventing electrostatic discharge T Small Philips screw driver T Philips screwdriver T Plastic flat head screw driver - Acer TravelMate 3220 | TravelMate 3210 / 2400 / 3220 Service Guide - Page 50
General Information Before You Begin Before proceeding with the disassembly procedure, make sure that you do the following: 1. Turn off the power to the system and all peripherals. 2. Unplug the AC adapter and all power and signal cables from the system. 3. Remove the battery pack. 44 Chapter 3 - Acer TravelMate 3220 | TravelMate 3210 / 2400 / 3220 Service Guide - Page 51
the inside assembly frame in that order. Start Battery *2 Middle Cover I*4 Lower Case Assembly *2 Wireless LAN Cover *1 Keyboard *4 LCD Module *1 *13 RTC Battery Bluetooth Module Wireless LAN Cover ODD Module *3 DIMM/HDD Cover Memory *4 HDD Module *4 HDD Bracket HDD *3 Upper Case Assembly - Acer TravelMate 3220 | TravelMate 3210 / 2400 / 3220 Service Guide - Page 52
LCD Module 4 screw caps *4 LCD Bezel *2 LCD Panel LCD Assembly *8 *2 LCD Inverter LCD LCD Wire Cable Screw List Item Description A SCW HEX NYL I#R-40/O#4-40 L5.5 B SCREW MACH WAFER M2*L4 NI C CPU SCREW M2.5*6.5 (2.7KG) D CPU SCREW M2.5*6.5 (4.5KG) E SCRW WH MS+CBZ M2.5+L4 BLACK F - Acer TravelMate 3220 | TravelMate 3210 / 2400 / 3220 Service Guide - Page 53
Removing the Battery Pack 1. Unlock the battery lock. 2. Slide the battery latch then remove the battery. Chapter 3 47 - Acer TravelMate 3220 | TravelMate 3210 / 2400 / 3220 Service Guide - Page 54
Removing the Wireless LAN Card/the HDD Module/the Memory/the CPU/ the ODD Module and the LCD Module Removing the Wireless LAN Card and the HDD Module 1. Remove the two screws fastening the PCI door. 2. Detach the PCI door. 3. Disconnect the wireless antennae. 4. Pop out the wireless LAN card then - Acer TravelMate 3220 | TravelMate 3210 / 2400 / 3220 Service Guide - Page 55
4. Remove the two screws fastening the thermal door. 5. Detach the thermal door from the main unit. 6. Remove the four screws holding the thermal module. (Follow the order indicated by the numbers: 4, 3, 2 then1. Please reverse the order when you assemble the system). 7. Disconnect the fan cablle as - Acer TravelMate 3220 | TravelMate 3210 / 2400 / 3220 Service Guide - Page 56
cover carefully. 4. Remove the two screws fastening the keyboard. 5. Turn over the keyboard as shown. 6. Disconnect the keyboard cable then remove the keyboard. 7. Tear off the mylard festening the wireless antenna set. 8. Pull out the wireless antenna from the main unit carefully. 9. Disconnect - Acer TravelMate 3220 | TravelMate 3210 / 2400 / 3220 Service Guide - Page 57
Chapter 3 51 - Acer TravelMate 3220 | TravelMate 3210 / 2400 / 3220 Service Guide - Page 58
the bluetooth cable from the bluetooth card. 5. Disconnect the touchpad to touchpad board FFC. 6. Remove the three screws fastening the touchpad board. 7. Detach the touchpad board. 8. Remove the four-way button from the upper case. 9. Remove the two screws fastening the touchpad support to - Acer TravelMate 3220 | TravelMate 3210 / 2400 / 3220 Service Guide - Page 59
10. Detach the touchpad support from the upper case carefully. 11. Detach the touchpad from the upper case. 12. Disconnect the FFC from the touchpad. Disassembling the Lower Case Assembly 1. - Acer TravelMate 3220 | TravelMate 3210 / 2400 / 3220 Service Guide - Page 60
8. Detach the VGA thermal from the VGA board. 9. Disconnect the modem cable from the main board. 10. Remove the two screws fastening the modem board as shwon. 11. Disconnect the modem board from the main board. 12. Disconnect the modem cable from the modem board. 13. Remove the two screws holding - Acer TravelMate 3220 | TravelMate 3210 / 2400 / 3220 Service Guide - Page 61
Disassembling the LCD Module 1. Remove the four screw caps as shown. 2. Remove the four screws holding the LCD bezel. 3. Then detach the LCD bezel from the LCD module. 4. Remove the screw fastening the LCD inverter. 5. Disconnect the LCD cable and disconnect the inverter cable, then remove the - Acer TravelMate 3220 | TravelMate 3210 / 2400 / 3220 Service Guide - Page 62
Disassembling the External Modules Disassembling the HDD Module 1. Remove the two screws holding the HDD bracket on one side. 2. Remove another two screws holding the HDD bracket on the other side. 3. Then take the hard disc drive out of the HDD bracket. Disassembling the ODD Module 1. Remove the - Acer TravelMate 3220 | TravelMate 3210 / 2400 / 3220 Service Guide - Page 63
are indicated. POST detects an error and displayed messages on screen. Other symptoms (i.e. LCD display problems or others). Symptoms cannot be re-created (intermittent problems). Go To "Power System Check" on page 59. "Insyde MobilePro BIOS POST Beep Code and POST Messages" on page 61 "Insyde - Acer TravelMate 3220 | TravelMate 3210 / 2400 / 3220 Service Guide - Page 64
error messages on the screen, or hang the system. 1. Boot from the diagnostics diskette and start the doagmpstotics program (please refer to main board. 2. Go to the diagnostic memory in the test items. 3. Press F2 in the test items. 4. Follow the instructions in the message window. NOTE: Make sure - Acer TravelMate 3220 | TravelMate 3210 / 2400 / 3220 Service Guide - Page 65
of the following power sources: 1. Remove the battery pack. 2. Connect the power adapter and check that power is supplied. 3. Disconnect the power adapter and install the charged battery pack; then check that power is supplied by the battery pack. If you suspect a power problem, see the appropriate - Acer TravelMate 3220 | TravelMate 3210 / 2400 / 3220 Service Guide - Page 66
From Software: 1. Check out the Power Management in control Panel 2. In Power Meter, confirm that if the parameters shown in the screen for Current Power Source and Total Battery Power Remaining are correct. 3. Repeat the steps 1 and 2, for both battery and adapter. 4. This helps you identify first - Acer TravelMate 3220 | TravelMate 3210 / 2400 / 3220 Service Guide - Page 67
. No video device found. No RAM installed. Keyboard controller failed during system inquiry about connected devices. The keyboard fails to respond or no keyboard is connected. CMOS data error, probably due to battery power loss. CMOS checksum error. The RAM failed during memory test at the indicated - Acer TravelMate 3220 | TravelMate 3210 / 2400 / 3220 Service Guide - Page 68
The system memory size does not match with the CMOS record. "CLOCK NOT TICKING CORRECTLY" The system clock does not working correctly. "TIME/DATA CORRUPT - RUN SCU" The time/date information in CMOS is invalid. "MACHINE IS LOCKED - TURN KEY" The keyboard operation is locked. "BOOT SECTOR 0 HAS - Acer TravelMate 3220 | TravelMate 3210 / 2400 / 3220 Service Guide - Page 69
ram, and reset cpu Turn off FASTA20 for post, and check have keyboard Initial PIC enable INT and Signal Power On Reset Initialize the Chipset and hook PCI BIOS Search For ISA Bus VGA Adapter, from address c000 to e000 Initialize Counter and Timer chip User register config through CMOS Size Memory - Acer TravelMate 3220 | TravelMate 3210 / 2400 / 3220 Service Guide - Page 70
Test Battery Fail & check CMOS X-SUM SUM DEBUG_HWIO_TEST_DMA_CTLRS Use DMA to copy data for Test the DMA controllers DEBUG_HWIO_INIT_8237 Initialize 8237A Controller DEBUG_POST_INIT_VECS Install and Initialize interrupt Vectors DEBUG_RAM_QUICK_SIZE Enter memory protect mode, use change RAM - Acer TravelMate 3220 | TravelMate 3210 / 2400 / 3220 Service Guide - Page 71
function Power manager initial & GEYSERVILLE CPU initialize Clear USB status register and Initiallize the USB Hub controller. check PCI 1.x VGA card rom mapping and rom signature enable PCI device use ram area, record in PCI register Enable PCI device ROM copy to RAM, record in PCI register update - Acer TravelMate 3220 | TravelMate 3210 / 2400 / 3220 Service Guide - Page 72
Hooks A8 DEBUG_PNP_WRITE_PROTECT_R Write protect RTData Area and NVRAM Copy T_DAT Buffer, and make runtime data checksum A9 DEBUG_PNP_INIT_RETURN PNP BIOS initialize finish General SMI Entry/Exit Code -- SMICHIP.ASM C0 dSMI_ENTRY SMI procedure entry point C1 dSMI_EXIT SMI procedure - Acer TravelMate 3220 | TravelMate 3210 / 2400 / 3220 Service Guide - Page 73
and power adapter). See "Power System Check" on page 59. Battery pack AC adapter See if the thermal module is overheat (Heat sink or fan). Main board Power source (battery pack and power adapter). See "Power System Check" on page 59. Battery pack Power adapter CPU Main board In Windows XP operating - Acer TravelMate 3220 | TravelMate 3210 / 2400 / 3220 Service Guide - Page 74
make noise or emit no sound. Microphone cannot work Action in Sequence OS volume control Audio driver Speaker Main board Speaker Main board Audio driver Volume control in Windows XP Main board Power Management-Related Symptoms Symptom / Error The system will not enter hibernation mode The system - Acer TravelMate 3220 | TravelMate 3210 / 2400 / 3220 Service Guide - Page 75
board Battery fuel gauge in Windows doesn't go higher than 90%. Refresh battery (continue use battery until power off, then charge battery). Battery pack not work correctly. USB does not work correctly Print problems. Parallel port device problems Action in Sequence Enter BIOS Setup Utility to - Acer TravelMate 3220 | TravelMate 3210 / 2400 / 3220 Service Guide - Page 76
work correctly. Phone cable Driver Reconnect the Internal modem cable to the main board tightly. Main board Internal LAN does not work correctly Lan cable Driver Main board NOTE: If you cannot find a symptom or an error in this list and the problem remains, see "Undetermined Problems" on page 73 - Acer TravelMate 3220 | TravelMate 3210 / 2400 / 3220 Service Guide - Page 77
defect, such as: cosmic radiation, electrostatic discharge, or software errors. FRU replacement should be considered only when a recurring problem exists. When analyzing an intermittent problem, do the following: 1. Run the diagnostic test for the system board in loop mode at least 10 times. 2. If - Acer TravelMate 3220 | TravelMate 3210 / 2400 / 3220 Service Guide - Page 78
or disconnect all of the following devices: T Non-Acer devices T Printer, mouse, and other external devices T Battery pack T Hard disk drive T DIMM T PC Cards 4. Power-on the computer. 5. Determine if the problem has changed. 6. If the problem does not recur, reconnect the removed devices one at - Acer TravelMate 3220 | TravelMate 3210 / 2400 / 3220 Service Guide - Page 79
Top View SW3 SW2 SW4 SW5 SW6 SW1 JP1 2 2 Chapter 5 JP7 2 2 JP4 JP5 2 2 KQ: 2 JP42 JP102 2 SW3 JP1 SW2 SW4 SW5 SW6 Power Switch Bluetooth Connector E-mail Switch Internet Browser Switch Emanager Switch User Programmable Switch SW1 JP5 JP4 JP42 JP7 JP10 Lid Swtich Touchpad Connector - Acer TravelMate 3220 | TravelMate 3210 / 2400 / 3220 Service Guide - Page 80
Fan Connector Battery Connector CPU Socket LVDS Connector VGA Board Connector AC-IN USB Port Acer ezDock (TravelMate 3220 USB Port USB Port IEEE 1394 Port Card Reader Connector Infrared Receiver Headphone out/line-out Jack (support SPDIF) Mic-in Jack HDD Connector Wireless LAN Card Connector BIOS - Acer TravelMate 3220 | TravelMate 3210 / 2400 / 3220 Service Guide - Page 81
(Field Replaceable Unit) listing in global configurations of TravelMate 2400/ 3210/3220 series products. Refer to this chapter whenever ordering for , it will not be noted on the printed Service Guide. For ACER AUTHORIZED SERVICE PROVIDERS, your Acer office may have a DIFFERENT part number code from - Acer TravelMate 3220 | TravelMate 3210 / 2400 / 3220 Service Guide - Page 82
Exploded Diagram The System 011 012 013 84 Chapter 6 - Acer TravelMate 3220 | TravelMate 3210 / 2400 / 3220 Service Guide - Page 83
Upper Case Assembly Chapter 6 85 - Acer TravelMate 3220 | TravelMate 3210 / 2400 / 3220 Service Guide - Page 84
Lower Case Assembly 86 Chapter 6 - Acer TravelMate 3220 | TravelMate 3210 / 2400 / 3220 Service Guide - Page 85
LCD Module Chapter 6 87 - Acer TravelMate 3220 | TravelMate 3210 / 2400 / 3220 Service Guide - Page 86
HDD Module ODD Module NOTE: Below is TravelMate 2400/3210/3220 FRU List. The columns highlighted in blue indicate the differential parts for TravelMate 3220. 88 Chapter 6 - Acer TravelMate 3220 | TravelMate 3210 / 2400 / 3220 Service Guide - Page 87
TravelMate 2400/3210/3220 FRU List Picture Adapter Battery Board No. NS (Not Show) NS NS The System012 Part Name and Description ADAPTER 3 PIN 65W DELTA SADP-65KB BEF 19V 3PIN ADAPTER 3 PIN 65W LITEON PA-1650-02CO 65W 3 PIN ADAPTER 3 PIN 65W HIPRO HPOK066B13CP 3P 65W BATTERY LI-ION 6 CELLS-SANYO - Acer TravelMate 3220 | TravelMate 3210 / 2400 / 3220 Service Guide - Page 88
TravelMate 2400/3210/3220 FRU List Picture No. The System013 Part Name and Description VGA BOARD M26P 64MB Part Number 55.A70V5.002 Cable Upper Case Assembly004 NS FFC CABLE - T/P TO T/P BOARD BLUETOOTH CABLE 50.A70V5.001 50.A70V5.002 NS MODEM CABLE 50.A70V5.003 NS NS NS NS NS NS - Acer TravelMate 3220 | TravelMate 3210 / 2400 / 3220 Service Guide - Page 89
TravelMate 2400/3210/3220 FRU List Picture No. The System254; Upper Case Assembly001 Part Name and Description UPPER CASE-TM NS The System002 UPPER CASE FOR DUCKING(TravelMate CASE- NON UMA LOWER CASE FOR DUCKING(TravelMate 3220) 4 - WAY BUTTON TP SUPPORT 60.A70V5.003 60.TAMV5.002 42.A70V5 - Acer TravelMate 3220 | TravelMate 3210 / 2400 / 3220 Service Guide - Page 90
TravelMate 2400/3210/3220 FRU List Picture Combo Drive No. NS NS NS NS NS NS NS NS ODD Module Part Name and Description CELERON M 350 (1.3G 1M) - Acer TravelMate 3220 | TravelMate 3210 / 2400 / 3220 Service Guide - Page 91
TravelMate 2400/3210/3220 FRU List Picture No. ODD Module002 ODD Module003 Part Name and Description DVD DUAL BEZEL - TRAY IN ODD BRACKET Part Number 42.A70V5.008 - Acer TravelMate 3220 | TravelMate 3210 / 2400 / 3220 Service Guide - Page 92
TravelMate 2400/3210/3220 FRU List Picture No. HDD Module001 Part Name and Description HDD BRACKET Part Number 33.A70V5.003 Lower Case Assembly008 HDD DOOR 42.A70V5.011 Keyboard LCD Module The System011 LCD Module LCD Module001 KEYBOARD DARFON CHINESE KEYBOARD DARFON US INTERNATIONAL - Acer TravelMate 3220 | TravelMate 3210 / 2400 / 3220 Service Guide - Page 93
TravelMate 2400/3210/3220 FRU List Picture No. LCD Module007 Part Name and Description LCD INVERTER LCD Module006 LCD WIRE CABLE Part Number 19.A70V5.001 50.A70V5. - Acer TravelMate 3220 | TravelMate 3210 / 2400 / 3220 Service Guide - Page 94
TravelMate 2400/3210/3220 FRU List Picture No. LCD Module006 Part Name and Description LCD WIRE CABLE Part Number 50.A70V5.005 LCD Module004 LCD PANEL WITH LOGO W/ - Acer TravelMate 3220 | TravelMate 3210 / 2400 / 3220 Service Guide - Page 95
TravelMate 2400/3210/3220 FRU List Picture No. LCD Module004 Part Name and Description LCD PANEL WITH LOGO W/O ANTENNA TM Part Number 60.TAAV5.003 LCD Module005 LCD - Acer TravelMate 3220 | TravelMate 3210 / 2400 / 3220 Service Guide - Page 96
TravelMate 2400/3210/3220 FRU List Picture No. LCD Module005 Part Name and Description LCD BEZEL Part Number 60.A70V5.006 LCD Module002, 003 LCD BRACKET SET 6K.A70V5.001 Mainboard Memory Heatsink The System251 NS NS The System007 MAINBOARD 915PM FOR VGA GLAN W/ READER PCMCIA SLOT W/O CPU - Acer TravelMate 3220 | TravelMate 3210 / 2400 / 3220 Service Guide - Page 97
TravelMate 2400/3210/3220 FRU List Picture No. Upper Case Assembly005 Part Name and Description TOUCHPAD Speaker NS SPEAKER SET (R&L) Part Number 56.A70V5.001 23.A70V5.002 - Acer TravelMate 3220 | TravelMate 3210 / 2400 / 3220 Service Guide - Page 98
100 Chapter 6 - Acer TravelMate 3220 | TravelMate 3210 / 2400 / 3220 Service Guide - Page 99
Chapter 6 101