Acer TravelMate 8100 TravelMate 8100 User's Guide
Acer TravelMate 8100 Manual
 |
View all Acer TravelMate 8100 manuals
Add to My Manuals
Save this manual to your list of manuals |
Acer TravelMate 8100 manual content summary:
- Acer TravelMate 8100 | TravelMate 8100 User's Guide - Page 1
TravelMate 8100 Series User's Guide - Acer TravelMate 8100 | TravelMate 8100 User's Guide - Page 2
information. No part of this publication may be reproduced, stored in a retrieval system, or transmitted, in any form or by any means, electronic, mechanical, photocopy, recording, or otherwise, without the prior written permission of Acer Incorporated. TravelMate 8100 Series Notebook Computer Model - Acer TravelMate 8100 | TravelMate 8100 User's Guide - Page 3
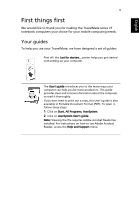
TravelMate series of notebook computers your choice for your mobile computing needs. Your guides To help you use your TravelMate, we have designed a set of guides Click on AcerSystem User's guide. Note: Viewing the file requires Adobe Acrobat Reader be installed. For instructions on how to use Adobe - Acer TravelMate 8100 | TravelMate 8100 User's Guide - Page 4
To turn on the computer, simply press and release the power button below the LCD screen beside the launch keys. See "Front view" on page 1 for the location of the power button. To turn the power off, do any of the following: • Use the Windows shutdown command Click on Start, Turn Off Computer; then - Acer TravelMate 8100 | TravelMate 8100 User's Guide - Page 5
according to local regulations. Recycle if at all possible. Cleaning and servicing When cleaning the computer, follow these steps: 1 Power off the computer and remove the battery pack. 2 Disconnect the AC adapter. 3 Use a soft cloth moistened with water. Do not use liquid or aerosol cleaners - Acer TravelMate 8100 | TravelMate 8100 User's Guide - Page 6
This device complies with Part 15 of the FCC instructions on wireless option devices that are included in the user's manual service, this device is intended to be operated indoors and installation outdoors is subject to licensing.For more information about our products, services, and support - Acer TravelMate 8100 | TravelMate 8100 User's Guide - Page 7
things first iii Your guides iii Basic care and tips for using your computer iv Turning your computer on and off iv Taking care of your computer iv Taking care of your AC adapter v Taking care of your battery pack v Cleaning and servicing v A TravelMate tour 1 Front view 1 Closed - Acer TravelMate 8100 | TravelMate 8100 User's Guide - Page 8
Infrared 40 Universal Serial Bus 41 IEEE 1394 port 41 PC Card slot 42 BIOS Utility 44 Boot sequence 44 Disc to Disc Recovery enable 44 Password 44 Using software 45 Playing DVD movies 45 Power management 46 Acer eRecovery 47 Create backup 47 Restore from backup 48 Create - Acer TravelMate 8100 | TravelMate 8100 User's Guide - Page 9
Troubleshooting my computer 53 Frequently-asked questions 55 Troubleshooting tips 58 Error messages 58 Requesting service 59 International Traveler's Warranty (ITW) 59 Before you call 60 Appendix A Regulation & safety notices 61 - Acer TravelMate 8100 | TravelMate 8100 User's Guide - Page 10
- Acer TravelMate 8100 | TravelMate 8100 User's Guide - Page 11
the Just for Starters... poster, let us show you around your new TravelMate computer. Front view # Item 1 Display screen 2 Power button 3 Status indicators 4 Keyboard 5 Palmrest Description Liquid-Crystal Display (LCD), displays computer output. Turns the computer on and off. Light-Emitting Diodes - Acer TravelMate 8100 | TravelMate 8100 User's Guide - Page 12
on page 20 for more details. Closed front view # Item 1 Speakers 2 5-in-1 card reader 3 Microphone 4 Infrared port Description Left and right speakers deliver stereo audio output. Accepts MS, MMC, xD, MS PRO, and SD cards. Note: Only one card can operate at any given time. Internal microphone for - Acer TravelMate 8100 | TravelMate 8100 User's Guide - Page 13
5 Power indicator 6 Battery indicator 7 Speaker/LineOut/Headphone jack 8 Line-in/Mic-in jack 9 Bluetooth communication button/ indicator 10 Wireless communication button/indicator 11 Latch 3 Description Lights when the computer is on. Lights when the battery is being charged. Connects to audio line - Acer TravelMate 8100 | TravelMate 8100 User's Guide - Page 14
1 External display port 2 Ventilation Slots 3 Network LAN Jack 4 RJ-11 Modem Jack 5 One USB 2.0 port 6 IEEE 1394 port Description Connects to a display device (e.g., external monitor, LCD projector). Enable the TravelMate to stay cool. Connects to an Ethernet 10/100/1000 based network. Connects to - Acer TravelMate 8100 | TravelMate 8100 User's Guide - Page 15
. 3 LED indicator Lights up when the optical drive is active. 4 Optical drive eject button Ejects the optical drive tray. 5 Emergency eject hole Ejects the optical drive tray when the computer is turned off. 6 Power jack Connects to an AC adapter. 7 Security keylock Connects to a Kensington - Acer TravelMate 8100 | TravelMate 8100 User's Guide - Page 16
6 Rear view English # Item 1 DVI-D port 2 S-video port 3 124-pin ezDock connector Description Supports digital video connections Connects to a television or display device with S-video input. Connects to the Acer ezDock. - Acer TravelMate 8100 | TravelMate 8100 User's Guide - Page 17
the opening of the fan. 4 AcerMedia bay Houses an AcerMedia drive module. 5 Wireless LAN bay Houses the computer's wireless LAN. 6 Hard disk bay Houses the computer's hard disk (secured by a screw). 7 Battery bay Houses the computer's battery pack. 8 Memory compartment Houses the - Acer TravelMate 8100 | TravelMate 8100 User's Guide - Page 18
English 8 Specifications Operating System • Microsoft® Windows® XP Home/Professional Service Pack 2 Edition Microprocessor • Intel® Pentium® M Processor with Intel® Centrino™ mobile technology at 1.6 ~ 2.13 GHz Memory • 256/512 MB of DDR2 533 SDRAM standard, upgradeable to 2 GB with dual soDIMM - Acer TravelMate 8100 | TravelMate 8100 User's Guide - Page 19
• Bluetooth® enabled Audio • 16-bit AC'97 stereo audio, Intel® high-definition audio compliant • Sound Blaster® Pro and MS-Sound compatible • Dual speakers and one internal microphone Keyboard and pointing device • Acer FineTouch™ keyboard with 5-degree curve, 88/89-key Windows keyboard with 12 - Acer TravelMate 8100 | TravelMate 8100 User's Guide - Page 20
Power • 71W Li-ion battery pack (14.8V, 4800mAh) with optional 42W Li- ion second battery pack (11.1V, 3800mAh) • 3-pin 65W AC adapter (Input 100-240V, 1.6A, 50-60Hz, Output 19V, 3.42A) Options/Accessories • Additional 512MB/1GB DDR-II 533 MHz soDIMM memory upgrade modules • Additional 3-pin AC - Acer TravelMate 8100 | TravelMate 8100 User's Guide - Page 21
screen, and four located on the front of the computer. The Power, Battery, and Wireless communication status indicators are visible even when the LCD display is closed. Icon Function Description HDD Lights when hard disc drive when the battery is charging. 2. Fully charged: light shows green - Acer TravelMate 8100 | TravelMate 8100 User's Guide - Page 22
keyboard includes an embedded numeric keypad, separate cursor keys, two Windows keys and twelve function keys. Lock keys The keyboard has three an external keypad. Scroll Lock (Fn+F12) When Scroll Lock is on, the screen moves one line up or down when you press the up or down arrow keys respectively - Acer TravelMate 8100 | TravelMate 8100 User's Guide - Page 23
English 13 Embedded numeric keypad The embedded numeric keypad functions like a desktop PC's numeric keypad. It is indicated by small characters located on the right-hand side of the keycaps. Desired action Num Lock on Num Lock off Type numbers Use embedded keypad in the same was as the numeric - Acer TravelMate 8100 | TravelMate 8100 User's Guide - Page 24
-specific functions. Key Windows logo key Description Start button. Combinations with this key perform shortcut functions. Below are a few examples: + (Activates next taskbar button) + (Explore My Computer) + (Find document) + (Opens Help and Support) + (Minimise all) - Acer TravelMate 8100 | TravelMate 8100 User's Guide - Page 25
See "Acer eManager" on page 25 Puts the computer in Sleep mode. Fn+F5 Fn+F6 Display toggle Screen blank Switches display output between the display screen, external monitor (if connected) and both the display screen and external monitor. Turns the display screen backlight off to save power. Press - Acer TravelMate 8100 | TravelMate 8100 User's Guide - Page 26
off. toggle Speaker toggle Volume up Turns the speakers on and off. Increases the speaker volume. Volume down Decreases the speaker volume. Brightness Increases the screen brightness. up Brightness Decreases the - Acer TravelMate 8100 | TravelMate 8100 User's Guide - Page 27
US keyboard users: The keyboard layout is set when you first set up Windows. For the Euro symbol to work, the keyboard layout has to be set to United States-International. To verify the keyboard type in Windows XP, follow the steps below: 1 Click on Start, Control Panel. 2 Double-click on Regional - Acer TravelMate 8100 | TravelMate 8100 User's Guide - Page 28
English 18 Note: Some fonts and software do not support the Euro symbol. Please refer to www.microsoft.com/typography/faq/faq12.htm for more information. - Acer TravelMate 8100 | TravelMate 8100 User's Guide - Page 29
on page 25. The mail and Web browser are default for Email and Internet programs, but can be reset by users. To set the Web browser, mail and programmable keys, run the Acer Launch Manager. See "Launch Manager" on page 26. Launch key Email Web browser P Default application Email application (user - Acer TravelMate 8100 | TravelMate 8100 User's Guide - Page 30
your finger on the surface of the touchpad. The central location on the palmrest provides optimum comfort and support. Touchpad basics The following items teach you how to use the touchpad: • Move your finger across button mimics your cursor pressing on the right scroll bar of Windows applications. - Acer TravelMate 8100 | TravelMate 8100 User's Guide - Page 31
21 English Function Left button (1) Right button (4) Main touchpad (2) Centre button (3) Execute Select Drag Access context menu Scroll Click twice quickly. Tap twice (at the same speed as double-clicking a mouse button). Click once. Tap once. Click and hold, then use finger to drag the - Acer TravelMate 8100 | TravelMate 8100 User's Guide - Page 32
drive tray To eject the optical drive tray when the computer is turned on, press the drive eject button. When the power is off, you can eject the drive connect a Kensington-compatible computer security lock. Wrap a computer security lock cable around an immovable object such as a table or handle of a - Acer TravelMate 8100 | TravelMate 8100 User's Guide - Page 33
English 23 Audio The computer comes with 16-bit high-fidelity AC'97 stereo audio, and dual stereo speakers. Adjusting the volume Adjusting the volume on the computer is easy. See "Hot keys" on page 15 for more information on adjusting the speaker volume. - Acer TravelMate 8100 | TravelMate 8100 User's Guide - Page 34
is a handy utility that offers four pre-defined display settings for users to view multiple windows on the same screen. To access this function, please go to Start - All Programs and click on Acer GridVista. You may choose any one of the four display settings indicated below: Double (Vertical - Acer TravelMate 8100 | TravelMate 8100 User's Guide - Page 35
to manage the settings and security of your PC. Acer ePresentation takes the hassle out of making presentations. Acer ePowerManagement provides a central location from where to control all your PC's power schemes and maximise battery life. Acer eRecovery backs up your files preventing data loss in - Acer TravelMate 8100 | TravelMate 8100 User's Guide - Page 36
English 26 Launch Manager Launch Manager allows you to set the two launch keys located above the keyboard. See "Launch keys" on page 19 for the location of the launch keys. You can access the Launch Manager by clicking on Start, All Programs, and then Launch Manager to start the application. - Acer TravelMate 8100 | TravelMate 8100 User's Guide - Page 37
your Notebook PC discs, from the drive(s). 3 Shut down the computer. 4 Close the display cover. 5 Disconnect the cord from the AC adaptor. 6 Disconnect computer out of Sleep mode, open the display; then press and release the power button. If you are taking the computer to a client's office or a - Acer TravelMate 8100 | TravelMate 8100 User's Guide - Page 38
entered Sleep mode. In both cases, press and release the power button to turn the computer back on. Note that the computer longer than 2.5 hours, or if your battery is not fully charged, you may want to take the AC adaptor with you to plug in your drive(s). Failure to remove the media can damage the - Acer TravelMate 8100 | TravelMate 8100 User's Guide - Page 39
computer. Pressure against the top cover can damage the screen. What to take with you Unless you already have some items at home, take the following items with you: • AC adaptor and power cord • The printed user's guide Special considerations Follow these guidelines to protect your computer while - Acer TravelMate 8100 | TravelMate 8100 User's Guide - Page 40
computer when carrying it into the gate area. What to take with you Take the following items with you: • AC adaptor • Spare, fully-charged battery pack(s) • Additional printer driver files if you plan to use another printer Special considerations In addition to the guidelines for taking the computer - Acer TravelMate 8100 | TravelMate 8100 User's Guide - Page 41
for traveling. What to bring with you Bring the following items with you: • AC adaptor • Power cords that are appropriate for the country to which you are traveling • Spare, fully-charged battery packs • Additional printer driver files if you plan to use another printer • Proof of purchase, in case - Acer TravelMate 8100 | TravelMate 8100 User's Guide - Page 42
cable BIOS level and runs during the BIOS routine check when a computer is powered up or rebooting. If no Smart Card or Emergency Card is detected, the computer will stop booting up to prevent any illegal access to the system. • PlatinumSecure enhances the secure logon procedure for your Windows - Acer TravelMate 8100 | TravelMate 8100 User's Guide - Page 43
Registering your notebook with Acer's service center is extremely important when replacing your lost instructions. To enable the Smart Card security feature, please refer to your Smart Card user manual. Running PlatinumSecure PlatinumSecure enhances the secure logon procedure for Windows® 2000 or XP - Acer TravelMate 8100 | TravelMate 8100 User's Guide - Page 44
Preboot Authentication System will be disabled. When Disable PlatinumSecure is selected, the PlatinumSecure Windows Logon Authentication with the Smart Card will be disabled, which means that the protection of your notebook as well as other options under System Lock Option and Password Option will - Acer TravelMate 8100 | TravelMate 8100 User's Guide - Page 45
selected, there is no protection for the notebook after boot up, and Password Option is disabled. • support is implemented and managed in Smart Card Manager. Please note that five users can be registered on one notebook Windows desktop, or • In Windows Explorer, right-click on a selected folder, file, - Acer TravelMate 8100 | TravelMate 8100 User's Guide - Page 46
Smart Card caching technology, you can greatly extend the limited card memory size to unlimited use by storing your private data in an encrypted to connect to the Internet. 2 Double-click on the PlatinumKey icon on your Windows desktop. 3 Enter your Smart Card password and click OK. 4 If PlatinumKey - Acer TravelMate 8100 | TravelMate 8100 User's Guide - Page 47
your Windows taskbar BIOS Utility. Once set, you must enter this password to gain access to the BIOS Utility. See "BIOS Utility" on page 44. • User Password secures your computer against unauthorised use. Combine the use of this password with password checkpoints on boot boot - Acer TravelMate 8100 | TravelMate 8100 User's Guide - Page 48
screen. • When the Supervisor Password is set, a prompt appears when you press to enter the BIOS Utility at boot-up. • Type the Supervisor Password and press to access the BIOS three tries, the system halts. Press and hold the power button for four seconds to shut down the computer. Then - Acer TravelMate 8100 | TravelMate 8100 User's Guide - Page 49
devices to your computer as you would with a desktop PC. For instructions on how to connect different external devices to the computer, see your online guide for more details. Fax/Data modem Your computer has a built-in V.92 56Kbps AC'97 Link fax/data modem. Warning! This modem port is not - Acer TravelMate 8100 | TravelMate 8100 User's Guide - Page 50
feature The built-in network feature allows you to connect your computer to an Ethernet-based network. To use the network feature, connect an Ethernet cable from the network jack on the rear of the computer to a network jack or hub on your network. Fast Infrared The computer's Fast Infrared (FIR - Acer TravelMate 8100 | TravelMate 8100 User's Guide - Page 51
serial bus which allows you to connect USB peripherals without taking up precious system resources. IEEE 1394 port The computer's IEEE 1394 port allows you to connect to an IEEE 1394compatible device like a video camera or digital camera. See your video or digital camera's documentation for details - Acer TravelMate 8100 | TravelMate 8100 User's Guide - Page 52
by expanding the bandwidth to 32 bits. Note: Refer to your card's manual for details on how to install and use the card, and its functions. into the slot and make the proper connections (e.g., network cable), if necessary. See your card manual for details. Ejecting a PC Card Before ejecting a PC Card - Acer TravelMate 8100 | TravelMate 8100 User's Guide - Page 53
it down until it clicks into place. 4 Replace the memory cover and secure it with the screw. 5 Reinstall the battery pack, and reconnect the AC adaptor. 6 Turn on the computer. The computer automatically detects and reconfigures the total memory size. Please consult a qualified technician or contact - Acer TravelMate 8100 | TravelMate 8100 User's Guide - Page 54
the Notebook PC logo is being displayed. Boot sequence To set the boot sequence in the BIOS Utility, activate the BIOS Utility, then select "Boot" from the categories listed at the top of the screen. Disc to Disc Recovery enable To enable Disc to Disc Recovery (Hard Disk Recovery), activate the BIOS - Acer TravelMate 8100 | TravelMate 8100 User's Guide - Page 55
discs are divided into 6 regions. Once your DVD drive is set to a region code, it will play code set will remain permanent. Recovering your hard disc does not reset the number of times the region code Latin America, Australia, New Zealand Former U.S.S.R., parts of Africa, India People's Republic of - Acer TravelMate 8100 | TravelMate 8100 User's Guide - Page 56
computer has a built-in power management unit that monitors system activity. System activity refers to any activity involving one or more of the following devices: keyboard, mouse, floppy drive, hard disc, peripherals connected to the serial and parallel ports, and video memory. If no activity is - Acer TravelMate 8100 | TravelMate 8100 User's Guide - Page 57
plug in an external USB or IEEE 1394-compatible optical disc burner before entering Acer eRecovery for optical disc related tasks. Create backup User can create and save backup images to hard drive, CD, or DVD. 1 Boot to Windows XP 2 Press + to open the Acer eRecovery utility. 3 Enter the - Acer TravelMate 8100 | TravelMate 8100 User's Guide - Page 58
method, click Next. Follow the instruction on screen to complete the process. Restore from backup User can restore backup previously created (as stated in the Create backup section) from hard drive, CD, or DVD. 1 Boot to Windows XP. 2 Press + to open the Acer eRecovery utility. 3 Enter the - Acer TravelMate 8100 | TravelMate 8100 User's Guide - Page 59
5 In the Recovery settings window, select Password: Change Acer eRecovery password and click Next. 6 Follow the instructions on screen to complete the process. Note: If the system crashes, and will not boot to Windows, you can run Acer disc-to-disc recovery to restore the factory default image under - Acer TravelMate 8100 | TravelMate 8100 User's Guide - Page 60
English 50 Acer disc-to-disc recovery Note: This feature is only available on certain models. Multilingual operating system installation Follow the instructions to choose the operating system and language you use when you first power-on the system. 1 Turn on the system. 2 Acer's multilingual - Acer TravelMate 8100 | TravelMate 8100 User's Guide - Page 61
. Please enter 000000:" is displayed. 4 Enter six zeros and continue. 5 The Acer Recovery main page appears. 6 Use the arrow keys to scroll through the items (operating system versions) and press to select. Important: This feature occupies 2~3 GB in a hidden partition on your hard drive. - Acer TravelMate 8100 | TravelMate 8100 User's Guide - Page 62
English 52 - Acer TravelMate 8100 | TravelMate 8100 User's Guide - Page 63
Troubleshooting my computer - Acer TravelMate 8100 | TravelMate 8100 User's Guide - Page 64
common system problems. Read it before calling a technician if a problem occurs. Solutions to more serious problems require opening up the computer. Do not attempt to open the computer by yourself. Contact your dealer or an authorised service center for assistance. Key link: http://global.acer.com/ - Acer TravelMate 8100 | TravelMate 8100 User's Guide - Page 65
to power the computer. Connect the AC adaptor to recharge the battery pack. • Make sure that the AC adaptor is properly plugged into the computer and to the power outlet. • If it is lit, check the following: • Is a non-bootable (non-system) disc in the external USB floppy drive? Remove or replace it - Acer TravelMate 8100 | TravelMate 8100 User's Guide - Page 66
screen on the computer or on an external monitor. No audio is heard from the computer. Check the following: • The volume may be muted. In Windows the optical drive tray without turning on the power. I cannot eject the optical drive tray. There is a mechanical eject button on the optical drive. Simply - Acer TravelMate 8100 | TravelMate 8100 User's Guide - Page 67
to a USB 2.0 port on the computer. If it works, contact your dealer or an authorised service center as the internal keyboard cable may be have the appropriate drivers (for printing to an infrared printer). • During the POST, press to access the BIOS Utility and verify to the Windows manual. - Acer TravelMate 8100 | TravelMate 8100 User's Guide - Page 68
course of action. Error Messages CMOS Battery Bad CMOS Checksum Error Disc Boot Failure Equipment Configuration Error Hard Disc 0 Error Hard Disc 0 Extended Type Error I/O Parity Error Corrective Action Contact your dealer or an authorised service center. Contact your dealer or an authorised - Acer TravelMate 8100 | TravelMate 8100 User's Guide - Page 69
service center. Memory Size Mismatch Press (during POST) to enter the BIOS Utility; then press Exit in the BIOS Utility to reboot. If you still encounter problems service center for assistance. Some problems may be solved using the BIOS Utility. Requesting service authorised service centers - Acer TravelMate 8100 | TravelMate 8100 User's Guide - Page 70
you call Acer for online service, and please be at your computer when you call. With your support, we can reduce the amount of time a call takes and help solve your problems efficiently. If there are error messages or beeps reported by your computer, write them down as they appear on the screen (or - Acer TravelMate 8100 | TravelMate 8100 User's Guide - Page 71
Appendix A Regulation & safety notices - Acer TravelMate 8100 | TravelMate 8100 User's Guide - Page 72
This appendix lists the general notices for your computer. - Acer TravelMate 8100 | TravelMate 8100 User's Guide - Page 73
pursuant to Part 15 of the FCC rules. These limits are designed to provide reasonable protection against harmful interference in a residential installation. This device generates, uses, and can radiate radio frequency energy and, if not installed and used in accordance with the instructions, may - Acer TravelMate 8100 | TravelMate 8100 User's Guide - Page 74
, to operate this computer. Operation conditions This device complies with Part 15 of the FCC Rules. Operation is subject to the following Canada. Declaration of Conformity for EU countries Hereby, Acer, declares that this Notebook PC series is in compliance with the essential requirements and - Acer TravelMate 8100 | TravelMate 8100 User's Guide - Page 75
to the telephone network, the telephone company may discontinue your service temporarily. If possible, they will notify you in advance. equipment from the phone line to determine if it is causing the problem. If the problem is with the equipment, discontinue use and contact your dealer or vendor - Acer TravelMate 8100 | TravelMate 8100 User's Guide - Page 76
make or model, nor does it imply that any product is compatible with all of Telecom's network services. 2 This equipment is not capable, under all operating conditions, of correct operation at the higher speeds to the same number within any 30 minute period for any single manual call initiation, and - Acer TravelMate 8100 | TravelMate 8100 User's Guide - Page 77
Telecom lines will always continue to support pulse dialing. 4 Use of pulse Should such problems occur, the user should NOT contact the telecom Fault Service. 5 This equipment may not provide for the effective hand-over of a call to another device connected to the same line. 6 Under power - Acer TravelMate 8100 | TravelMate 8100 User's Guide - Page 78
Service. Important safety instructions Read these instructions carefully. Save them for future reference. 1 Follow all warnings and instructions sure of the type of power available, consult your dealer or local power company. 7 Do not allow anything to rest on the power cord. Do not locate this - Acer TravelMate 8100 | TravelMate 8100 User's Guide - Page 79
. Do not disassemble or dispose of them in fire. Keep them away from children and dispose of used batteries promptly. 14 To avoid hazard of unexpected electrical shock, use the AC adaptor only when the wall socket is properly grounded. 15 Use only the proper type of power supply cord set (provided - Acer TravelMate 8100 | TravelMate 8100 User's Guide - Page 80
drive used with this computer is a laser product. The CD or DVD drive's classification label (shown below) is located on the drive. ÅLEN LCD pixel statement The LCD unit is produced with high-precision manufacturing techniques. Nevertheless, some pixels may occasionally misfire or appear as black or - Acer TravelMate 8100 | TravelMate 8100 User's Guide - Page 81
English English 71 and other limited viewing uses only unless otherwise authorised by Macrovision Corporation. Reverse engineering or disassembly is prohibited. Apparatus Claims of U.S. Patent Nos. 4,631,603, 4,577,216, 4,819,098, 4,907,093, and 6,516,132 licensed for limited viewing uses only. - Acer TravelMate 8100 | TravelMate 8100 User's Guide - Page 82
Notebook PC series shall be used in such a manner that the potential for human contact during normal operation is minimized as follows: 1 Users are requested to follow the RF safety instructions to co-channel Mobile Satellite systems. 3 High power radar are allocated as primary users of the 5. - Acer TravelMate 8100 | TravelMate 8100 User's Guide - Page 83
To prevent radio interference to the licensed service, this device is intended to be operated to co-channel Mobile Satellite systems. • High power radars are allocated as primary users (meaning they fields (RSS-102) The Notebook PC series employs low gain integral antennas that do not emit - Acer TravelMate 8100 | TravelMate 8100 User's Guide - Page 84
population; consult Safety Code 6, obtainable from Health Canada's Web site at www.hc-sc.gc.ca/rpb. English Note: Acer Wireless Mini PCI Adapter implements a transmission diversity function. The function does not emit radio frequencies simultaneously from both antennas. One of the antennas is - Acer TravelMate 8100 | TravelMate 8100 User's Guide - Page 85
Communications Commission Declaration of Conformity This device complies with Part 15 of the FCC Rules. Operation is subject Person: Phone No.: Fax No.: Notebook Personal Computer ZF1 Travelmate 8100 TravelMate 810xxx ("x" = 0~9, a ~ z, or A ~ Z) Acer America Corporation 2641 Orchard Parkway, San - Acer TravelMate 8100 | TravelMate 8100 User's Guide - Page 86
.com.tw Hereby declare that: Product: Trade Name: Model Number: Machine Type: SKU Number: Notebook PC Acer ZF1 TravelMate 8100 TravelMate 810xxx ("x" = 0~9, a ~ z, or A ~ Z) Is in compliance with the essential requirements and other relevant provisions of the following EC directives. Reference
-
 1
1 -
 2
2 -
 3
3 -
 4
4 -
 5
5 -
 6
6 -
 7
7 -
8
-
9
-
10
-
11
-
12
-
13
-
14
-
15
-
16
-
17
-
18
-
19
-
20
-
21
-
22
-
23
-
24
-
25
-
26
-
27
-
28
-
29
-
30
-
31
-
32
-
33
-
34
-
35
-
36
-
37
-
38
-
39
-
40
-
41
-
42
-
43
-
44
-
45
-
46
-
47
-
48
-
49
-
50
-
51
-
52
-
53
-
54
-
55
-
56
-
57
-
58
-
59
-
60
-
61
-
62
-
63
-
64
-
65
-
66
-
67
-
68
-
69
-
70
-
71
-
72
-
73
-
74
-
75
-
76
-
77
-
78
-
79
-
80
-
81
-
82
-
83
-
84
-
85
-
86
 |
 |

TravelMate 8100 Series
User’s Guide