Acer X221 User Guide
Acer X221 Manual
 |
View all Acer X221 manuals
Add to My Manuals
Save this manual to your list of manuals |
Acer X221 manual content summary:
- Acer X221 | User Guide - Page 1
LCD monitors 2 Package contents 3 Installation instructions 3 Assembling the monitor 3 Adjusting the viewing angle 4 Connecting the devices 5 Switching the power 6 Adjusting display settings 6 External controls 6 OSD options...7 OSD menu ...7 Troubleshooting 10 General specifications 11 - Acer X221 | User Guide - Page 2
do not attempt to repair the monitor by yourself. Opening or removing covers can lead to injury or death through electrocution or other hazards. Please contact a qualified engineer if the troubleshooting section does not solve your problem. Recycling information Acer cares very much about protecting - Acer X221 | User Guide - Page 3
cable VGA cable DVI cable User's Guide (CD) (Optional) Quick Start Guide (Optional) Assembling the monitor Installation instructions 1. Position the monitor on top of the base. 2. Connect the base into the neck of the monitor along the track. Detaching the monitor If you need to detach the - Acer X221 | User Guide - Page 4
Adjusting the viewing angle The viewing angle of the monitor ranges from -5 - 20°. NOTES • Do not touch the LCD screen when you change the angle. It may cause damage or break the LCD screen. • Careful attention is required not to catch your fingers or hands when you change the angle. 4 - Acer X221 | User Guide - Page 5
the power cord, and then insert the power cord into a properly grounded electrical socket. Connect the signal cable to the VGA input socket of the monitor, and connect the 2 VGA cable signal cable to the VGA output socket of the graphics card on the computer. Then tighten the thumbscrews on the - Acer X221 | User Guide - Page 6
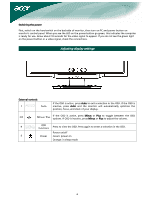
External controls 1 Auto If the OSD is active, press Auto to exit a selection in the OSD. If the OSD is inactive, press Auto and the monitor will automatically optimize the position, focus, and clock of your display. 2/3 Minus / Plus If the OSD is active, press Minus or Plus to toggle - Acer X221 | User Guide - Page 7
OSD options Please refer to "External controls" on Page 6. To adjust the OSD settings: 1. Press the Menu button to open the OSD menu. 2. Use Plus/Minus buttons to toggle between the 10 OSD functions (and also to adjust the controls to desired levels once a function has been selected). 3. Press Menu - Acer X221 | User Guide - Page 8
Color adjustment: There are three ways to adjust color: Warm (reddish white) Cool (bluish white) User (you can adjust the colors red, green and blue to the intensity you desire) Language for Asia: Select the OSD menu language. Select from English, German, Spanish, Simplified Chinese, Traditional - Acer X221 | User Guide - Page 9
Auto Config: System runs auto-configuration. (Optional) Input signal: Select either Analog Input or Digital Input video. Information: This shows information about the screen. Reset: Resets all settings to default levels. Exit: Exit from OSD. 9 - Acer X221 | User Guide - Page 10
optimize the position of your display. See horizontal and vertical position adjustment (p. 7). Caution: Do not attempt to service or open the monitor or computer yourself. Please refer all servicing to qualified service personnel if the "Troubleshooting" section cannot solve your problems. 10 - Acer X221 | User Guide - Page 11
source Power consumption [Energy Star] On. Stand by OFF Power consumption Max. Stand by OFF Dimension and weight Dimensions (W×H×D) Weight (Net/Gross) Specification 22-inch flat panel active-matrix TFT LCD WXGA+ 1680×1050 pixels 0.282 mm 16.7 M 300 cd/m² (Typical) 1000:1 (Typical) 5ms (Typical
-
 1
1 -
 2
2 -
 3
3 -
 4
4 -
 5
5 -
 6
6 -
 7
7 -
8
-
9
-
10
-
11
 |
 |

1
Table of Contents
Precautions
.......................................................................................................
2
Special notes on LCD monitors
........................................................................
2
Package contents
.............................................................................................
3
Installation instructions
...................................................................................
3
Assembling the monitor
..............................................................................
3
Adjusting the viewing angle
........................................................................
4
Connecting the devices
................................................................................
5
Switching the power
....................................................................................
6
Adjusting display settings
................................................................................
6
External controls
...........................................................................................
6
OSD options
......................................................................................................
7
OSD menu
.....................................................................................................
7
Troubleshooting
.............................................................................................
10
General specifications
....................................................................................
11