Acer Aspire 3000 Aspire 3000 / 5000 User's Guide - Page 66
Acer eRecovery, Create backup - boot from usb
 |
View all Acer Aspire 3000 manuals
Add to My Manuals
Save this manual to your list of manuals |
Page 66 highlights
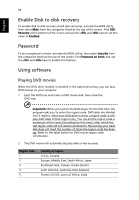
English 58 Acer eRecovery Acer eRecovery is a tool to quickly backup and restore the system. You can create and save a backup of the current system configuration to hard drive, CD, or DVD. Acer eRecovery consists of the following functions: 1 Create backup 2 Restore from backup 3 Create factory default image CD 4 Re-install bundled software without CD 5 Change Acer eRecovery password This chapter will guide you through each process. Note: This feature is only available on certain models. For systems that do not have a built-in optical disk burner, plug in an external USB or IEEE 1394-compatible optical disk burner before entering Acer eRecovery for optical disk related tasks. Create backup You can create and save backup images to hard drive, CD, or DVD. 1 Boot to Windows XP 2 Press + to open the Acer eRecovery utility. 3 Enter the password to proceed. The default password is six zeros. 4 In the Acer eRecovery window, select Recovery settings and click Next. 5 In the Recovery settings window, select Backup snapshot image and click Next. 6 Select the backup method. a Use Backup to HDD to store the backup disk image on drive D:. b Backup to optical device to store the backup image on CD or DVD. 7 After choosing the backup method, click Next. Follow the instructions on screen to complete the process.
-
 1
1 -
2
-
3
-
4
-
5
-
6
-
7
-
8
-
9
-
10
-
11
-
12
-
13
-
14
-
15
-
16
-
17
-
18
-
19
-
20
-
21
-
22
-
23
-
24
-
25
-
26
-
27
-
28
-
29
-
30
-
31
-
32
-
33
-
34
-
35
-
36
-
37
-
38
-
39
-
40
-
41
-
42
-
43
-
44
-
45
-
46
-
47
-
48
-
49
-
50
-
51
-
52
-
53
-
54
-
55
-
56
-
57
-
58
-
59
-
60
-
 61
61 -
 62
62 -
 63
63 -
 64
64 -
 65
65 -
 66
66 -
 67
67 -
 68
68 -
 69
69 -
 70
70 -
 71
71 -
72
-
73
-
74
-
75
-
76
-
77
-
78
-
79
-
80
-
81
-
82
-
83
-
84
-
85
-
86
 |
 |