Acer Aspire 4755G User Manual - Page 34
English, Setup, ENTER, Saving Changes
 |
View all Acer Aspire 4755G manuals
Add to My Manuals
Save this manual to your list of manuals |
Page 34 highlights
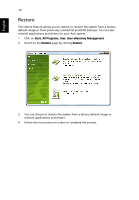
English 15 If you prefer to set the boot priority for long-term use, you should select the Boot submenu. 1 Turn on your computer and insert the first system recovery disc into the optical disc drive. Restart your computer. 2 During startup when the Acer logo shows, press the F2 key to enter BIOS Setup, where you can set system parameters. 3 Use the left and right arrow keys to select the Boot submenu. 4 Use the up and down arrow keys to select the IDE1* device. 5 Use the F6 key to move the IDE1* device to the highest boot priority, or use the F5 key to move other devices to a lower boot priority. Ensure that the IDE1* device is the highest priority. 6 Press the ESC key to enter the Exit submenu, press the ENTER key to Exit Saving Changes. Press the ENTER key again to select Yes. The system will reboot. 7 When you reboot, Windows will be installed from the recovery disc. 8 Insert the second recovery disc when prompted, then follow the onscreen prompts to complete the restore. 9 Remove the recovery disc from the optical drive once the restore is complete. Do this before rebooting your computer.
-
 1
1 -
2
-
3
-
4
-
5
-
6
-
7
-
8
-
9
-
10
-
11
-
12
-
13
-
14
-
15
-
16
-
17
-
18
-
19
-
20
-
21
-
22
-
23
-
24
-
25
-
26
-
27
-
28
-
 29
29 -
 30
30 -
 31
31 -
 32
32 -
 33
33 -
 34
34 -
 35
35 -
 36
36 -
 37
37 -
 38
38 -
 39
39 -
40
-
41
-
42
-
43
-
44
-
45
-
46
-
47
-
48
-
49
-
50
-
51
-
52
-
53
-
54
-
55
-
56
-
57
-
58
-
59
-
60
-
61
-
62
-
63
-
64
-
65
-
66
-
67
-
68
-
69
-
70
-
71
-
72
-
73
 |
 |
