Adaptec 131CA Hardware Guide
Adaptec 131CA - AAA RAID Controller Manual
 |
UPC - 760884130476
View all Adaptec 131CA manuals
Add to My Manuals
Save this manual to your list of manuals |
Adaptec 131CA manual content summary:
- Adaptec 131CA | Hardware Guide - Page 1
Installation and Hardware Guide AAA-131CA PCI-to-Wide UltraSCSI Array Adapter R - Adaptec 131CA | Hardware Guide - Page 2
R Adaptec, Inc. 691 South Milpitas Boulevard Milpitas, CA 95035 © 1997 Adaptec, Inc. All rights reserved. Adaptec, and the Adaptec logo are trademarks of Adaptec, Inc. which may be registered in some jurisdictions. Printed in Singapore STOCK NO.: 511694-00, Rev. A KL 10/97 - Adaptec 131CA | Hardware Guide - Page 3
w w w w AAA-131CA PCI-to-Wide UltraSCSI Array Adapter Installation and Hardware Guide R - Adaptec 131CA | Hardware Guide - Page 4
this document, or from the use of the information contained herein. Adaptec reserves the right to make changes in the product design without reservation and without notification to its users. Disclaimer IF THIS PRODUCT DIRECTS YOU TO COPY MATERIALS, YOU MUST HAVE PERMISSION FROM THE COPYRIGHT OWNER - Adaptec 131CA | Hardware Guide - Page 5
, and if not installed and used in accordance with the instruction manual, may cause harmful interference to radio communications. However, there is received, including interference that may cause undesired operation. Adaptec, Inc. AAA-131CA Tested To Comply With FCC Standards FOR HOME OR - Adaptec 131CA | Hardware Guide - Page 6
- Adaptec 131CA | Hardware Guide - Page 7
1-2 2 Installing the AAA-131CA Adapter and Connecting SCSI Devices AAA-131CA Layout 2-2 Installing SIMM Memory 2-3 Installing the AAA-131CA Array Adapter 2-3 Connecting the LED Activity Indicator 2-5 Connecting SCSI Devices 2-6 Choosing SCSI Cables 2-6 Connecting Internal SCSI Devices 2-7 Connecting - Adaptec 131CA | Hardware Guide - Page 8
NT 4.0 4-3 Installing the Driver When Windows NT is Already Installed 4-4 Windows NT 3.51 4-4 Windows NT 4.0 4-6 Installing Adaptec CI/O Workstation Array Management Software for Windows NT 4-7 5 Configuring the AAA-131CA Adapter with SCSISelect Default AAA-131CA Adapter Settings 5-2 Starting the - Adaptec 131CA | Hardware Guide - Page 9
Contents D Obtaining SCSI Cables and Converters External Cables D-2 Internal Ribbon Cables D-2 Converters D-2 E Listing of Vendors Array Storage Enclosure Manufacturers E-1 SCSI Disk Drive Manufacturers E-2 Index vii - Adaptec 131CA | Hardware Guide - Page 10
- Adaptec 131CA | Hardware Guide - Page 11
that supports Bus Mastering s A minimum of one SCSI hard disk drive s A standard 72-pin, 16-MByte, Fast-page mode 70-ns or faster SIMM (non-EDO). (See the Adaptec Web Site at http://www.adaptec.com/RAID for a list of approved SIMMs and vendors.) s Five MBytes of hard disk space for the AAA-131CA - Adaptec 131CA | Hardware Guide - Page 12
) Installation Overview s Install the AAA-131CA adapter in the desktop system s Connect the SCSI devices to the AAA-131CA s Create the first (bootable) array with the ArrayConfigCA™ program s Install the AAA-131CA driver along with Windows NT s Install the Adaptec CI/O Workstation Array Management - Adaptec 131CA | Hardware Guide - Page 13
2 w w w w Installing the AAA-131CA Adapter and Connecting SCSI Devices To install the AAA-131CA your SCSI devices, you will need to s Install SIMM memory s Back up any existing data s Install the AAA-131CA in your system s Connect SCSI devices 2-1 - Adaptec 131CA | Hardware Guide - Page 14
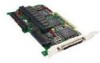
AAA-131CA Installation and Hardware Guide AAA-131CA Layout Figure 2-1 identifies the major components on the AAA-131CA. You may find it helpful to refer to this figure while installing your adapter. 68-pin Internal SCSI Connector 50-pin Internal SCSI Connector LED Connector 68-pin Wide External - Adaptec 131CA | Hardware Guide - Page 15
the AAA-131CA Adapter and Connecting SCSI Devices Installing SIMM Memory Before you can use the AAA-131CA adapter, the SIMM memory socket must be populated with a standard 72-pin 16-MByte Fastpage mode SIMM, as shown in Figure 2-2. (The SIMM may already be installed in the socket.) Visit the Adaptec - Adaptec 131CA | Hardware Guide - Page 16
AAA-131CA Installation and Hardware Guide 4 Insert the AAA-131CA adapter in the PCI slot, as shown in Fig- ure 2-3. Press down firmly so that the Screw Host Adapter Bracket Bus Contacts PCI Expansion Slots (typically white or ivory) Figure 2-3. Installing an AAA-131CA in a PCI Expansion Slot 2-4 - Adaptec 131CA | Hardware Guide - Page 17
LED Activity Indicator (Optional) An LED on the front panel of most computers lights to indicate non-SCSI hard disk activity. If you want the LED to light whenever there is activity on the AAA-131CA adapter instead, you must disconnect the LED cable from the motherboard and connect it to the LED - Adaptec 131CA | Hardware Guide - Page 18
AAA-131CA Installation and Hardware Guide Connecting SCSI Devices The AAA-131CA adapter supports both internal and external SCSI devices. Up to 15 SCSI devices can be supported on each SCSI channel-either 16-bit devices alone or a combination of 16-bit and up to seven 8-bit devices. Note: If you are - Adaptec 131CA | Hardware Guide - Page 19
(Refer to your computer and device documentation for instructions.) 3 If you are connecting 8-bit internal SCSI devices, attach one end of the 50-pin cable to the 50-pin internal SCSI connector on the AAA-131CA adapter. If you are connecting 16-bit internal SCSI devices, attach one end of the 68-pin - Adaptec 131CA | Hardware Guide - Page 20
AAA-131CA Installation and Hardware Guide 4 Attach the remaining connectors on the cable to the remaining internal devices. 5 Connect an available DC power cable (from your computer's power supply) to the power input connector on each SCSI device. Connecting External SCSI Devices For each external - Adaptec 131CA | Hardware Guide - Page 21
Installing the AAA-131CA Adapter and Connecting SCSI Devices 3 Attach the connector at the other end of the cable to either one of the SCSI connectors on the external SCSI device, as shown in Figure 2-7. (If you are installing only one external device, attach an active terminator to the device.) 3 - Adaptec 131CA | Hardware Guide - Page 22
AAA-131CA Installation and Hardware Guide 4 Connect other external SCSI devices by daisy-chaining each device to the previous device until all external SCSI devices have been connected, as shown in Figure 2-8. (The device at the end of the chain must have an active terminator installed. See SCSI - Adaptec 131CA | Hardware Guide - Page 23
Installing the AAA-131CA Adapter and Connecting SCSI Devices Connecting External SCSI Array Enclosures (Storage Subsystems) If you are installing the AAA-131CA adapter in a powerful, highend desktop system, you may decide to use a SCSI array enclosure for your SCSI disk drives, instead of installing - Adaptec 131CA | Hardware Guide - Page 24
AAA-131CA Installation and Hardware Guide s If the enclosure you are using for the array drives is not devices supplying termination power should be located near the end of the SCSI bus. s Symptoms of SCSI cabling-related problems are drives not being recognized, drives locking up, or drives that - Adaptec 131CA | Hardware Guide - Page 25
Array controller). Note: UltraSCSI data transfer rates do not currently support more than eight devices per channel. - Six m (19.7 enclosure. SCSI ID Numbers Each device attached to a SCSI channel on the AAA-131CA adapter, as well as the SCSI channel itself, must be assigned a unique SCSI ID number - Adaptec 131CA | Hardware Guide - Page 26
to determine how to enable or disable termination on your particular SCSI device. The internal SCSI cables supplied in the Adaptec AAA-131CA kits have attached terminators, so you should disable termination on all internal SCSI devices connected to the cable. In general, we recommend that you - Adaptec 131CA | Hardware Guide - Page 27
If the BIOS message does not appear, see Appendix A, Troubleshooting. Note: If you need to configure the SCSI options (for example, ID, Parity Checking, and Termination) of your system after the AAA-131CA adapter is installed, see Chapter 5, Configuring the AAA-131CA Adapter with SCSISelect. Ì 2-15 - Adaptec 131CA | Hardware Guide - Page 28
- Adaptec 131CA | Hardware Guide - Page 29
array parameters of if you want to add spare disks to the array. For more information on using ArrayConfigCA, see the Adaptec Array1000CA Family Array Management Guide. Follow these steps to create an initial array with the ArrayConfigCA Express Setup. (You can probably complete the Express Setup - Adaptec 131CA | Hardware Guide - Page 30
AAA-131CA Installation and Hardware Guide Note: To select ArrayConfigCA menu options, type the hot key-the letter that appears in a different color. (The hot key letters are underlined in the following instructions). You can also press the ↑ and ↓ keys until the option is highlighted and then press - Adaptec 131CA | Hardware Guide - Page 31
two disks are available or if ArrayConfigCA encounters some other problem. If this happens, install more disk drives or run instructions in the Microsoft documentation. (Chapter 4 of this Installation and Hardware Guide also has instructions for installing Windows NT and the other AAA-131CA - Adaptec 131CA | Hardware Guide - Page 32
- Adaptec 131CA | Hardware Guide - Page 33
sure the AAA-131CA adapter is already installed. If you plan to boot from an array, make sure the array is already created. To install all of the software, you must complete the following in the order presented: 1 Install the cda1000.sys driver for Windows NT 2 Install the Adaptec CI/O Workstation - Adaptec 131CA | Hardware Guide - Page 34
AAA-131CA Installation and Hardware Guide Installing the Array1000CA Driver for Windows NT This section explains how to install the Adaptec Array1000CA Miniport Driver (cda1000.sys) for Windows NT. To begin driver installation, see either Installing the Driver When Installing Windows NT below, or - Adaptec 131CA | Hardware Guide - Page 35
to the a:\winnt\ directory. The screen displays the adapter drivers supported on the diskette. The Adaptec Array1000CA Family Adapter driver is highlighted by default; press Enter. 10 If you want to add drivers for other host adapters (other than the AAA-131CA), do so at this time by repeating Step - Adaptec 131CA | Hardware Guide - Page 36
diskette in your floppy drive. 6 The screen displays the adapter drivers supported on the diskette. Select the Adaptec Array1000CA Family Adapter and press Enter. 7 If you want to add drivers for other host adapters (other than the AAA-131CA), do so at this time by pressing S and repeating Step - Adaptec 131CA | Hardware Guide - Page 37
6 The screen displays the adapter drivers supported on the diskette. The Adaptec Array1000CA Family Adapter driver is highlighted by default; click OK. The driver is added to the list of SCSI adapters. 7 Select Adaptec Array1000CA Family Adapter from the list of SCSI adapters, and click Install. At - Adaptec 131CA | Hardware Guide - Page 38
AAA-131CA Installation and Hardware Guide 11 Add other types of host adapters if necessary (see Step 4 above), or click Close to exit the SCSI adapters portion of Windows NT Setup, and then close the program. 12 When you see this message, click OK to exit: The changes you have - Adaptec 131CA | Hardware Guide - Page 39
]setup.exe (The setup.exe file is located at \win_nt\disk1\setup.exe on the CD-ROM, and at \setup.exe on Disk 1 of the Adaptec CI/O Workstation Array Management Software for Windows NT.) 4 Follow the directions that appear on the screen. 5 When installation is complete, reboot the system. The follow - Adaptec 131CA | Hardware Guide - Page 40
AAA-131CA Installation and Hardware Guide 6 Double-click the CI/O Array Management Software icon to start the program. See the Adaptec Array1000CA Family Array Management Guide for information on using the Adaptec CI/O Workstation Array Management Software to add, delete, or manage your arrays. Ì - Adaptec 131CA | Hardware Guide - Page 41
the default settings, explains when you should change them, and tells you how to do it. SCSISelect also includes SCSI disk utilities to list the SCSI IDs of devices on the AAA-131CA adapter, format SCSI disk drives, and check them for defects. Instructions for using these utilities are included. 5-1 - Adaptec 131CA | Hardware Guide - Page 42
AAA-131CA Installation and Hardware Guide Default AAA-131CA Adapter Settings The default SCSISelect settings, shown in the table below, are appropriate for using the AAA-131CA in most computer systems. For situations where you might want or need to change the settings, see the descriptions of each - Adaptec 131CA | Hardware Guide - Page 43
Configuring the AAA-131CA Adapter with SCSISelect Starting the SCSISelect Utility To start menu that appears displays the options Configure/View Host Adapter Settings and SCSI Disk Utilities. Adaptec AAA-13x/ARO-113x SCSISelect(TM) Utility v2.00 AAA-13x/ARO-113x at Bus:Channel 00:C Would you like to - Adaptec 131CA | Hardware Guide - Page 44
AAA-131CA Installation and Hardware Guide Using the SCSI Disk Utilities To access the SCSI disk utilities, select the SCSI Disk Utilities option from the menu that appears after starting SCSISelect. Once the option is selected, SCSISelect immediately scans the SCSI bus (to determine the devices - Adaptec 131CA | Hardware Guide - Page 45
parity; otherwise, leave it enabled. Most SCSI devices do support SCSI parity. If you are not sure whether a device supports SCSI parity, consult the documentation for the device. s Array Adapter SCSI Termination-This option sets termination on the AAA-131CA adapter. The default setting is Auto Mode - Adaptec 131CA | Hardware Guide - Page 46
data transfer negotiation (Sync Negotiation) between the device and AAA-131CA adapter is initiated by the adapter. Normally, you should leave the Initiate Sync Negotiation setting enabled, because most SCSI devices support synchronous negotiation and because it allows for faster data transfer - Adaptec 131CA | Hardware Guide - Page 47
to Enabled, the AAA-131CA BIOS is installed, and all Int13 devices are supported. When set to Disabled, the AAA-131CA BIOS is not installed. The default setting is Enabled. BIOS Support for Bootable CD-ROM This option determines whether the AAA-131CA BIOS supports booting from a CD-ROM drive. When - Adaptec 131CA | Hardware Guide - Page 48
- Adaptec 131CA | Hardware Guide - Page 49
A w w w w Troubleshooting Troubleshooting Checklist Check the following if you have problems installing or running the AAA-131CA adapter and SCSI devices: s Does the AAA-131CA BIOS sign-on message appear during bootup? If not, check the following items: - Is the AAA-131CA adapter properly seated in - Adaptec 131CA | Hardware Guide - Page 50
AAA-131CA Installation and Hardware Guide s If you are having trouble booting from a SCSI disk drive or array, make sure your computer's CMOS setup is set to No Drives Installed (the required setting for SCSI drives). Also, verify that the drive or array has been selected as the boot-first (boot) - Adaptec 131CA | Hardware Guide - Page 51
When installing multiple adapters, keep the following considerations in mind: s If you are booting from a SCSI disk drive or an array supported by the AAA-131CA adapter, then the adapter must be the card that the computer scans first. Usually, you need to determine by experimentation which PCI slot - Adaptec 131CA | Hardware Guide - Page 52
- Adaptec 131CA | Hardware Guide - Page 53
software necessary to use a CD-ROM connected to the AAA-131CA adapter. To operate a CD-ROM drive supported by the AAA-131CA adapter under DOS, you need s The SCSI driver, aspi8dos.sys (version 1.27 or later) s The CD-ROM driver, aspicd.sys s The Microsoft CD-ROM extensions, mscdex.exe The aspi8dos - Adaptec 131CA | Hardware Guide - Page 54
AAA-131CA Installation and Hardware Guide To complete the driver installation, edit the config.sys file to \aspi8dos.sys /d device=c:\scsi\aspicd.sys /d:aspicd0 Sample Command Line for autoexec.bat File: \dos\mscdex.exe /d:aspicd0 /M:12 (This assigns the CD-ROM the next available drive letter, - Adaptec 131CA | Hardware Guide - Page 55
manager also increases. Use this option only if you want to run an ASPI program that specifies a higher number of concurrent commands. /d /d Displays information about the AAA-131CA and attached SCSI devices when the computer boots. /L /L Enables aspi8dos to recognize all eight possible LUNs - Adaptec 131CA | Hardware Guide - Page 56
AAA-131CA Installation and Hardware Guide Command Line Options for aspicd.sys Option Example Use /d: /d:aspicd0 Required in the config.sys command line. Assigns a name to the CD-ROM drive so that mscdex can assign the CD-ROM a logical drive letter. The name must exactly match the CD-ROM - Adaptec 131CA | Hardware Guide - Page 57
are required in high-performance SCSI Array (RAID) systems to ensure data integrity. Adaptec provides the highest quality SCSI cables designed specifically for use with Adaptec AAA-131CA Array adapters. For purchasing information, contact Adaptec: Adaptec, Inc. 691 S. Milpitas Boulevard Milpitas - Adaptec 131CA | Hardware Guide - Page 58
and Hardware Guide External Cables Part Number ACK-W2W-E External Cables Connectors High-density 68-pin male to High-density 68-pin male Length 1 m Internal Ribbon Cables Internal Ribbon Cables Part Number ACK-F2F-5IT1 ACK-W2W-5IT1 Connectors 5 position (4 devices + SCSI Card), Standard 50 - Adaptec 131CA | Hardware Guide - Page 59
E w w w w Listing of Vendors This appendix contains a partial listing of array storage enclosure and SCSI disk drive manufacturers. Array Storage Enclosure Manufacturers JMR Electronics, Inc. 20400 Plummer Street Chatsworth, CA 91311 USA Tel: (818) 993-4801 Fax: (818) 993-9173 - Adaptec 131CA | Hardware Guide - Page 60
AAA-131CA Installation and Hardware Guide SCSI Disk Drive Manufacturers Fujitsu Computer Products of America, Inc. 2904 Orchard Parkway San Jose, CA 95134-2009 USA Tel (U.S.): (800) 626-4686 Tel (Intl): (408) - Adaptec 131CA | Hardware Guide - Page 61
D-1 D Daisy-chain 2-10 Devices, connecting 2-6 Disk drive manufacturers E-2 Drivers for DOS C-1 for Windows NT 4-2 E Enclosure, Array 2-6, E-1 IDE drives 2-5 Installation 2-3 Adaptec CI/O Workstation Array Management software 4-7 cache memory 2-3 hints for connecting SCSI devices 2-12 local memory - Adaptec 131CA | Hardware Guide - Page 62
AAA-131CA Installation and Hardware Guide Windows NT driver 4-2-4-7 Windows NT software 4-1-4-8 IRQ A-1 L LED connector 2-5 Local memory 2-3 LUNs C-3, C-4 M Memory, cache 2-3 Memory, local 2-3 Microsoft CD-ROM extensions C-1 Motherboard chipset A-1 mscdex.exe C-1 Multiple host adapters B-1 N NT
-
 1
1 -
 2
2 -
 3
3 -
 4
4 -
 5
5 -
 6
6 -
 7
7 -
8
-
9
-
10
-
11
-
12
-
13
-
14
-
15
-
16
-
17
-
18
-
19
-
20
-
21
-
22
-
23
-
24
-
25
-
26
-
27
-
28
-
29
-
30
-
31
-
32
-
33
-
34
-
35
-
36
-
37
-
38
-
39
-
40
-
41
-
42
-
43
-
44
-
45
-
46
-
47
-
48
-
49
-
50
-
51
-
52
-
53
-
54
-
55
-
56
-
57
-
58
-
59
-
60
-
61
-
62
 |
 |

R
Installation and Hardware Guide
AAA-131CA
PCI-to-Wide UltraSCSI Array Adapter