Adaptec 3405 User Guide - Page 94
Modifying Cache Settings, Initializing Disk Drives, Manage Arrays, Ctrl+C, Enter
 |
UPC - 760884155028
View all Adaptec 3405 manuals
Add to My Manuals
Save this manual to your list of manuals |
Page 94 highlights
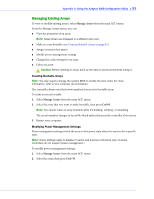
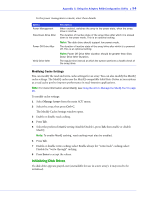
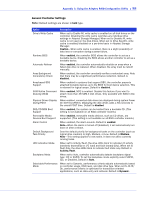
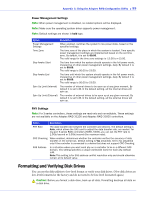
Appendix C: Using the Adaptec RAID Configuration Utility ● 94 In the power management console, enter these details: Option Power Management Slow Down Drive After Power Off Drive After Verify Drive After Description When enabled, switches the array to low power state, when the array/ drive is inactive. The duration of inactive state of the array/drive after which it is slowed down to low power mode. This is an optional setting. Note: The disk drive should support low power mode. The duration of inactive state of the array/drive after which it is powered off. This is an optional setting. Note: Power Off Drive After duration should be greater than Slow Down Drive After Duration. The regular time interval at which the system performs a health check of the array/drive. Modifying Cache Settings You can modify the read and write cache settings for an array. You can also modify the MaxIQ cache settings. The MaxIQ cache uses the MaxIQ-compatible Solid State Drives in your system as a read cache pool to improve performance in read-intensive applications. Note: For more information about MaxIQ, see Using the ACU to Manage the MaxIQ Pool on page 96. To modify cache settings: 1 Select Manage Arrays from the main ACU menu. 2 Select the array, then press Ctrl+C. The Modify Cache Settings window opens. 3 Enable or disable read caching. 4 Press Tab. 5 Select the preferred MaxIQ setting (Enable/Disable), press Tab, then enable or disable MaxIQ. Note: To enable MaxIQ caching, read caching must also be enabled. 6 Press Tab. 7 Enable or disable write caching: select Enable always for "write-back" caching; select Disable for "write-through" caching. 8 Press Enter to accept the values. Initializing Disk Drives If a disk drive appears grayed-out (unavailable for use in a new array), it may need to be initialized.
-
 1
1 -
2
-
3
-
4
-
5
-
6
-
7
-
8
-
9
-
10
-
11
-
12
-
13
-
14
-
15
-
16
-
17
-
18
-
19
-
20
-
21
-
22
-
23
-
24
-
25
-
26
-
27
-
28
-
29
-
30
-
31
-
32
-
33
-
34
-
35
-
36
-
37
-
38
-
39
-
40
-
41
-
42
-
43
-
44
-
45
-
46
-
47
-
48
-
49
-
50
-
51
-
52
-
53
-
54
-
55
-
56
-
57
-
58
-
59
-
60
-
61
-
62
-
63
-
64
-
65
-
66
-
67
-
68
-
69
-
70
-
71
-
72
-
73
-
74
-
75
-
76
-
77
-
78
-
79
-
80
-
81
-
82
-
83
-
84
-
85
-
86
-
87
-
88
-
 89
89 -
 90
90 -
 91
91 -
 92
92 -
 93
93 -
 94
94 -
 95
95 -
 96
96 -
 97
97 -
 98
98 -
 99
99 -
100
-
101
-
102
-
103
-
104
-
105
-
106
-
107
-
108
-
109
-
110
-
111
-
112
-
113
-
114
-
115
-
116
-
117
-
118
-
119
-
120
-
121
-
122
-
123
-
124
-
125
-
126
-
127
-
128
-
129
-
130
-
131
-
132
-
133
-
134
-
135
-
136
-
137
-
138
-
139
-
140
-
141
-
142
-
143
-
144
-
145
-
146
-
147
-
148
-
149
-
150
-
151
-
152
-
153
-
154
-
155
-
156
-
157
-
158
 |
 |