Adaptec 5325301728 User Guide
Adaptec 5325301728 - Snap Server 4200 NAS Manual
 |
UPC - 753253017287
View all Adaptec 5325301728 manuals
Add to My Manuals
Save this manual to your list of manuals |
Adaptec 5325301728 manual content summary:
- Adaptec 5325301728 | User Guide - Page 1
4200/4500 Replacing the Front Bezel Note These instructions apply to multiple models; illustrations may vary slightly bezel. A muted click indicates the latches are locked. Field Service Documentation 1 Copyright © 2007, Adaptec, Inc. All rights reserved. Information in this document is subject - Adaptec 5325301728 | User Guide - Page 2
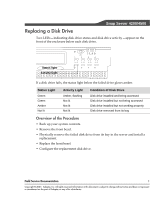
drive from its bay in the server and install a replacement. • Replace the front bezel. • Configure the replacement disk drive. Field Service Documentation 1 Copyright © 2007, Adaptec, Inc. All rights reserved. Information in this document is subject to change without notice and does not represent - Adaptec 5325301728 | User Guide - Page 3
LED should not be lit. 2 On the closed handle of the failed disk drive, press the latch to the right. 2 Field Service Documentation Copyright © 2007, Adaptec, Inc. All rights reserved. Information in this document is subject to change without notice and does not represent a commitment on the part - Adaptec 5325301728 | User Guide - Page 4
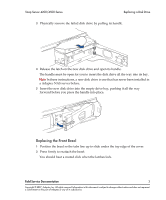
into its bay. Note In these instructions, a new disk drive is one that has never been installed in a Adaptec NAS server before. 5 Insert the new hear a muted click when the latches lock. Field Service Documentation 3 Copyright © 2007, Adaptec, Inc. All rights reserved. Information in this - Adaptec 5325301728 | User Guide - Page 5
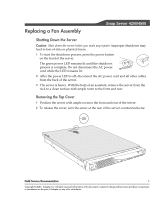
and rear of the server. 2 To release the cover, turn the screw at the rear of the server counterclockwise. Field Service Documentation 1 Copyright © 2007, Adaptec, Inc. All rights reserved. Information in this document is subject to change without notice and does not represent a commitment on - Adaptec 5325301728 | User Guide - Page 6
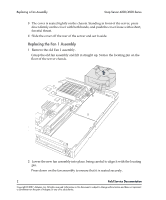
to align it with the locating pin. Press down on the fan assembly to ensure that it is seated securely. 2 Field Service Documentation Copyright © 2007, Adaptec, Inc. All rights reserved. Information in this document is subject to change without notice and does not represent a commitment on the - Adaptec 5325301728 | User Guide - Page 7
careful to align it with the connector. 3 Press down on the fan assembly to ensure that it is seated securely. Field Service Documentation 3 Copyright © 2007, Adaptec, Inc. All rights reserved. Information in this document is subject to change without notice and does not represent a commitment on - Adaptec 5325301728 | User Guide - Page 8
. 2 Reattach all cables to the rear of the server. 3 Press the power button on the front of the server. 4 Field Service Documentation Copyright © 2007, Adaptec, Inc. All rights reserved. Information in this document is subject to change without notice and does not represent a commitment on the - Adaptec 5325301728 | User Guide - Page 9
, press down firmly on the cover with both hands, and push the cover loose with a short, forceful thrust. Field Service Documentation 1 Copyright © 2007, Adaptec, Inc. All rights reserved. Information in this document is subject to change without notice and does not represent a commitment on - Adaptec 5325301728 | User Guide - Page 10
the new power supply Insert the replacement power supply into the server chassis and slide it forward into place. 2 Field Service Documentation Copyright © 2007, Adaptec, Inc. All rights reserved. Information in this document is subject to change without notice and does not represent a commitment - Adaptec 5325301728 | User Guide - Page 11
. 2 Reattach all cables to the rear of the server. 3 Press the power button on the front of the server. Field Service Documentation 3 Copyright © 2007, Adaptec, Inc. All rights reserved. Information in this document is subject to change without notice and does not represent a commitment on the - Adaptec 5325301728 | User Guide - Page 12
Snap Server 4200/4500 Installing a SCSI Card Note These instructions apply to multiple models; illustrations may and push the cover loose with a short, forceful thrust. Field Service Documentation 1 Copyright © 2007, Adaptec, Inc. All rights reserved. Information in this document is subject to - Adaptec 5325301728 | User Guide - Page 13
you can use it to cover the opening if you ever permanently remove the SCSI card. Back right corner of server (front view) 3 Install the SCSI card. 2 Field Service Documentation Copyright © 2007, Adaptec, Inc. All rights reserved. Information in this document is subject to change without notice - Adaptec 5325301728 | User Guide - Page 14
and is properly seated. Avoid contact with metal surfaces on the card. Back of chassis 4 Replace the removed PCI retention clip. The the power button on the front of the server. Field Service Documentation 3 Copyright © 2007, Adaptec, Inc. All rights reserved. Information in this document is - Adaptec 5325301728 | User Guide - Page 15
Snap Server 4200/4500 Replacing a SCSI Card Note These instructions apply to multiple models; illustrations may the cover off the rear of the server and set it aside. Field Service Documentation 1 Copyright © 2007, Adaptec, Inc. All rights reserved. Information in this document is subject to - Adaptec 5325301728 | User Guide - Page 16
server and set it aside. Back right corner of server (back view) 2 Remove the failed SCSI card from its slot. 3 Install the new SCSI card. 2 Field Service Documentation Copyright © 2007, Adaptec, Inc. All rights reserved. Information in this document is subject to change without notice and does - Adaptec 5325301728 | User Guide - Page 17
Press firmly to be sure the card is seated properly in its slot. Avoid contact with metal surfaces on the card. Grasp or press the edges only power button on the front of the server. Field Service Documentation 3 Copyright © 2007, Adaptec, Inc. All rights reserved. Information in this document - Adaptec 5325301728 | User Guide - Page 18
and rear. Removing the Top Cover and SCSI Card 1 Remove the top cover of the Snap Server by turning the cover retention screw at the back of the server counterclockwise until it becomes loose. Field Service Documentation 1 Copyright © 2007, Adaptec, Inc. All rights reserved. Information in this - Adaptec 5325301728 | User Guide - Page 19
of the server and lifting it from the chassis. 2 Remove the Serial ATA card from its protective packaging. Avoid contact with metal surfaces on the card. 2 Field Service Documentation Copyright © 2007, Adaptec, Inc. All rights reserved. Information in this document is subject to change without - Adaptec 5325301728 | User Guide - Page 20
SCSl card to the upper (PCI) slot, grasp only the edges of the card and press firmly until it snaps into place. • If you do not have a SCSI card, be Server without the top cover in place. Field Service Documentation 3 Copyright © 2007, Adaptec, Inc. All rights reserved. Information in this - Adaptec 5325301728 | User Guide - Page 21
Installing a Serial ATA Card Snap Server 4200/4500 Series Replace the Snap Server the server. 3 Press the power button on the front of the server. 4 Field Service Documentation Copyright © 2007, Adaptec, Inc. All rights reserved. Information in this document is subject to change without notice - Adaptec 5325301728 | User Guide - Page 22
Snap Server 4200/4500 Replacing a Serial ATA Card Caution There are static-sensitive electronics inside the the back of the server counterclockwise until it becomes loose. Field Service Documentation 1 Copyright © 2007, Adaptec, Inc. All rights reserved. Information in this document is subject - Adaptec 5325301728 | User Guide - Page 23
the server and set it aside. Removing and Replacing the Serial ATA Card Caution PCI cards are seated properly only when you hear a distinct 'snap' sound. screw at the rear of the server. 2 Field Service Documentation Copyright © 2007, Adaptec, Inc. All rights reserved. Information in this document - Adaptec 5325301728 | User Guide - Page 24
Series Replacing a Serial ATA Card Restoring Power to the Server 1 If you disconnected the cable(s), reattach them to the server. 2 Connect the power cord. 3 Press the power button on the front of the server. Power button Field Service Documentation 3 Copyright © 2007, Adaptec, Inc. All rights - Adaptec 5325301728 | User Guide - Page 25
supporting up to 3 GB of RAM. Before replacing or upgrading your RAM, consider the following guidelines: • Use only DIMMs supplied by Adaptec - Adaptec power cord while the LED remains lit. Field Service Documentation 1 Copyright © 2007, Adaptec, Inc. All rights reserved. Information in this - Adaptec 5325301728 | User Guide - Page 26
cover loose with a short, forceful thrust. 4 Slide the cover off the rear of the server and set it aside. 2 Field Service Documentation Copyright © 2007, Adaptec, Inc. All rights reserved. Information in this document is subject to change without notice and does not represent a commitment on the - Adaptec 5325301728 | User Guide - Page 27
edges of the module, insert it into the next available slot. Avoid contact with metal surfaces on the module. Field Service Documentation 3 Copyright © 2007, Adaptec, Inc. All rights reserved. Information in this document is subject to change without notice and does not represent a commitment on - Adaptec 5325301728 | User Guide - Page 28
. 2 Reattach all cables to the rear of the server. 3 Press the power button on the front of the server. 4 Field Service Documentation Copyright © 2007, Adaptec, Inc. All rights reserved. Information in this document is subject to change without notice and does not represent a commitment on the - Adaptec 5325301728 | User Guide - Page 29
4200/4500 Installing the Server into a Rack Note These instructions apply to multiple models; illustrations may vary slightly. 12-24 screws for attaching the assemblies to the rack Field Service Documentation 1 Copyright © 2007, Adaptec, Inc. All rights reserved. Information in this document is - Adaptec 5325301728 | User Guide - Page 30
distance between the front and rear posts of the rack • A nut driver sized to complement the nuts provided with the kit Overview of the Procedure with ample room to the front and rear. 2 Field Service Documentation Copyright © 2007, Adaptec, Inc. All rights reserved. Information in this document - Adaptec 5325301728 | User Guide - Page 31
Set both inner sliders aside for now. Later in the procedure, you attach them to the sides of the chassis. Field Service Documentation 3 Copyright © 2007, Adaptec, Inc. All rights reserved. Information in this document is subject to change without notice and does not represent a commitment on the - Adaptec 5325301728 | User Guide - Page 32
holes in the extender. 4 Insert 3 of the longer screws, with the screw heads on the inside of the assembly. 4 Field Service Documentation Copyright © 2007, Adaptec, Inc. All rights reserved. Information in this document is subject to change without notice and does not represent a commitment on - Adaptec 5325301728 | User Guide - Page 33
being collapsed. If you press firmly, or firmly tap one end of the assembly on the floor, it does collapse. Field Service Documentation 5 Copyright © 2007, Adaptec, Inc. All rights reserved. Information in this document is subject to change without notice and does not represent a commitment on - Adaptec 5325301728 | User Guide - Page 34
screwdriver can help you control the screw as you put it through the access oval and into the screw hole. 6 Field Service Documentation Copyright © 2007, Adaptec, Inc. All rights reserved. Information in this document is subject to change without notice and does not represent a commitment on the - Adaptec 5325301728 | User Guide - Page 35
slide rail assembly with the appropriate slot in the extender. 11 Insert a second screw through the access oval. Field Service Documentation 7 Copyright © 2007, Adaptec, Inc. All rights reserved. Information in this document is subject to change without notice and does not represent a commitment - Adaptec 5325301728 | User Guide - Page 36
procedure, attaching the two remaining rail extenders to the front and rear of the second slide rail assembly. 8 Field Service Documentation Copyright © 2007, Adaptec, Inc. All rights reserved. Information in this document is subject to change without notice and does not represent a commitment - Adaptec 5325301728 | User Guide - Page 37
that the rack is ready, with slide rail assemblies in position, you need to prepare the chassis for mounting. Field Service Documentation 9 Copyright © 2007, Adaptec, Inc. All rights reserved. Information in this document is subject to change without notice and does not represent a commitment on - Adaptec 5325301728 | User Guide - Page 38
release button 2 Align the screw holes in the inner slider with corresponding holes in the chassis side panel. 10 Field Service Documentation Copyright © 2007, Adaptec, Inc. All rights reserved. Information in this document is subject to change without notice and does not represent a commitment - Adaptec 5325301728 | User Guide - Page 39
drives inserted weighs 27 pounds. To avoid accidents, have another person help you support the weight of the chassis as you slide it into the rack. 1 attach the ear brackets to the rack. Field Service Documentation 11 Copyright © 2007, Adaptec, Inc. All rights reserved. Information in this - Adaptec 5325301728 | User Guide - Page 40
system. 1 Attach the cable(s). 2 Connect the power cord. 3 Press the power button on the front of the server. 12 Field Service Documentation Copyright © 2007, Adaptec, Inc. All rights reserved. Information in this document is subject to change without notice and does not represent a commitment on - Adaptec 5325301728 | User Guide - Page 41
Server 4200/4500 Rack Mount Bracket Kit These instructions explain how to install the L-shaped rack mount to a clean surface with ample room to the front and rear. Field Service Documentation 1 Copyright © 2007, Adaptec, Inc. All rights reserved. Information in this document is subject to change - Adaptec 5325301728 | User Guide - Page 42
align the ears with the posts on the rack. You may want another person to support the chassis in position. • For a standard, 4-post rack, align the ears on the front of the Snap Server. 2 Field Service Documentation Copyright © 2007, Adaptec, Inc. All rights reserved. Information in this document
-
 1
1 -
 2
2 -
 3
3 -
 4
4 -
 5
5 -
 6
6 -
 7
7 -
8
-
9
-
10
-
11
-
12
-
13
-
14
-
15
-
16
-
17
-
18
-
19
-
20
-
21
-
22
-
23
-
24
-
25
-
26
-
27
-
28
-
29
-
30
-
31
-
32
-
33
-
34
-
35
-
36
-
37
-
38
-
39
-
40
-
41
-
42
 |
 |

Field Service Documentation
1
Snap Server 4200/4500
Copyright © 2007,
Adaptec, Inc. All rights reserved. Information in this document is subject to change without notice and does not represent
a commitment on the part of Adaptec or any of its subsidiaries.
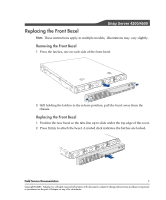
Replacing the Front Bezel
Note
These instructions apply to multiple models;
illustrations may vary slightly.
Removing the Front Bezel
1
Press the latches, one on each side of the front bezel.
2
Still holding the latches in the release position, pull the bezel away from the
chassis.
Replacing the Front Bezel
1
Position the new bezel so the tabs line up to slide under the top edge of the cover.
2
Press firmly to attach the bezel. A muted click indicates the latches are locked.