Airlink AKVM4 Quick Installation Guide
Airlink AKVM4 Manual
 |
View all Airlink AKVM4 manuals
Add to My Manuals
Save this manual to your list of manuals |
Airlink AKVM4 manual content summary:
- Airlink AKVM4 | Quick Installation Guide - Page 1
Quick Installation Guide Model # AKVM-4 Section 1 Introduction The AKVM-4 switch is a 4-port PS/2 type KVM switch that comes with 3-in-1 combo KVM cables to save you 1cabling troubles. It on back. Section 4 Technical Support Email: [email protected] Website: www.airlinkplus.com Continue on Back - Airlink AKVM4 | Quick Installation Guide - Page 2
Quick Reference Chart Command Select PC Next lower channel Next higher channel Autoscan Beep Sound On/Off Reset KVM Hotkeys ScrLk + ScrLk + (channel #) 1 ScrLk + ScrLk + (up arrow) ScrLk + ScrLk + (down arrow) ScrLk + ScrLk + B ScrLk + ScrLk + End Autoscan Stop Autoscan ScrLk + ScrLk + S Any key
-
 1
1 -
 2
2
 |
 |

Ver. 1A
Quick Installation Guide
1
Model # AKVM-4
Section 1
The
AKVM-4 switch
is a 4-port PS/2 type KVM switch
that comes with 3-in-1 combo KVM cables to save you
cabling troubles. It enables users to access, control,
boot, and reboot up to 4 computers using only one key-
board, video monitor, and mouse. It can be your best
companion for managing 2 to 4 computers on either
SOHO or corporate desktop
.
Introduction
Section 2
Before connecting any cable, please make sure all of your
computers and their peripherals have been powered off.
Otherwise, the KVM switch may not be set up properly.
Installation
Step 1
Make sure all the computers that are to be
connected to the KVM switch and their peripherals
are powered-off.
If not, power them off before
you proceed with the following steps.
Step 2
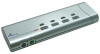
Connect the shared keyboard, monitor, and
mouse to the main KVM unit. See Fig. 1.1
Fig 1.1
Step 3
Connect each of your computer to the KVM
switch using the provided 3-in-1 combo KVM
cables.See Fig. 1.2
Step 4
Power up the connected computers one by
one. After the computers are powered up, the
keyboard and mouse will be recognized and you
can begin operating the KVM switch.
Section 3
Operations
There are two methods to select a specific computer:
Using the
push button
or the
hotkey sequence
.
Hotkey Sequence
The hotkey sequence consists of three specific
keystrokes pressd on the keyboard.
Hotkey sequence =
ScrLk + ScrLk +
Command key
The two consecutive
ScrLk
key should be pressed
within 2 seconds and the following command key(s)
should also be pressed within 2 seconds. Otherwise,
the hotkey sequence will not be validated.
For detailed Hotkey sequences and their correspond-
ing functions, please refer to the Quick Reference
Chart on back.
Push Button
The push button lets you directly switch between the
computers. Simply press the applicable button on the
KVM unit to select the corresponding computer.
Section 4
Technical Support
Email: [email protected]
Website: www.airlinkplus.com
Continue on Back
PC side
KVM side
Fig 1.2
You can use individual standard keyboard, mouse
and video cables to extend the cable distance, but
depending on the type of cables you use, the
maximum cable distance is limited to 5 ~ 7 meters
(15.5 ~ 23 feet).