Akai MPK88 Operation Manual
Akai MPK88 Manual
 |
View all Akai MPK88 manuals
Add to My Manuals
Save this manual to your list of manuals |
Akai MPK88 manual content summary:
- Akai MPK88 | Operation Manual - Page 1
SEMI-WEIGHTED USB/MIDI KEYBOARD CONTROLLER HAMMER-ACTION USB/MIDI KEYBOARD CONTROLLER OPERATOR'S MANUAL WWW.AKAIPRO.COM - Akai MPK88 | Operation Manual - Page 2
- Akai MPK88 | Operation Manual - Page 3
TRANSPORT CONTROL 29 EDITING TAP TEMPO...29 EDITING FOOTSWITCH PEDAL INPUTS 30 EDITING EXPRESSION PEDAL INPUT 31 EDITING SPLIT ...32 SPLIT POINT...32 SPLIT PARAMETERS ...32 GLOBAL MODE ...33 KILL MIDI - Page1...33 MIDI COMMON CHANNEL - Page 2 33 LCD CONTRAST - Page 3...33 KEYBOARD VELOCITY - Akai MPK88 | Operation Manual - Page 4
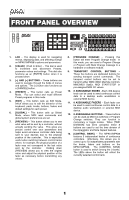
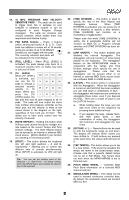
of the keyboard, pads, knobs, buttons, faders and default settings for each preset. 6. [GLOBAL] - This button calls up Global Mode, where MIDI reset commands and global system preferences are set. 7. [PREVIEW] - This button allows you to see what value will be sent by a controller, without actually - Akai MPK88 | Operation Manual - Page 5
Mode). Tap Tempo does not work when the MPK61/MPK88 is set to External sync. 25. PITCH BEND WHEEL - Transmits MIDI Pitch Bend information on a selected MIDI channel and port. 26. MODULATION WHEEL - This wheel can be used to transmit continuous controller data. By default, the modulation wheel will - Akai MPK88 | Operation Manual - Page 6
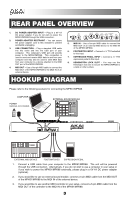
EXPRESSION PEDAL 1. Connect a USB cable from your computer to the MPK61/MPK88. The unit will be powered through the USB connection. Alternatively, if you do not wish to use a computer in your setup or if you wish to power the MPK61/MPK88 externally, please plug in a 6V-1A DC power adapter - Akai MPK88 | Operation Manual - Page 7
is connected to the MPK61/MPK88. • USB cable connected: MIDI data from your computer is passed to the MIDI OUT port. When a USB cable is connected, you should activate "MIDI echo" in your sequencer if you want the MPK61/MPK88 to control another external device. • USB cable not connected: Whatever - Akai MPK88 | Operation Manual - Page 8
are several kinds of information that the MPK61/MPK88 will display while in use: OCTAVE, TRANSPOSITION, NOTE, AFTERTOUCH (Channel Pressure), CONTROL CHANGE, MIDI MACHINE CONTROL (MMC), and PREVIEW MODE information. OCTAVE AND TRANSPOSITION When using the keyboard, the LCD will display the current - Akai MPK88 | Operation Manual - Page 9
PORT AND CHANNEL AFTERTOUCH INDICATOR PAD BANK MIDI MACHINE CONTROL COMMAND (MMC) MIDI MACHINE CONTROL (MMC) is commonly used to send transport control messages to hardware record or playback machines. For example: Pressing [PLAY] on the MPK61/MPK88 sends an MMCPLAY message to a connected multi - Akai MPK88 | Operation Manual - Page 10
time. Edit Mode This mode allows you to edit the configuration of the MPK61/MPK88. Edit Mode is a powerful tool for customizing your set-up. In this mode, you can make changes to how the keyboard, pads, knobs and faders are behaving. For example, you may wish to have a fader or a knob transmit - Akai MPK88 | Operation Manual - Page 11
MPK88's keyboard, sliders, knobs, and pads will behave. Using Presets allows you to save different configurations so you can quickly load them when you need them, without having to reprogram the MPK61/MPK88 you can quickly identify and access different controller configurations. 1. To name or rename - Akai MPK88 | Operation Manual - Page 12
the [] buttons. To change the values of the fields, turn the [VALUE] dial. 5. When finished editing the controller, press [ENTER] to accept the change or press [ - Akai MPK88 | Operation Manual - Page 13
PARAMETERS CONTROLLER SELECTED KEYBOARD PAGE 1 OCTAVE AFTERTOUCH VELOCITY PADS NOTE PROGRAM CHANGE KNOBS AND FADERS BUTTONS ARP ON/OFF NOTE REPEAT TIME DIVISION PITCH BEND WHEEL MODULATION WHEEL TRANSPORT TAP TEMPO EXPRESSION PEDAL SPLIT SUSTAIN PEDAL CONTROL CHANGE AFTERTOUCH CONTROL CHANGE - Akai MPK88 | Operation Manual - Page 14
keyboard when the current Preset is loaded. AFTERTOUCH - Aftertouch describes pressure applied to the keys after they have been pressed. Aftertouch can often be used to control the vibrato, sustain or decay of a sound. The Aftertouch setting on the MPK61/MPK88 set the keyboard's MIDI channel field - Akai MPK88 | Operation Manual - Page 15
MPK61/MPK88 can .' What is a Note Message? A Note Message is a MIDI message which is traditionally used to start and stop sounds. When you press one of the . Please consult your software or hardware device's documentation to find out whether Program Change messages are supported. For more information - Akai MPK88 | Operation Manual - Page 16
the [>] button to select the next field. Note: When not used via USB, only pads assigned to port A will transmit MIDI information via the 5-pin MIDI port on the back of the MPK61/MPK88. NOTE FIELD NOTE FIELD NOTE FIELD This field sets the MIDI Note Number that the pad will transmit when it is hit - Akai MPK88 | Operation Manual - Page 17
port (i.e. A7). You may also assign Program Change to use the MIDI Common Channel. 1. Use the [] button to select the next field. PROGRAM CHANGE - Akai MPK88 | Operation Manual - Page 18
sound module. What is Aftertouch? Aftertouch refers to MIDI information sent when pressure is applied to a pad after it has been struck, and while it is being held down. Aftertouch is often used to control volume, vibrato and other parameters. On the MPK61/MPK88, the knobs and sliders can also be - Akai MPK88 | Operation Manual - Page 19
to select the next field. Note: When not used via USB, only knobs and faders assigned to port A will be transmitted via the 5-pin MIDI port on the back of the MPK61/MPK88. CONTROL CHANGE FIELD CONTROL CHANGE FIELD In this field you can set which Control Change Number the pad will transmit when it - Akai MPK88 | Operation Manual - Page 20
that the MPK61/MPK88 is controlling. The following list of parameters can be accessed if "Aftertouch" is selected as the event type for the selected knob or fader. MIDI CHANNEL FIELD MIDI PORT/CHANNEL FIELD This field sets the MIDI Port and Channel which the knob or fader will use to transmit - Akai MPK88 | Operation Manual - Page 21
of NRPN functions depends strictly on the software with which you will be using the MPK61/MPK88. Please consult your software's documentation to find out how NRPN functions are supported. MIDI CHANNEL FIELD MIDI PORT/CHANNEL FIELD This field sets the MIDI Port and Channel which the knob will - Akai MPK88 | Operation Manual - Page 22
the [>] button to select the next field. Note: When not used via USB, only buttons assigned to port A will be transmitted via the 5-pin MIDI port on the back of the MPK61/MPK88. CONTROL CHANGE FIELD In this field you can set which Control Change Number the button will transmit when it is pressed - Akai MPK88 | Operation Manual - Page 23
port (i.e. A7). You may also assign Program Change to use the MIDI Common Channel. 1. Use the [] button to select the next field. PROGRAM CHANGE - Akai MPK88 | Operation Manual - Page 24
EDITING THE ARPEGGIATOR The built-in Arpeggiator is one of the features which sets the MPK61/MPK88 apart from other controllers. The Arpeggiator allows you to arpeggiate a sequence of notes by holding down a combination of keys. The Arpeggiator will be synced to the tempo parameter of the MPK61/ - Akai MPK88 | Operation Manual - Page 25
Select one of the following arpeggio types in this field - Up, Down, Incl, Excl, Rand, Chrd. 1. While in Arp Type field, use [VALUE] dial to select Arp Type. 2. Use the [>] button to select the next field. Arp Type descriptions: UP - Notes arpeggiate from the lowest note to the highest note held - Akai MPK88 | Operation Manual - Page 26
following parameters can be edited by selecting "GATE SWING" on Page 1. GATE Select the arpeggiator Gate in this field. 1. While in Gate field, use [VALUE] dial to select Gate duration. 2. Use the [>] button to select the next field. GATE DURATION SWING Select the arpeggiator Swing in this field - Akai MPK88 | Operation Manual - Page 27
repeatedly trigger a sound by simply holding down a pad. The sound will be retriggered at a rate equivalent to the Time Division currently selected on the MPK61/MPK88. With the Note Repeat feature, you can record a phrase that would be difficult to record in real time, such as 16 beat hi hat, snare - Akai MPK88 | Operation Manual - Page 28
(TGL) manner, where pressing the button turns on the Note Repeat function and pressing again turns it off. 1. While in Button Mode field, use [VALUE] dial to select Button Mode (Toggle or Momentary). 2. Press [ENTER] to accept change. BUTTON MODE NOTE REPEAT PARAMETERS - GATE, SWING The following - Akai MPK88 | Operation Manual - Page 29
Arpeggiator. When Note Repeat or the Arpeggiator is enabled, the MPK61/MPK88 will output notes at a rate equivalent to the Time Division setting. is loaded. 1. While in Default Time Division field, use [VALUE] dial to select Gate duration. 2. Use the [>] button to select the next field. DEFAULT - Akai MPK88 | Operation Manual - Page 30
Bend wheel can be assigned to transmit pitch bend information on a specific MIDI Channel. 1. Press the [EDIT] button to enter Edit Mode. 2. Now Bend settings. PRESS ENTER TO EDIT 5. Use the [VALUE] dial to select the MIDI Channel for the Pitch Bend wheel. 6. Press [ENTER] to accept the change - Akai MPK88 | Operation Manual - Page 31
to go to next field. In this field, you can specify which MIDI CC the Modulation wheel will be transmitting. MIDI CC FIELD MINIMUM VALUE 1. Use the [>] button to select MIDI CC field. 2. Turn [VALUE] dial to select the desired MIDI CC. 3. Use the [>] button to go to next field. In this field, you - Akai MPK88 | Operation Manual - Page 32
settings. 5. When on Page 2, use the [VALUE] dial to select the format of the transport control messages (MMC, MMC/MIDI, MIDI, CTRL). 6. Press [ENTER] to accept the change or [ - Akai MPK88 | Operation Manual - Page 33
button to select the next field. Note: When not used via USB, only footswitch messages assigned to port A will be transmitted via the 5-pin MIDI port on the back of the MPK61/MPK88. CONTROL CHANGE FIELD In this field you can set which Control Change Number the footswitch will transmit when it is - Akai MPK88 | Operation Manual - Page 34
. ARP LATCH - footswitch will be used as an Arp Latch button. SUSTAIN - footswitch will be used as a Sustain pedal. EDITING EXPRESSION PEDAL INPUT You can think of the expression pedal input on the MPK61/MPK88 as another fader, for the purposes of this manual. Refer to 'Editing Knobs and Faders - Akai MPK88 | Operation Manual - Page 35
the control to edit. The LCD will show "Set SPLT" on Page 1. Use the [VALUE] dial to select a parameter and press [ENTER] to select it: PITCH (pitch bend wheel): ON or OFF MODWHEEL (modulation wheel): ON or OFF SUSTAIN 1 and SUSTAIN 2 (sustain pedals): ON or OFF EXPRESSION (the expression pedal): ON - Akai MPK88 | Operation Manual - Page 36
Page 5 Page 6 Page 7 Page 8 Page 9 Page 10 Page 11 Page 12 Page 13 KILL MIDI - Page1 KILL MIDI allows you to send either an ALL NOTES OFF message on each MIDI Channel or a RESET ALL CONTROLLERS command. ALL NOTES OFF is a MIDI message used to turn off any notes that might be playing on your DAW or - Akai MPK88 | Operation Manual - Page 37
MPK88 outputs MIDI velocities, based on a certain ratio of the input / output velocity that characterizes the particular curve. The Keyboard Velocity Curve feature is intended to help you optimize the keys on the MPK61/MPK88 to your particular playing style and can add expressivity and control , use - Akai MPK88 | Operation Manual - Page 38
Press [ENTER] to set Transposition. Note: Transposing the keyboard will have a global effect on the MPK61/MPK88. MIDI CLOCK FIELD MIDI CLOCK is used to synchronize devices together. In addition, MIDI Clock on the MPK61/MPK88 is used in conjunction with the Note Repeat and Arpeggiator features to - Akai MPK88 | Operation Manual - Page 39
data from the MPK61/MPK88, including Controller Numbers, MIDI Channels and various other parameters via SysEx. 1. While in Global Mode, use [>] button to scroll 1. Make sure that the device is connected to the MPK61/MPK88 either via the USB or the MIDI IN port. 2. Make sure that you are in Preset - Akai MPK88 | Operation Manual - Page 40
, often referred to as a Patch Change, is a MIDI message used for sending data to devices to cause them to change to a new program. This allows you to tell a hardware or software device which sound to play. For example, if your MPK61/MPK88 is controlling a piano patch on your DAW or an external - Akai MPK88 | Operation Manual - Page 41
if your USB port does not supply enough power or if you are using a USB hub, it may be necessary to use the adapter. Question: Answer: What software applications is the MPK61/MPK88 compatible with? The MPK61/MPK88 is compatible with any software or hardware device which supports the MIDI protocol - Akai MPK88 | Operation Manual - Page 42
after software application has started. Problem is caused by use of a USB hub. Software application not set to receive MIDI data from the MPK61/MPK88. MPK61/MPK88's MIDI channel not the same as application's incoming MIDI chanel. Sustain pedal was plugged in after the MPK61/MPK88 was powered on - Akai MPK88 | Operation Manual - Page 43
channel pressure- sensitive) MPK88: 88 fully weighted hammer-action keys (velocity- and channel pressure- sensitive) 16 (velocity- and pressure-sensitive) 4 8 8 8 Quickstart Guide Operator's Manual USB cable (3m) CD-ROM disc 5-pin DIN x 1 5-pin DIN x 1 Slave connector x 1 (MIDI over USB) 6V DC, 1A - Akai MPK88 | Operation Manual - Page 44
7-51-0296-B
-
 1
1 -
 2
2 -
 3
3 -
 4
4 -
 5
5 -
 6
6 -
 7
7 -
8
-
9
-
10
-
11
-
12
-
13
-
14
-
15
-
16
-
17
-
18
-
19
-
20
-
21
-
22
-
23
-
24
-
25
-
26
-
27
-
28
-
29
-
30
-
31
-
32
-
33
-
34
-
35
-
36
-
37
-
38
-
39
-
40
-
41
-
42
-
43
-
44
 |
 |

WWW.AKAIPRO.COM
SEMI-WEIGHTED USB/MIDI KEYBOARD CONTROLLER
HAMMER-ACTION USB/MIDI KEYBOARD CONTROLLER
X
OPERATOR'S MANUAL