Alesis MultiMix 16 USB FX User Guide
Alesis MultiMix 16 USB FX Manual
 |
View all Alesis MultiMix 16 USB FX manuals
Add to My Manuals
Save this manual to your list of manuals |
Alesis MultiMix 16 USB FX manual content summary:
- Alesis MultiMix 16 USB FX | User Guide - Page 1
USER GUIDE ENGLISH ( 3 - 9 ) GUÍA DEL USUARIO ESPAÑOL ( 10 - 17 ) GUIDE D'UTILISATION FRANÇAIS ( 18 - 25 ) GUIDA PER L'USO ITALIANO ( 26 - 33 ) BENUTZERHANDBUCH DEUTSCH ( 34 - 40 ) - Alesis MultiMix 16 USB FX | User Guide - Page 2
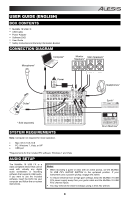
- Alesis MultiMix 16 USB FX | User Guide - Page 3
position. If your instrument uses a passive pickup, engage the switch. y To reduce electrical hum at high gain settings, keep the MultiMix 16 USB FX's power supply away from your guitar cable and the MultiMix 16 USB FX's channel inputs. y You may remove the mixer's endcaps using a 3mm hex wrench. 3 - Alesis MultiMix 16 USB FX | User Guide - Page 4
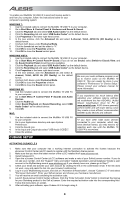
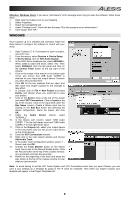
set up to receive audio via the MultiMix 16 USB FX. This can usually be done in your software's "Preferences" or "Device Setup." Please consult your software manual for WINDOWS XP: more information. 1. Use the included cable to connect the MultiMix 16 USB FX to your computer. 2. Go to Start Menu - Alesis MultiMix 16 USB FX | User Guide - Page 5
mixer. 1. Open Cubase LE 6. If prompted to open a project, cancel for now. 2. From the menus, select Devices Device Setup. 3. In Device Setup, click on VST Audio System. 4. In the ASIO driver select "USB Audio CODEC 1" for the Left stereo input and "USB Audio stop the recording. 16. Rewind to the - Alesis MultiMix 16 USB FX | User Guide - Page 6
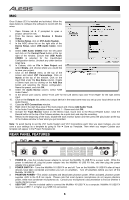
connected and before you turn on amplifiers. Turn off amplifiers before you turn off the MultiMix 16 USB FX. 3. PHANTOM POWER - This switch activates and deactivates phantom power. When activated, phantom power supplies +48V to the XLR mic inputs. Please note that most dynamic microphones do not - Alesis MultiMix 16 USB FX | User Guide - Page 7
17 17 17 17 17 37 1. POWER LED - Illuminates when the MultiMix 16 USB FX is on. 2. PHANTOM POWER LED - Illuminates when phantom power is engaged. 3. MAIN OUT - outboard effects devices but can also be used like an extra input channel for synthesizers, drum machines, etc. If your source is mono - Alesis MultiMix 16 USB FX | User Guide - Page 8
, or to create a custom monitor mix for yourself or your musicians. 28. FX SEND - Adjusts the channel audio level that is sent to MultiMix 16 USB FX's internal effects processor. Turn this up for the channels that you want internal effects applied to. 29. PREFADE - When this button is engaged - Alesis MultiMix 16 USB FX | User Guide - Page 9
EFFECTS TO HEAR THE EFFECTS ON A CHANNEL: Turn up the FX POST SEND (28) for that channel. Then, turn up the FX RETURN knob (32). Press the MAIN TO MONITOR button to hear the mix in your headphones. Use the EFFECTS SELECTOR KNOB (30) to choose one - Alesis MultiMix 16 USB FX | User Guide - Page 10
GUÍA DEL USUARIO (ESPAÑOL) CONTENIDO DE LA CAJA y MultiMix 16 USB FX y Cable USB y Adaptador de Alimentación y DVD de Software y Guía del pitch - octave + tap accomp store x y z phrase latch pr ogra m s setups push co nf ig r s hyth m s p attern analog modeling synth * Se - Alesis MultiMix 16 USB FX | User Guide - Page 11
de audio esté configurado para recibir audio por MultiMix 16 USB FX. Esto se puede hacer habitualmente en "Preferences" (Preferencias) o "Device Setup" (Configuración de dispositivos) del software. Para más información, consulte el manual del software. Si experimenta demasiada latencia después de - Alesis MultiMix 16 USB FX | User Guide - Page 12
que se reconozca el MultiMix 16 USB FX. CONFIGURACIÓN DE mero, haga clic en el menú "Support" (Soporte) y seleccione "Update eLicenser Setup (Dispositivos Configuración de dispositivos. 3. En Device Setup, haga clic en VST Audio System (Sistema de audio VST). 4. En el cuadro desplegable del driver - Alesis MultiMix 16 USB FX | User Guide - Page 13
la ventana de Cubase, efectúe una prueba rápida y detenga la grabación. 16. Rebobine hasta el comienzo de la pista y pulse el botón de En la lista de drivers ASIO del lado derecho de Device Setup, seleccione USB Audio Codec. Haga clic en OK (Aceptar). 5. Seleccione USB Audio CODEC en el - Alesis MultiMix 16 USB FX | User Guide - Page 14
la alimentación eléctrica desconectada, enchufe la fuente de alimentación al MultiMix 16 USB FX primero y luego al tomacorriente. 2. INTERRUPTOR DE ENCENDIDO - Enciende y apaga el MultiMix 16 USB FX. Encienda el MultiMix 16 USB FX después de desconectar todos los dispositivos de entrada y antes de - Alesis MultiMix 16 USB FX | User Guide - Page 15
18 18 18 18 18 17 17 17 17 17 17 17 17 17 17 17 17 37 1. LED DE ENCENDIDO - Se ilumina cuando el MultiMix 16 USB FX está encendido. 2. LED DE ALIMENTACIÓN FANTASMA- Se ilumina cuando se acopla la alimentación fantasma. 3. SALIDA PRINCIPAL - Use cables estándar TRS de 1/4" para conectar estas - Alesis MultiMix 16 USB FX | User Guide - Page 16
ajuste de la perilla GAIN (Ganancia) o la perilla de volumen CHANNEL (Canal). Para lograr capacidad de monitoreo por software mientras graba en post-ecualización) que se envía al procesador de efectos interno del MultiMix 16 USB FX. Aumente el ajuste para los canales a los que desea aplicar efectos - Alesis MultiMix 16 USB FX | User Guide - Page 17
EFECTOS PARA OÍR LOS EFECTOS EN UN CANAL: Aumente el ajuste FX - SEND (28) de ese canal. Luego, aumente el ajuste de la perilla FX RETURN (32). Pulse el botón MAIN TO MONITOR para oír la mezcla en sus auriculares. Use la PERILLA EFFECTS (Selectora de efectos) (30) para elegir uno - Alesis MultiMix 16 USB FX | User Guide - Page 18
) CONTENU DE LA BOÎTE y MultiMix 16 USB FX y Câble USB y Câble d'alimentation y CD Logiciel y Guide d'utilisation y Consignes de Sécurité et pitch - octave + tap accomp store x y z phrase latch pr ogra m s setups push co nf ig r s hyth m s p attern analog modeling synth *Vendu - Alesis MultiMix 16 USB FX | User Guide - Page 19
dans votre ordinateur, puis suivez les instructions à l'écran pour installer le logiciel. Afin que le MultiMix 16 USB FX y Lors de l'enregistrement d'une guitare ou d'une basse dotée de micros actifs, réglez le sélecteur GUITAR SWITCH du MultiMix 16 USB FX à la position levée. Si vous utilisez - Alesis MultiMix 16 USB FX | User Guide - Page 20
pour le produit Steinberg dans le Soft-eLicenser. Entrez le code d'activation dans le champ correspondant. Suivez ensuite les instructions à l'écran. 9. Une fois l'activation complétée, vous pouvez ouvrir Cubase et commencer à l'utiliser. Attention utilisateurs Windows : Si un message d'erreur - Alesis MultiMix 16 USB FX | User Guide - Page 21
Cliquez sur la clé anglaise dans le coin inférieur droit et assurez-vous que « USB Audio CODEC » est coché comme périphérique d'entrée et de sortie. Décochez être du Cubase, effectuez un essai rapide, puis arrêtez l'enregistrement. 16. Retournez au début de la piste et cliquez sur le bouton de - Alesis MultiMix 16 USB FX | User Guide - Page 22
est hors tension, branchez le câble d'alimentation dans le MultiMix 16 USB FX, puis dans la prise de courant. 2. INTERRUPTEUR D'ALIMENTATION - Cette touche permet de mettre le MultiMix 16 USB FX sous et hors tension. Branchez le MultiMix 16 USB FX après avoir branché tous les appareils et avant de - Alesis MultiMix 16 USB FX | User Guide - Page 23
18 18 18 18 18 18 18 17 17 17 17 17 17 17 17 17 17 17 17 37 1. DEL D'ALIMENTATION - S'allume lorsque le MultiMix 16 USB FX est sous tension. 2. DEL D'ALIMENTATION FANTÔME - S'allume lorsque l'alimentation fantôme est activée. 3. MAIN OUT - Branchez des câbles 1/4 po (6,35 mm) standards à cette - Alesis MultiMix 16 USB FX | User Guide - Page 24
égaliseur ou tout autre processeur de signaux entre le préamplificateur du MultiMix 16 USB FX et le convertisseur A/N. Utilisez des câbles TRS 1/4 po (6,35 EQ FREQ - Ce bouton permet d'ajuster le niveau des fréquences que le CHANNEL EQ (MID) augmentera ou supprimera. 26. HI EQ (AIGUËS) - Ce bouton - Alesis MultiMix 16 USB FX | User Guide - Page 25
EFFETS POUR ENTENDRE LES EFFETS SUR UN CANAL : Augmentez le FX POST SEND (28) pour ce canal. Ensuite, augmentez le FX RETURN (29). Appuyez sur le bouton MAIN TO MONITOR afin d'acheminer le signal à votre casque d'écoute. Uilisez le bouton EFFECTS SELECTOR (30) pour sélectionner un - Alesis MultiMix 16 USB FX | User Guide - Page 26
) CONTENUTI DELLA CONFEZIONE y MultiMix 16 USB FX y Cavo USB y Adattatore di Alimentazione y store x y z phrase latch pr ogra m s setups push co nf ig r s hyth m s p il funzionamento del mixer. • Mac: OS X 10.6-10.8 • PC: Windows 7, Vista, o XP* • Porta USB *Requisiti per il - Alesis MultiMix 16 USB FX | User Guide - Page 27
audio tramite il MultiMix 16 USB FX. WINDOWS 7: 1. Servirsi del cavo in dotazione per collegare il MultiMix 16 USB FX al computer. 2. Recarsi su Start Pannello di controllo Hardware e Solitamente ciò può essere fatto sotto "Opzioni" o "Setup". Consultare il manuale del software per maggiori - Alesis MultiMix 16 USB FX | User Guide - Page 28
Control Center (eLCC) e prendere nota del proprio numero Soft-eLicenser. Se il numero non viene visualizzato, cliccare sul menu "Support" e selezionare "Update eLicenser License Database" (aggiorna database delle licenze eLicenser).Creare un account utente nell'area MySteinberg all'indirizzo www - Alesis MultiMix 16 USB FX | User Guide - Page 29
mixer. 1. Aprire Cubase LE 6. Se viene richiesto di aprire un progetto, annullare per adesso. 2. Dai menu, selezionare Periferiche Setup periferiche. 3. In Device Setup cliccare su VST Audio System. 4. Nella casella a discesa del driver interrompere la registrazione. 16. Riavvolgere all' - Alesis MultiMix 16 USB FX | User Guide - Page 30
il mixer. 1. Aprire il Cubase LE 6. Se viene richiesto di aprire un progetto, annullare per adesso. 2. Dai menu, selezionare Periferiche Setup periferiche. 3. In Device Setup cliccare su VST Audio System. 4. Nell'elenco dei driver ASIO presente sul lato destro di Setup periferiche, selezionare USB - Alesis MultiMix 16 USB FX | User Guide - Page 31
MultiMix 16 USB FX ad una presa di alimentazione. Ad alimentazione spenta, collegare l'alimentazione elettrica innanzitutto nel MultiMix 16 USB FX, quindi ad una presa elettrica. 2. POWER SWITCH (interruttore di alimentazione) - Accende e spegne il MultiMix 16 USB FX. Accendere il MultiMix 16 USB FX - Alesis MultiMix 16 USB FX | User Guide - Page 32
EQ, o qualsiasi altro elaboratore di segnale tra il preamplificatore del MultiMix 16 USB FX e l'A/D converter. Servirsi di un cavo standard TRS da 1/4" quando per udire il segnale. nelle parti più rumorose della canzone. 17. CHANNEL VOLUME (volume canale) - Regola il livello audio sul canale. 18. - Alesis MultiMix 16 USB FX | User Guide - Page 33
CUFFIE - Regola il livello del volume inviato alle cuffie. EFFETTI PER SENTIRE GLI EFFETTI SU UN CANALE: accendere l'FX POST SEND (28) per quel canale. Quindi, alzare la manopola FX RETURN (32). Premere il tasto MAIN TO MONITOR per ascoltare il mix in cuffia. Servirsi della manopola EFFECTS SELECTOR - Alesis MultiMix 16 USB FX | User Guide - Page 34
BENUTZERHANDBUCH (DEUTSCH) LIEFERUMFANG y MultiMix 16 USB FX y USB-Kabel y Netzteil y Software-DVD y pr ogra m s setups push co nf ig r s hyth m s p attern analog modeling synth *Separat erhältlich SYSTEMANFORDERUNGEN Hinweis: Computer nicht für Mixer Betrieb erforderlich. • Mac - Alesis MultiMix 16 USB FX | User Guide - Page 35
zu reduzieren, bewahren Sie das Netzteil des MultiMix 16 USB FX nicht in der Nähe des Gitarrenkabels oder der Kanaleingänge des MultiMix 16 USB FX auf. y Sie können die Endkappen des Mixers mit einem 3mm-Inbusschlüssel entfernen. Damit Ihr MultiMix 16 USB FX Audiodaten an Ihren Computer senden und - Alesis MultiMix 16 USB FX | User Guide - Page 36
klicken Sie auf das "Support"-Menü und wählen Software so zu konfigurieren, dass sie mit Ihrem Mixer aufnehmen können. 1. Öffnen Sie Cubase LE Sie aus den Menüs Geräte Geräte-Setup. 3. Im Geräte-Setup klicken Sie auf VST Audio System. 4. und vergewissern Sie sich, dass USB Audio CODEC als Eingabe- und - Alesis MultiMix 16 USB FX | User Guide - Page 37
einen kurzen Test durch und beenden die Aufnahme. 16. Springen Sie zurück zum Anfang des Tracks die Software so zu konfigurieren, dass Sie mit Ihrem Mixer aufnehmen können. 1. Öffnen Sie Cubase LE 6. äte-Setups wählen Sie USB Audio Codec. Klicken Sie auf OK. 5. Wählen Sie anschließend USB Audio - Alesis MultiMix 16 USB FX | User Guide - Page 38
18 18 18 18 18 18 17 17 17 17 17 17 17 17 17 17 17 17 37 1. POWER-LED - Leuchtet, wenn der MultiMix 16 USB FX eingeschaltet ist. 2. PHANTOMSPEISUNG POWER-LED - Leuchtet, wenn die Phantomspeisung eingeschaltet ist. 3. HAUPTAUSGANG - Verwenden Sie handelsübliche 1/4"-Kabel, um diesen Ausgang an Ihre - Alesis MultiMix 16 USB FX | User Guide - Page 39
an. 13. INSERT - Mit der Insert-Buchse können Sie einen Kompressor, EQ oder jeden beliebigen Signalprozessor zwischen den Vorverstärker des MultiMix 16 USB FX und den A/D-Wandler einschleifen. Verwenden Sie ein handelsübliches 1/4"-TRS-Kabel, um ein Gerät linken als auch am rechten Kanal zu hören - Alesis MultiMix 16 USB FX | User Guide - Page 40
. 34. 2 TRKS/USB TO MAIN - Schaltet das Signal des Computers und der 2-TRACK EINGÄNGE zum HAUPTAUSGANG. 35. 2 TRKS/USB TO MONITOR - Schaltet das REN SIE DIE EFFEKTE EINES KANALS: Drehen Sie FX POST SEND (28) für diesen Kanal auf. Drehen Sie anschließend den Regler FX RETURN (32) auf. Drücken Sie - Alesis MultiMix 16 USB FX | User Guide - Page 41
SPECIFICATIONS POWER SUPPLY: 18V AC, 700mA INPUT CHANNELS: MIC INPUT Sensitivity Range: -69dBu to -19dBu nominal, +18dBu maximum LINE INPUT Sensitivity Range: -49dBu to -+1dBu nominal, +18dBu maximum MIC INPUT / LINE INPUT Gain Range: -∞ to +20dB EQUALIZATION: AUX SENDS: AUX RETURNS: CHANNEL - Alesis MultiMix 16 USB FX | User Guide - Page 42
- Alesis MultiMix 16 USB FX | User Guide - Page 43
- Alesis MultiMix 16 USB FX | User Guide - Page 44
www.alesis.com 7-51-0389-B
-
 1
1 -
 2
2 -
 3
3 -
 4
4 -
 5
5 -
 6
6 -
 7
7 -
8
-
9
-
10
-
11
-
12
-
13
-
14
-
15
-
16
-
17
-
18
-
19
-
20
-
21
-
22
-
23
-
24
-
25
-
26
-
27
-
28
-
29
-
30
-
31
-
32
-
33
-
34
-
35
-
36
-
37
-
38
-
39
-
40
-
41
-
42
-
43
-
44
 |
 |

USER GUIDE
ENGLISH ( 3 – 9 )
GUÍA DEL USUARIO
ESPAÑOL ( 10 – 17 )
GUIDE D’UTILISATION
FRANÇAIS ( 18 – 25 )
GUIDA PER L'USO
ITALIANO ( 26 – 33 )
BENUTZERHANDBUCH
DEUTSCH ( 34 – 40 )