Alpine INA-W900BT Owner's Manual (English) - Page 21
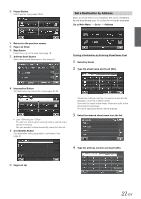
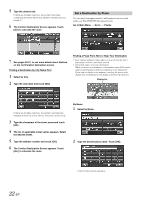
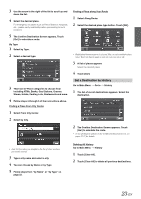
From the Map Display, Setting a Destination
 |
UPC - 793276100276
View all Alpine INA-W900BT manuals
Add to My Manuals
Save this manual to your list of manuals |
Page 21 highlights
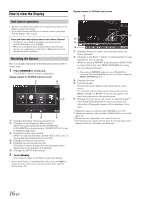
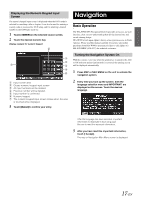
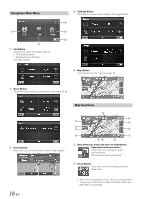
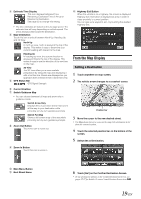
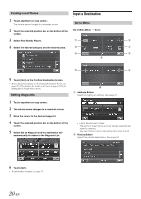
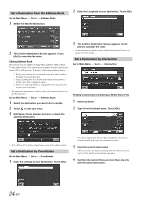
Estimate Time Display This icon displays Estimated Time Remaining, Estimated Time of Arrival or Direction to Destination. See page 32 to change this setting. • The time estimates are based on the average speed. The estimate time will vary depending on vehicle speed. The arrow always points toward the destination. Map Orientation Touch this icon to switch between North Up, Heading Up and 3D View. North Up In north up view, north is always at the top of the display. This makes it easy to determine your current heading with respect to the map. Heading Up In heading-up view, the current direction is always pointing to the top of the display. This makes it easy to see the direction of the next turn on the map. 3D View The 3D View offers you a more realistic perspective by tilting the map and displaying it with a horizon line. Streets are displayed as you approach them instead of from a birds-eye view. GPS Status Bar GPS Signal Strength Current Position Switch Guidance Map • You can choose between full map and arrow only in guidance mode. Switch Arrow Only Displays three successive arrow maneuvers all the way to your destination while providing turn-by-turn guidance prompts. Switch Full Map Shows a full-screen map of the area while providing turn-by-turn guidance prompts. Zoom Out Button Touch this icon to zoom out. Highway Exit Button When the vehicle is on a Highway, the screen is displayed. Highway exit information is displayed as a list in order of close proximity to current position. You can also set a waypoint, etc., by touching the desired Highway Exit. From the Map Display Setting a Destination 1 Touch anywhere on map screen. 2 The vehicle arrow changes to a crosshair cursor. Position bar 3 Move the cursor to the new desired street. • Use Map Zoom button to zoom out the map if the destination is far from the current location. 4 Touch the selected position bar on the bottom of the screen. 5 Select Set as Destination. Zoom In Button Touch this icon to zoom in. Main Menu Button Next Street Name 6 Touch [Go!] on the Confirm Destination Screen. • To use destination options on the Confirm Destination Screen, see pages 25-27 for details. To cancel, touch Previous Screen icon . 19-EN
-
 1
1 -
2
-
3
-
4
-
5
-
6
-
7
-
8
-
9
-
10
-
11
-
12
-
13
-
14
-
15
-
 16
16 -
 17
17 -
 18
18 -
 19
19 -
 20
20 -
 21
21 -
 22
22 -
 23
23 -
 24
24 -
 25
25 -
 26
26 -
27
-
28
-
29
-
30
-
31
-
32
-
33
-
34
-
35
-
36
-
37
-
38
-
39
-
40
-
41
-
42
-
43
-
44
-
45
-
46
-
47
-
48
-
49
-
50
-
51
-
52
-
53
-
54
-
55
-
56
-
57
-
58
-
59
-
60
-
61
-
62
-
63
-
64
-
65
-
66
-
67
-
68
-
69
-
70
-
71
-
72
-
73
-
74
-
75
-
76
-
77
-
78
-
79
-
80
-
81
-
82
-
83
-
84
-
85
-
86
-
87
-
88
-
89
-
90
-
91
-
92
-
93
-
94
-
95
-
96
-
97
-
98
-
99
-
100
-
101
 |
 |