Alpine INA-W900BT Owner's Manual (English) - Page 56
Setting the External Device Interrupt Mode, Setting the Interrupt Icon Display - aux input
 |
UPC - 793276100276
View all Alpine INA-W900BT manuals
Add to My Manuals
Save this manual to your list of manuals |
Page 56 highlights
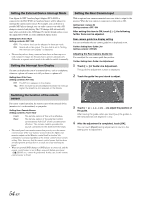
Setting the External Device Interrupt Mode If an Alpine Ai-NET Auxiliary Input Adapter (KCA-801B) is connected to the INA-W900, an Auxiliary Source will be allowed to interrupt the current audio source. For example, you can listen to a portable MP3 player through your car audio system even with a CD changer connected and playing. The CD changer will automatically mute when switched to the AUX Input. For further details on how to use the Alpine KCA-801B, see your authorized Alpine dealer. Setting item: IN Int. Mute Setting contents: OFF / ON OFF: The volume level can be adjusted in Interrupt mode. ON: Sound will not be output. The icon that is set in "Setting the Interrupt Icon Display" is displayed. • The auxiliary device being connected must have an Interrupt wire with a negative trigger for this function to operate automatically. Otherwise, a separate switch needs to be added to switch it manually. Setting the Interrupt Icon Display The unit can display the icon of an external device, such as a telephone, whenever a phone call comes in to tell you there is a phone call. Setting item: IN Int. Icon Setting contents: INT / TEL INT: The INT icon appears on the display. TEL: When the external device (telephone) sends the interrupt signal, the telephone icon appears on the display. Setting the Rear Camera Input With an optional rear camera connected, rear view video is output to the monitor. When the rear camera is connected, set this item to ON. Setting item: Camera IN Setting contents: OFF / ON After setting this item to ON, touch [ ], the following further items can be adjusted. Rear camera guide line display setting You can set whether the rear camera guide line is displayed or not. Further Setting item: Guide Line Setting contents: OFF/ON Adjusting the Rear Camera Guide line You can adjust the rear camera guide line position Further Setting item: Guide Line Adjustment 1 Touch [ ] of Guide Line Adjustment. The guide line adjustment screen is displayed. 2 Touch the guide line you intend to adjust. Switching the function of the remote sensor For remote control operation, the remote sensor of the external device (monitor, etc.) can be switched, as you prefer. Setting item: Remote Sensor Setting contents: Front / Rear Front: Rear: The remote sensor of this unit is effective. The remote sensor of the external monitor connected to AUX OUT of this unit becomes effective. The remote control operates the source connected to the AUX OUT terminals. • The touch panel rear monitor sensor has priority over the remote control sensor. If the rear monitor (connected to the Alpine rear monitor output via the Monitor control lead) is touched, the command is executed regardless of the remote control sensor switch setting. Note, however, that the remote control sensor that has been set takes priority if it has been 5 seconds since last touching the panel. • When an optional DVD changer or DVD player is connected, and the remote control sensor is set to Rear, some soft button operations ( [ ] STOP, etc.) cannot be performed. In this case, set the remote control sensor to Front. 3 Touch or [ ] to adjust the position of the guide. After moving the guide, when you touch [ ], the guides in the horizontal row are aligned in a row. 4 After the adjustment is completed, touch [OK]. You can touch [Reset] during adjustment to return to the setting prior to adjustment. 54-EN
-
 1
1 -
2
-
3
-
4
-
5
-
6
-
7
-
8
-
9
-
10
-
11
-
12
-
13
-
14
-
15
-
16
-
17
-
18
-
19
-
20
-
21
-
22
-
23
-
24
-
25
-
26
-
27
-
28
-
29
-
30
-
31
-
32
-
33
-
34
-
35
-
36
-
37
-
38
-
39
-
40
-
41
-
42
-
43
-
44
-
45
-
46
-
47
-
48
-
49
-
50
-
 51
51 -
 52
52 -
 53
53 -
 54
54 -
 55
55 -
 56
56 -
 57
57 -
 58
58 -
 59
59 -
 60
60 -
 61
61 -
62
-
63
-
64
-
65
-
66
-
67
-
68
-
69
-
70
-
71
-
72
-
73
-
74
-
75
-
76
-
77
-
78
-
79
-
80
-
81
-
82
-
83
-
84
-
85
-
86
-
87
-
88
-
89
-
90
-
91
-
92
-
93
-
94
-
95
-
96
-
97
-
98
-
99
-
100
-
101
 |
 |
