Alpine INA-W910 Owner's Manual (english) - Page 17

Getting Started, Accessory List, Location of Controls, Turning Power On or Off - antenna

Page 17 highlights

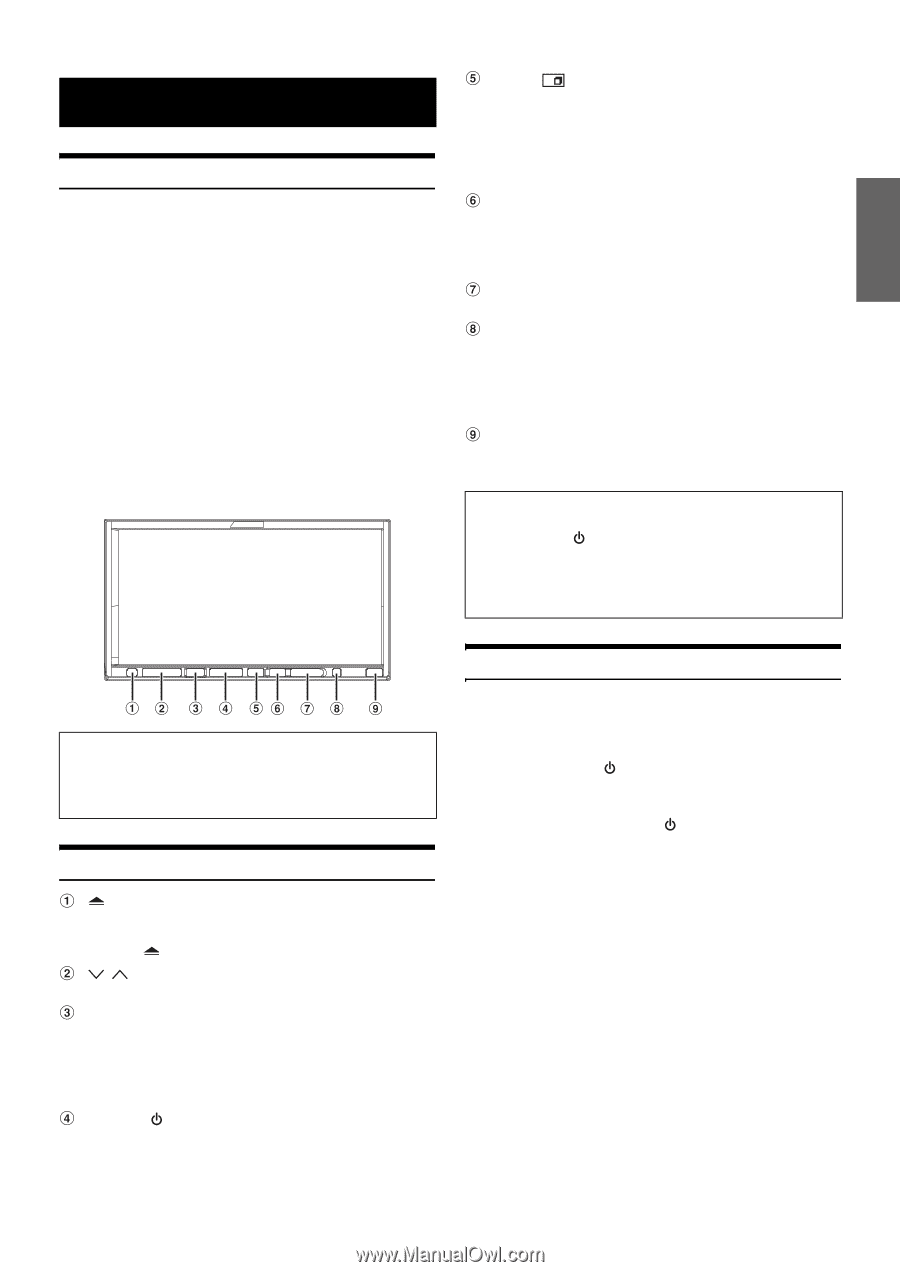
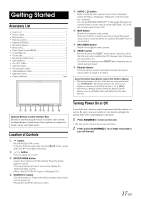
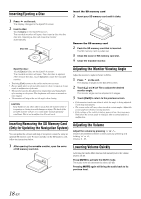
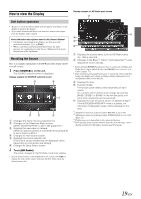
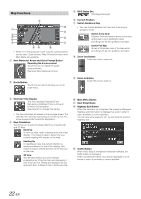
Getting Started Accessory List • Head unit 1 • Power cable 1 • Microphone 1 • Remote control 1 • Battery (CR2025 1 • Mounting sleeve 1 • Bracket key 2 • Flush Head Screw (M5x8 6 • Screw (M5×8 8 • Face plate 1 • Mounting Position Seal 2 • GPS Antenna 1 • Pre OUT Cable 1 • AUX I/O Cable 1 • AV extension cable 1 • USB extension cable 1 • USB 30P cable 1 • Owner's Manual 1 set AUDIO button Return to the AV main source screen that is displayed before the Setup, Navigation, Telephone, Camera mode, etc. is started. Turn on GUIDEVIEW WINDOW™ mode (page 33) when the current screen is audio source screen (HD Radio, CD, iPod, etc.). Press again to turn it off. MAP button Recall the navigation map screen. Press and hold for at least 2 seconds to recall the saved Jump Source channel. (When an optional SiriusXM Tuner is connected.) NAVI MENU button Recall the navigation menu screen. RESET switch Be sure to press the RESET switch when using the unit for the first time, after installing the CD changer, after changing the car battery, etc. Turn off the unit power, press RESET with a ballpoint pen or similar pointed object. Remote Sensor Point the remote control transmitter towards the remote sensor within a range of 2 meters. About the button descriptions used in this Owner's Manual • The buttons found on the face of the unit are expressed in bold (e.g. SOURCE/ ). The buttons found on the touch-screen display are shown in bold within brackets, [ ] (e.g. [Exit]). • This Owner's Manual explains mainly the function of soft buttons, when a soft button and a unit button have the same function. Optional Remote Control Interface Box This unit is operable using the vehicle's secondary radio controls. An Alpine Remote Control Interface Box (optional) is required. For details, contact your Alpine dealer. Location of Controls button Recalls the Eject/Tilt screen. If the disc does not eject after touching [Eject] of Disc, press and hold for at least 3 seconds. / button Press to adjust the volume. MUTE/PHONE button Lowers the volume by 20 dB instantly. Press the button again to cancel. Press and hold for at least 2 seconds to display the Telephone Menu screen. (When "BLUETOOTH IN" is set to ON (page 67). ) SOURCE/ button Turns the power on. Press and hold for at least 3 seconds to turn the power off. Recalls the SOURCE selection screen. Turning Power On or Off Some of this unit's functions cannot be performed while the vehicle is in motion. Be sure to stop your vehicle in a safe location and apply the parking brake, before attempting these operations. 1 Press SOURCE/ to turn on the unit. • The unit can be turned on by pressing any button. 2 Press and hold SOURCE/ for at least 3 seconds to turn off the unit. 17-EN

  • 1
  • 2
  • 3
  • 4
  • 5
  • 6
  • 7
  • 8
  • 9
  • 10
  • 11
  • 12
  • 13
  • 14
  • 15
  • 16
  • 17
  • 18
  • 19
  • 20
  • 21
  • 22
  • 23
  • 24
  • 25
  • 26
  • 27
  • 28
  • 29
  • 30
  • 31
  • 32
  • 33
  • 34
  • 35
  • 36
  • 37
  • 38
  • 39
  • 40
  • 41
  • 42
  • 43
  • 44
  • 45
  • 46
  • 47
  • 48
  • 49
  • 50
  • 51
  • 52
  • 53
  • 54
  • 55
  • 56
  • 57
  • 58
  • 59
  • 60
  • 61
  • 62
  • 63
  • 64
  • 65
  • 66
  • 67
  • 68
  • 69
  • 70
  • 71
  • 72
  • 73
  • 74
  • 75
  • 76
  • 77
  • 78
  • 79
  • 80
  • 81
  • 82
  • 83
  • 84
  • 85
  • 86
  • 87
  • 88
  • 89
  • 90
  • 91
  • 92
  • 93
  • 94
  • 95
  • 96
  • 97
  • 98
  • 99
  • 100
  • 101
  • 102
  • 103
  • 104
  • 105
  • 106
  • 107
  • 108
  • 109
  • 110
  • 111
  • 112
  • 113
  • 114
  • 115
  • 116
  • 117
  • 118
  • 119
  • 120
  • 121
  • 122
  • 123
  • 124
  • 125
  • 126
  • 127
  • 128
  • 129
  • 130
  • 131

17
-EN
Accessory List
Head unit
.............................................................................
1
Power cable
.........................................................................
1
Microphone
..........................................................................
1
Remote control
....................................................................
1
Battery (CR2025)
.................................................................
1
Mounting sleeve
..................................................................
1
Bracket key
..........................................................................
2
Flush Head Screw (M5x8)
...................................................
6
Screw (M5×8)
......................................................................
8
Face plate
............................................................................
1
Mounting Position Seal
........................................................
2
GPS Antenna
.......................................................................
1
Pre OUT Cable
....................................................................
1
AUX I/O Cable
.....................................................................
1
AV extension cable
..............................................................
1
USB extension cable
...........................................................
1
USB 30P cable
....................................................................
1
Owner’s Manual
.............................................................
1 set
Location of Controls
button
Recalls the Eject/Tilt screen.
If the disc does not eject after touching
[Eject]
of Disc, press
and hold
for at least 3 seconds.
/
button
Press to adjust the volume.
MUTE/PHONE button
Lowers the volume by 20 dB instantly. Press the button
again to cancel.
Press and hold for at least 2 seconds to display the
Telephone Menu screen.
(When “BLUETOOTH IN” is set to ON (page 67). )
SOURCE/
button
Turns the power on. Press and hold for at least 3 seconds to
turn the power off.
Recalls the SOURCE selection screen.
AUDIO
button
Return to the AV main source screen that is displayed
before the Setup, Navigation, Telephone, Camera mode,
etc. is started.
Turn on GUIDEVIEW WINDOW™ mode (page 33) when the
current screen is audio source screen (HD Radio, CD, iPod,
etc.). Press again to turn it off.
MAP button
Recall the navigation map screen.
Press and hold for at least 2 seconds to recall the saved
Jump Source channel. (When an optional SiriusXM Tuner is
connected.)
NAVI MENU button
Recall the navigation menu screen.
RESET switch
Be sure to press the
RESET
switch when using the unit for
the first time, after installing the CD changer, after changing
the car battery, etc.
Turn off the unit power, press
RESET
with a ballpoint pen or
similar pointed object.
Remote Sensor
Point the remote control transmitter towards the remote
sensor within a range of 2 meters.
Turning Power On or Off
Some of this unit’s functions cannot be performed while the vehicle is in
motion. Be sure to stop your vehicle in a safe location and apply the
parking brake, before attempting these operations.
1
Press
SOURCE
/
to turn on the unit.
The unit can be turned on by pressing any button.
2
Press and hold
SOURCE
/
for at least 3 seconds to
turn off the unit.
Getting Started
Optional Remote Control Interface Box
This unit is operable using the vehicle’s secondary radio controls.
An Alpine Remote Control Interface Box (optional) is required. For
details, contact your Alpine dealer.
About the button descriptions used in this Owner’s Manual
The buttons found on the face of the unit are expressed in bold
(e.g.
SOURCE/
). The buttons found on the touch-screen
display are shown in bold within brackets, [ ] (e.g.
[Exit]
).
This Owner’s Manual explains mainly the function of soft
buttons, when a soft button and a unit button have the same
function.