Alpine INA-W910 Owner's Manual (english) - Page 79
Using the Pro Logic II Mode, X-OVER Adjustment, Performing Time Correction Manually (Time Correction)
 |
View all Alpine INA-W910 manuals
Add to My Manuals
Save this manual to your list of manuals |
Page 79 highlights
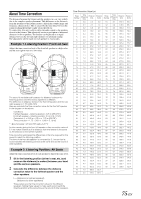
Using the Pro Logic II Mode Pro Logic processing can be conducted on the music signals recorded on two channels to achieve Dolby Pro Logic II surround sound. For two-channel Dolby Digital and DTS signals, there is also a "Rear Fill" function for outputting the signals of the front channel to the rear channel. Setting items: Dolby PLII / Rear Fill Touch [ ] or [ ] of Dolby PLII / Rear to select the desired mode. PL II Movie: PL II Music: OFF: Suits the stereo TV shows and all programs encoded in Dolby Surround. It improves the sound field directivity to near that of discrete 5.1-channel sound. Can be used for all stereo music recordings, and provides a wide, deep sound field. Turns Dolby PL II function to OFF. If PL II Music is selected, the center width can be adjusted with following operations. This function offers the optimum vocal position by adjusting the center channel position between the center speaker and the L/R speaker. (The adjustments established in "Adjusting the acoustic image (Bi-Phantom)" (page 81) are ineffective while this function is activated.) Touch [ ] or [ ] of Center Width Cont. to adjust the level. The level can be adjusted between 0 to +7. When the level increases, the center channel position moves from the center speaker position to both sides. Touch [Off] of Center Width Cont. to turn off the center width control. • This adjustment is effective when the setting of the center speaker is Small or Large in the Speaker Setup (page 82). • "Rear Fill" function: Depending on the input signals, the sound may only be output from the front speakers. In this case, the "Rear Fill" function can be used to output signals from the rear speakers as well. • Avoid stopping, pausing, switching the disc, cueing, fast-forwarding or switching the audio channel of this unit while making this adjustment. The setting is canceled if the Decode mode is switched. • This adjustment is ineffective when the speaker is set Center to OFF in "Setting the Speakers" (page 81). • This function only works with two-channel signals. This operation is ineffective when 5.1-channel DTS or Dolby Digital signals are input. • If the setting of Rear Fill is made when Rear Mix is ON, sound is unchanged in the Rear Fill setting because Rear Mix is given priority during 2 channel decoder other than linear PCM. • For linear PCM signals, the voice is output from the rear speaker regardless of the Rear Fill and Rear Mix setting. X-OVER Adjustment Setting item: X-Over 1 Touch [ ] or [ ] of X-Over to select L+R or L/R. L+R: L/R: Sets the same adjustment values for the left and right channels. Different adjustment values can be set for the left and right channels. 2 Touch the title bar of X-Over. A speaker list on the X-Over screen is displayed. 3 Touch the title bar of the speaker to be adjusted. The screen changes to the X-Over screen to be adjusted. 4 Adjust the crossover to your preference. Selecting the Cut-Off Frequency Touch [ ] or [ ] of Freq., then select the cut-off frequency (crossover point). The adjustable bandwidth differs depending on the speaker (channel). Adjusting the Level Touch [ ] or [ ] of Level, then adjust the HPF or LPF level. Adjusting the Slope Touch [ ] or [ ] of Slope, then adjust the HPF or LPF slope. • When the speaker is set to the "OFF" mode, the X-Over for that speaker cannot be set. Refer to "Setting the Speakers" (page 81). • Check the playback frequencies of the connected speakers before adjusting. • In order to protect the speakers, there is no OFF setting for the subwoofer low pass filter (the slope remains the same). • The HPF cannot be set Slope to OFF if Tweeter (TW) is selected for Front1. Or, only the subwoofer is adjustable if Stereo is selected for the subwoofer. Performing Time Correction Manually (Time Correction) Because of the particular conditions inside the vehicle, there can be major differences in the distances between the various speakers and the listening position. It is possible to calculate the optimum correction values and eliminate the time error at the listening position yourself using this function. Setting item: Time Correction 1 Sit in the listening position (the driver's seat, for example) and measure the distance (in meters) between your head and the various speakers. 2 Calculate the difference in distance between the farthest speaker and the other speakers. L = (distance of farthest speaker) - (distance of other speakers) 3 Divide the distances calculated for the different speakers by the speed of sound (343 m/s temperature 20 °C). This value is the time correction value for the various speakers. 79-EN
-
 1
1 -
2
-
3
-
4
-
5
-
6
-
7
-
8
-
9
-
10
-
11
-
12
-
13
-
14
-
15
-
16
-
17
-
18
-
19
-
20
-
21
-
22
-
23
-
24
-
25
-
26
-
27
-
28
-
29
-
30
-
31
-
32
-
33
-
34
-
35
-
36
-
37
-
38
-
39
-
40
-
41
-
42
-
43
-
44
-
45
-
46
-
47
-
48
-
49
-
50
-
51
-
52
-
53
-
54
-
55
-
56
-
57
-
58
-
59
-
60
-
61
-
62
-
63
-
64
-
65
-
66
-
67
-
68
-
69
-
70
-
71
-
72
-
73
-
 74
74 -
 75
75 -
 76
76 -
 77
77 -
 78
78 -
 79
79 -
 80
80 -
 81
81 -
 82
82 -
 83
83 -
 84
84 -
85
-
86
-
87
-
88
-
89
-
90
-
91
-
92
-
93
-
94
-
95
-
96
-
97
-
98
-
99
-
100
-
101
-
102
-
103
-
104
-
105
-
106
-
107
-
108
-
109
-
110
-
111
-
112
-
113
-
114
-
115
-
116
-
117
-
118
-
119
-
120
-
121
-
122
-
123
-
124
-
125
-
126
-
127
-
128
-
129
-
130
-
131
 |
 |
