Alpine IVA W205 Owners Manual - Page 37
SYSTEM Setup - bluetooth
 |
UPC - 093276200588
View all Alpine IVA W205 manuals
Add to My Manuals
Save this manual to your list of manuals |
Page 37 highlights
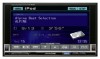
SYSTEM Setup System Setup Operation To display the System mode screen: To watch a video source, your vehicle must be parked with the ignition key in the ACC or ON position. To do this, follow the procedure below. 1 Bring your vehicle to a complete stop at a safe location. Engage the parking brake. 2 Keep pushing the foot brake and release the parking brake once then engage it again. 3 When the parking brake is engaged for the second time, release the foot brake. • For automatic transmission vehicles, place the transmission lever in the Park position. Now, the locking system for the System mode operation has been released. Engaging the parking brake can reactivate the System mode, as long as the car's ignition has not been turned off. It is not necessary to repeat the above procedure (1 through 3) of "To display the System mode screen." Each time the ignition is turned OFF, perform the procedure of "To display the System mode screen." The following steps 1 to 4 are common operations to each "Setting item" of SYSTEM Setup. Refer to each section for details. 1 Touch [SETUP] on the main source screen. The SETUP selection screen is displayed. 2 Touch [SYSTEM]. The SYSTEM SETUP screen appears. 3 Touch [ ], [ ] or [OFF], [ON], etc., of the desired item to change its setting. Setting items: IN INT. MUTE / IN INT. ICON / REMOTE SENSOR*4 / CAMERA IN / NAV. IN / NAV. MIX*5 / AUX IN / AUX IN LEVEL*1 / AUX OUT / BLUETOOTH IN / USB ADAPTER / VISUAL KEY*2 / CUSTOMISE KEY / OPTICAL OUT / SUBWOOFER*3 *1 Not displayed when OFF is set in "Setting the AUX Mode" (page 36). *2 Not displayed when OFF is set in "Setting the Navigation Mode" (page 36). *3 Not displayed when an external audio processor is connected. *4 When ON is set in "Setting the Picture Output" (page 36), the item is displayed. *5 When ON is set in "Setting the Navigation Mode" (page 36), the item is displayed. 4 Touch [RETURN] to return to the previous screen. Touch and hold [RETURN] for at least 2 seconds to return to the main source screen that was displayed before the setup operation was started. • Immediately after changing the settings of System Mode (while the system is writing data automatically) do not turn the ignition key (engine key) to OFF. Otherwise, the settings may not be changed. Setting the External Device Interrupt Mode If an Alpine Ai-NET Auxiliary Input Adapter (KCA-801B) is connected to the IVA-W205, an Auxiliary Source will be allowed to interrupt the current audio source. For example, you can listen to a portable MP3 player through your car audio system even with a CD changer connected and playing. The CD changer will automatically mute when switched to the AUX Input. For further details on how to use the Alpine KCA-801B, see your authorized Alpine dealer. Setting item: IN INT. MUTE Setting contents: OFF / ON OFF: The volume level can be adjusted in Interrupt mode. ON: Sound will not be output. The icon that is set in "Setting the Interrupt Icon Display" is displayed. • The auxiliary device being connected must have an Interrupt wire with a negative trigger for this function to operate automatically. Otherwise, a separate switch needs to be added to switch it manually. Setting the Interrupt Icon Display The unit can display the icon of an external device, such as a telephone, whenever a phone call comes in to tell you there is a phone call. Setting item: IN INT. ICON Setting contents: INT / TEL INT: The INT icon appears on the display. TEL: When the external device (telephone) sends the interrupt signal, the telephone icon appears on the display. Switching the function of the remote sensor For remote control operation, the remote sensor of the external device (monitor, etc.) can be switched, as you prefer. Setting item: REMOTE SENSOR Setting contents: FRONT / REAR FRONT: REAR: The remote sensor of this unit is effective. The remote sensor of the external monitor connected to AUX OUT of this unit becomes effective. The remote control operates the source connected to the AUX OUT terminals. • The touch panel rear monitor sensor has priority over the remote control sensor. If the rear monitor (connected to the Alpine rear monitor output via the Monitor control lead) is touched, the command is executed regardless of the remote control sensor switch setting. Note, however, that the remote control sensor that has been set takes priority if it has been 5 seconds since last touching the panel. • When an optional DVD changer or DVD player is connected, and the remote control sensor is set to REAR, some soft button operations ( [ ] STOP, etc.) cannot be performed. In this case, set the remote control sensor to FRONT. 35-EN
-
 1
1 -
2
-
3
-
4
-
5
-
6
-
7
-
8
-
9
-
10
-
11
-
12
-
13
-
14
-
15
-
16
-
17
-
18
-
19
-
20
-
21
-
22
-
23
-
24
-
25
-
26
-
27
-
28
-
29
-
30
-
31
-
 32
32 -
 33
33 -
 34
34 -
 35
35 -
 36
36 -
 37
37 -
 38
38 -
 39
39 -
 40
40 -
 41
41 -
 42
42 -
43
-
44
-
45
-
46
-
47
-
48
-
49
-
50
-
51
-
52
-
53
-
54
-
55
-
56
-
57
-
58
-
59
-
60
-
61
-
62
-
63
-
64
-
65
-
66
-
67
-
68
-
69
-
70
-
71
-
72
-
73
-
74
-
75
-
76
-
77
-
78
-
79
-
80
-
81
-
82
-
83
-
84
-
85
-
86
-
87
-
88
-
89
-
90
-
91
-
92
-
93
-
94
-
95
-
96
-
97
-
98
-
99
-
100
-
101
-
102
-
103
-
104
-
105
-
106
-
107
-
108
-
109
-
110
-
111
-
112
-
113
-
114
-
115
-
116
-
117
-
118
-
119
-
120
-
121
-
122
-
123
-
124
-
125
-
126
-
127
-
128
-
129
-
130
-
131
-
132
-
133
-
134
-
135
-
136
-
137
-
138
-
139
-
140
-
141
-
142
-
143
-
144
-
145
-
146
-
147
-
148
-
149
-
150
-
151
-
152
-
153
-
154
-
155
-
156
-
157
-
158
-
159
-
160
-
161
-
162
-
163
-
164
-
165
-
166
-
167
-
168
-
169
-
170
-
171
-
172
-
173
-
174
-
175
-
176
-
177
-
178
-
179
-
180
-
181
-
182
-
183
-
184
-
185
-
186
-
187
-
188
-
189
-
190
-
191
-
192
-
193
-
194
-
195
-
196
-
197
-
198
-
199
-
200
-
201
-
202
-
203
-
204
-
205
-
206
-
207
-
208
-
209
-
210
-
211
-
212
-
213
-
214
-
215
-
216
-
217
-
218
-
219
-
220
-
221
-
222
-
223
-
224
-
225
-
226
-
227
-
228
-
229
-
230
-
231
-
232
-
233
-
234
-
235
-
236
-
237
-
238
 |
 |