Alpine KTX-H12 Installation Manual
Alpine KTX-H12 Manual
 |
View all Alpine KTX-H12 manuals
Add to My Manuals
Save this manual to your list of manuals |
Alpine KTX-H12 manual content summary:
- Alpine KTX-H12 | Installation Manual - Page 1
, Failing to do so could lead to damaged equipment or an accident. Alpine Electronics bears no responsibility for problems that arise as a result of failure to follow the instructions in the manual. ˜ Make sure enclosure is secured to the vehicle. Failing to do so can lead to electric shock, injury - Alpine KTX-H12 | Installation Manual - Page 2
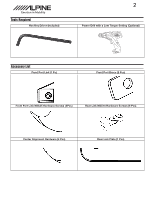
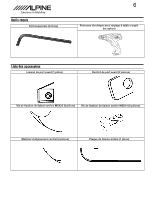
Tools Required Hex Key Driver (Included) 2 Power Drill with a Low Torque Setting (Optional) Accessory List Front Port Link (1 Pc) Front Port Brace (2 Pcs) Front Port Link M5X25 Hardware Screws (4Pcs) Rear Link M5X14 Hardware Screws (8 Pcs) Center Alignment Hardware (4 Pcs) Rear Link Plate (1 - Alpine KTX-H12 | Installation Manual - Page 3
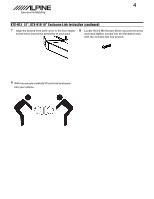
3 KTX-H12 12", KTX-H10 10" Enclosure Link Instruction 1 By hand tighten (2) threaded center alignment dowels into each enclosure. (4 Total) 2 Slide both enclosures together nesting the center alignment dowels into the opposing enclosure snugly. 3 - Alpine KTX-H12 | Installation Manual - Page 4
4 KTX-H12 12", KTX-H10 10" Enclosure Link Instruction (continued) 7 Align the braced front port cover to the four empty screw holes around the perimeter of each port 8 Locate the (4) M5 Screws 25mm you - Alpine KTX-H12 | Installation Manual - Page 5
vous risquez d'endommager l'équipement ou de provoquer un accident. Alpine Electronics n'est en aucun cas responsable des problèmes liés au non-respect des instructions indiquées dans le mode d'emploi. ˜ Assurez-vous que le caisson est bien fixé au véhicule. Le non-respect de cette consigne peut - Alpine KTX-H12 | Installation Manual - Page 6
Outils requis Clé hexagonale (incluse) 6 Perceuse électrique avec réglage à faible couple (en option) Liste des accessoires Liaison de port avant (1 pièce) Renfort de port avant (2 pièces) Vis de fixation de liaison arrière M5X25 (4 pièces) Vis de fixation de liaison arrière M5X14 (8 pièces) - Alpine KTX-H12 | Installation Manual - Page 7
7 Instructions pour liaison du caisson KTX-H12 de 12 po, KTX-H10 de 10 po 1 Serrez à caisson. (4 au total) centrales dans le caisson opposé. 3 À l'arrière des boîtiers combinés, alignez le support de liaison arrière pour qu'il soit en affleurement dans la zone encastrée. 4 Prenez (8) vis M5 de - Alpine KTX-H12 | Installation Manual - Page 8
8 Instructions pour liaison du caisson KTX-H12 de 12 po, KTX-H10 de 10 po (suite) 7 Alignez le couvercle de port avant renforcé sur les quatre
-
 1
1 -
 2
2 -
 3
3 -
 4
4 -
 5
5 -
 6
6 -
 7
7 -
8
 |
 |

KTX-H12 & KTX-H10 Linking Kit Installation Manual
Compatible with the following models:
R-SB12V, R-SB10V, S-SB12V, S-SB10V
Introduction
Congratulations on purchasing the KTX-H12 or H10. This installation manual is designed to take you through the
step-by-step installation of the linking your ‘R’ or ‘S’ Series Halo Enclosures Together. Please familiarize yourself with
the owners manual and if you still have additional questions please call 1-800-TECH-101.
Note: To ensure safe use, Always follow these precautions.
The installation of this product requires specialized skills and experience. We recommend that you have the product
installed by an Alpine authorized dealer.
Before you use this product, be sure to carefully read this installation manual so that you can use the product
correctly, Failing to do so could lead to damaged equipment or an accident.
Alpine Electronics bears no responsibility
for problems that arise as a result of failure to follow the instructions in the manual.
±
Make sure enclosure is secured to the vehicle. Failing to do so can lead to electric shock, injury or damage to
equipment.
±
When making a hole in the vehicle body, be careful to avoid damaging pipes, the fuel tank, electrical wiring,
and the like. This kind of damage could lead to an accident or fire.
±
Do not install the product where it may be exposed to water or in a place with high levels of humidity or dust.
Doing so could lead to fire or damaged equipment.
±
Start all screw threads by hand and avoid overtourqing screws, failure to do so may damage your equipment.
1
±
I
f using the KTE-10G, or KTE-12G Grille Kit do not use the supplied wood screws, instead use the 40mm
machine screws pre-installed with the enclosure.