Alpine R2-DB8V-TRK Owners Manual
Alpine R2-DB8V-TRK Manual
 |
View all Alpine R2-DB8V-TRK manuals
Add to My Manuals
Save this manual to your list of manuals |
Alpine R2-DB8V-TRK manual content summary:
- Alpine R2-DB8V-TRK | Owners Manual - Page 1
the product correctly, Failing to do so could lead to damaged equipment or an accident. Alpine Electronics bears no responsibility for problems that arise as a result of failure to follow the instructions in the manual. ˜ Make sure enclosure is secured to the vehicle. Failing to do so can lead to - Alpine R2-DB8V-TRK | Owners Manual - Page 2
Tools Required Hex Key Driver (2pcs. included) Power Drill with a Low Torque Setting (Optional) 4mm 3mm Note: Use Hex Key Drivers for Enclosure feet, Front/Rear brackets and amp tray: Failure do so could result in damage to the enclosure. Note: Power Drill for Subwoofer and Amplifier - Alpine R2-DB8V-TRK | Owners Manual - Page 3
1 Installation screws are temporarily installed in both driver and passenger side enclosures. Remove all screws to prepare for assembly. Stacking feet screws Stacking feet screws Rear bracket screws Driver side Passenger side 2 If applicable, attach inner amp tray brackets using supplied - Alpine R2-DB8V-TRK | Owners Manual - Page 4
7 Align front cover and trim bars, then install with supplied M5x20mm screws (4pcs, 4mm hex drive). Front cover Trim bars Recommended configuration for specific vehicles Table 1: Recommended vehicle settings Vehicle 2015+ F-150 2018+ Silverado/Sierra 2007+ Wrangler 2018+ RAM Width 51" (max) 51" ( - Alpine R2-DB8V-TRK | Owners Manual - Page 5
d'installation des enceintes pour camions R/S-DB8V-TRK Compatibles avec les modèles suivants : R2-W8D2 S-W8D2 Introduction Félicitations pour votre achat de ces enceintes pour camions. Le présent guide d'installation est conçu pour vous guider pas à pas dans l'installation des enceintes ventilées - Alpine R2-DB8V-TRK | Owners Manual - Page 6
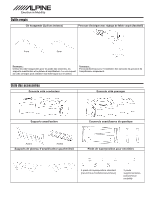
Perceuse électrique avec réglage de faible couple (facultatif) 4mm 3mm Remarque : Utilisez les clés hexagonales pour les pieds des enceintes, les supports avant/arrière et le plateau d'amplificateur : Le non-respect de cette consigne peut entraîner des dommages aux enceintes. Remarque : Perceuse - Alpine R2-DB8V-TRK | Owners Manual - Page 7
20 mm (4 pièces) fournies, comme montré. Mise en garde : Pour éviter d'endommager les enceintes, utilisez les clés hexagonales fournies pour installer le support avant. Support arrière 5 Installez les pieds, comme montré, à l'aide des vis M5 x 60 mm (6 pièces) et des rondelles M5 x 20 mm (6 pièces - Alpine R2-DB8V-TRK | Owners Manual - Page 8
7 Alignez le couvercle avant et les barres de garniture, puis installez-les à l'aide des vis M5 x 20 mm fournies (4 pièces, clé hexagonale de 4 mm). Couvercle avant Barres de garniture Configuration recommandée pour des véhicules spécifiques Tableau 1 : Réglages recommandés pour les véhicules Vé
-
 1
1 -
 2
2 -
 3
3 -
 4
4 -
 5
5 -
 6
6 -
 7
7 -
8
 |
 |

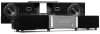
R/S-DB8V-TRK Truck Enclosure Installation Manual
Compatible with the following models:
R2-W8D2
S-W8D2
Introduction
Congratulations on purchasing this truck enclosure. This installation manual is designed to take you through the step-
by-step installation of the ‘R’ or ‘S’ Series Dual 8” Subwoofer Vented Enclosure for Trucks. Please familiarize yourself
with the owners manual and if you still have additional questions please contact our support team at 1-800-TECH-
101.
Note: To ensure safe use, Always follow these precautions.
The installation of this product requires specialized skills and experience. We recommend that you have the product
installed by an Alpine authorized dealer.
Before you use this product, be sure to carefully read this installation manual so that you can use the product
correctly, Failing to do so could lead to damaged equipment or an accident. Alpine Electronics bears no responsibility
for problems that arise as a result of failure to follow the instructions in the manual.
±
Make sure enclosure is secured to the vehicle. Failing to do so can lead to electric shock, injury or damage to
equipment.
±
When making a hole in the vehicle body, be careful to avoid damaging pipes, the fuel tank, electrical wiring,
and the like. This kind of damage could lead to an accident or fire.
±
Do not install the product where it may be exposed to water or in a place with high levels of humidity or dust.
Doing so could lead to fire or damaged equipment.
±
Start all screw threads by hand and avoid overtourqing screws, failure to do so may damage your equipment.
±
Matching Alpine mono ampliers are sold separately - check with an Alpine authorized dealer.
Recommended Amplifier settings
R-A75M amp
S-A60M amp
Gain=1 o’clock position
LP Filter=70Hz
Bass EQ=0 (Off)
Subsonic Filter=30Hz
Gain=1 o’clock position
LP Filter=70Hz
Bass EQ=0 (Off)
(Note: If available with your HU/DSP -
We recommend a Subsonic filter, if possible
with Fc=30Hz @-24dB/Oct.)