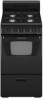
Amana AGG222VDB Installation Instruction
Amana AGG222VDB Manual
 |
UPC - 883049215907
View all Amana AGG222VDB manuals
Add to My Manuals
Save this manual to your list of manuals |
Amana AGG222VDB manual content summary:
- Amana AGG222VDB | Installation Instruction - Page 1
INSTALLATION INSTRUCTIONS 20" (50.8 CM) FREESTANDING GAS RANGE with standard clean oven INSTRUCCIONES DE INSTALACIÓN ESTUFA AUTÓNOMA A GAS DE 20" (50,8 CM) con horno de limpieza estándar Table of Contents/Índice 2 To the installer: Please leave this instruction book with the unit. To the consumer: - Amana AGG222VDB | Installation Instruction - Page 2
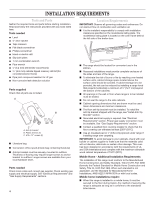
2 INSTALLATION REQUIREMENTS 4 Tools and Parts 4 Location Requirements 4 Electrical Requirements 6 Gas Supply Requirements 6 INSTALLATION INSTRUCTIONS 8 Unpack Range 8 Install Anti-Tip Bracket 8 Verify Anti-Tip Bracket Location 9 Level Range 9 Make Gas Connection 9 Check Operation 10 - Amana AGG222VDB | Installation Instruction - Page 3
WARNING: Gas leaks cannot always be detected by smell. Gas suppliers recommend that you use a gas detector approved by UL or CSA. For more information, contact your gas supplier. If a gas leak is detected, follow the "What to do if you smell gas" instructions. 3 - Amana AGG222VDB | Installation Instruction - Page 4
Parts Gather the required tools and parts before starting installation. Read and follow the instructions compound resistant to LP gas ■ Non-corrosive leak-detection solution Parts supplied Check that all parts are included. A of the sides and rear of the range. ■ To eliminate the risk of burns - Amana AGG222VDB | Installation Instruction - Page 5
cm) max. upper cabinet depth 20" (50.8 cm) min. of cooktop, see NOTE. This shaded area recommended for installation of gas pipe. 24" (61.0 cm) 10" (25.4 cm) ( range hood or microwave hood combination above the range, follow the range hood or microwave hood combination installation instructions - Amana AGG222VDB | Installation Instruction - Page 6
can be used. If the types of gas listed do not include the type of gas available, check with the local gas supplier. LP Gas conversion: Conversion must be done by a qualified service technician. No attempt shall be made to convert the appliance from the gas specified on the model/serial rating plate - Amana AGG222VDB | Installation Instruction - Page 7
(1.3 cm) or 3⁄4" (1.9 cm) I.D., flexible metal appliance connector may be used for connecting range to the gas supply line. ■ A 1⁄2" (1.3 cm) male pipe " WCP) or lower The range must be isolated from the gas supply piping system by closing its individual manual shutoff valve during any pressure - Amana AGG222VDB | Installation Instruction - Page 8
INSTALLATION INSTRUCTIONS Unpack Range 1. Do not use oven door handle to lift or move the range. 2. Remove shipping materials, tape and film from range. Keep cardboard bottom under range. Remove oven racks and parts package from inside oven. 3. Take 4 cardboard corners from the carton. Stack one - Amana AGG222VDB | Installation Instruction - Page 9
Construction and Safety, Title 24, HUD Part 280). When such standard is not applicable, use the Standard for Manufactured Home Installations, ANSI A225.1/NFPA 501A or with local codes. 13. Continue installing your range using the following installation instructions. Verify Anti-Tip Bracket Location - Amana AGG222VDB | Installation Instruction - Page 10
extension cord. Failure to follow these instructions can result in death, fire, or electrical shock. 7. Plug into a grounded 3 prong outlet. Check Operation A A. Gas pressure regulator IMPORTANT: Do not remove the gas pressure regulator. 2. Check that the gas pressure regulator shutoff valve is in - Amana AGG222VDB | Installation Instruction - Page 11
Installation 1. Check to be sure all parts are now installed. If there is an extra part, go back through the steps to see Troubleshooting" in the Use and Care Guide. ■ When the range has been on for 5 minutes, feel for heat. If you do not feel heat, turn the range off and check to see that the gas - Amana AGG222VDB | Installation Instruction - Page 12
Reinstall the cap. A. Cap To Convert Surface Burners A To Convert Gas Pressure Regulator 1. Ensure that the manual shutoff valve is in the closed position. A B C A. Shutoff valve in "closed" position B. Gas supply line C. To range 12 B A. Burner cap B. Burner 1. Remove burner grate, burner caps - Amana AGG222VDB | Installation Instruction - Page 13
orifice spuds in the parts bag for future use and keep with bag containing literature. 6. Reinstall burners, burner caps and burner grates. Complete Conversion 1. Refer to the "Make Gas Connection" section for properly connecting the range to the gas supply. 2. Turn the manual shutoff valve in the - Amana AGG222VDB | Installation Instruction - Page 14
Remove burner grates, burner caps, and burners. A To Convert Gas Pressure Regulator 1. Ensure that the manual shutoff valve is in the closed position. A B C A. Shutoff valve in "closed" position B. Gas supply line C. To range 2. Unplug or disconnect power. 14 B A. Burner cap B. Burner 2. Locate - Amana AGG222VDB | Installation Instruction - Page 15
oven racks, oven tray and flame spreader. Complete Conversion 1. Refer to the "Make Gas Connection" section for properly connecting the range to the gas supply. 2. Turn the manual shutoff valve in the gas supply line to the open position. 3. Refer to the "Check Operation" section for proper - Amana AGG222VDB | Installation Instruction - Page 16
Notes 16 - Amana AGG222VDB | Installation Instruction - Page 17
SEGURIDAD DE LA ESTUFA 17 - Amana AGG222VDB | Installation Instruction - Page 18
. • de bomberos. - agencia de servicio o por el proveedor de gas. ADVERTENCIA: Las pérdidas de gas no siempre se pueden detectar por el olfato. Los proveedores de gas recomiendan que usted use un detector de gas aprobado por UL (Laboratorio de normalización) o CSA (Asociación canadiense de seguridad - Amana AGG222VDB | Installation Instruction - Page 19
de hoja plana ■ Destornillador Phillips ■ Taladro manual o eléctrico ■ Pinzas ajustables ■ Llave de de hormigón/cerámica) ■ Pegamento para tuberías resistente a gas LP ■ Solución para detección de fugas que no sea un recinto cerrado de los lados y la parte posterior de la estufa. ■ Para eliminar el - Amana AGG222VDB | Installation Instruction - Page 20
ancho mín. de la abertura del armario 20" (50,8 cm) ancho de la cm) Se recomienda esta área sombreada para la instalación de la tubería de gas. 24" (61,0 cm) 10" (25,4 cm) 4111⁄12" (106,6 mm). 30" (76,2 cm) de espacio mínimo entre la parte superior de la plataforma de la superficie de cocción y la - Amana AGG222VDB | Installation Instruction - Page 21
de una persona calificada incluyen: personal de servicio del sistema de calefacción con licencia, personal autorizado de la compañía de gas, y personal autorizado para dar servicio. No seguir estas instrucciones puede ocasionar la muerte, explosión o incendio. Observe todos los códigos y reglamentos - Amana AGG222VDB | Installation Instruction - Page 22
la línea por encima de 1⁄2 lb/pulg2 manométrica (14" WCP) La estufa y su válvula de cierre individual manual deberán ser desconectadas del sistema de tubería del suministro de gas durante toda prueba efectuada en dicho sistema a presiones de prueba mayores de 1⁄2 lb/pulg2 (3,5 kPa). Prueba de presi - Amana AGG222VDB | Installation Instruction - Page 23
a lo largo, sobre el piso, detrás de la estufa para protegerla cuando se coloque sobre su parte posterior. Con la ayuda de 2 o más personas, agarre la estufa con firmeza y colóquela suavemente sobre su parte posterior, en los esquinales de cartón. 4. Jale la base de cartón con firmeza para quitarla - Amana AGG222VDB | Installation Instruction - Page 24
seguridad y construcción de casas fabricadas, Título 24 CFR, Parte 3280 (anteriormente conocido como Estándar federal para la seguridad y construcción de casas rodantes, Título 24, HUD Parte 280). Cuando no sea aplicable ese estándar, use el Estándar - Amana AGG222VDB | Installation Instruction - Page 25
(ON). Regulador de presión de gas C A D E F A. Accesorio de conexión del regulador de presión B. Codo de 90° C. Tubería de hierro negro G D. Unión E. Niple F. Válvula de cierre manual G. Tubería de gas de 1⁄2" a 3⁄4" Vista frontal Válvula de cierre Parte frontal Vista lateral Posición "abierta - Amana AGG222VDB | Installation Instruction - Page 26
3. Abra la válvula de cierre manual de la línea de suministro de gas. La válvula está "abierta" cuando la manija está paralela al tubo de gas. A B A. Válvula cerrada BBA... VOCálpolvesuneladvaavblavielevrtea 4. Pruebe todas las conexiones aplicando con un cepillo una solución aprobada para detección - Amana AGG222VDB | Installation Instruction - Page 27
dejar que fluya el gas. El quemador del horno funcionará hasta que el mismo haya alcanzado una temperatura de 350°F. Después de 20 a 40 segundos, por el material de embalaje. Seque meticulosamente con un paño suave. 6. Lea el Manual de uso y cuidado de la estufa para el uso y la limpieza de la estufa - Amana AGG222VDB | Installation Instruction - Page 28
ADVERTENCIA Cómo convertir el regulador de la presión del gas 1. Asegúrese de que la válvula de cierre manual esté en la posición cerrada. A Peligro de Explosión Use una línea de suministro de gas nueva con aprobación de CSA International. Instale una válvula de cierre. Apriete firmemente todas - Amana AGG222VDB | Installation Instruction - Page 29
ándar 78 Complete la conversión 1. Vea la sección "Conexión del suministro de gas" para conectar la estufa debidamente al suministro de gas. 2. Gire la válvula de cierre manual en la línea de suministro de gas a la posición abierta. 3. Vea la sección "Verifique el funcionamiento" para los ajustes - Amana AGG222VDB | Installation Instruction - Page 30
soporte anti-vuelco. No seguir estas instrucciones puede ocasionar la muerte o quemaduras graves en niños y adultos. Cómo convertir el regulador de la presión del gas 1. Asegúrese de que la válvula de cierre manual esté en la posición cerrada. 30 A. Tapa 6. Vuelva a colocar la tapa. - Amana AGG222VDB | Installation Instruction - Page 31
del horno. La espita del orificio está detrás del obturador de aire del quemador del horno. A A. Obturador de aire 3. Ubique la espita del orificio de gas natural marcada con "51" en la bolsa con material impreso que se suministró con la estufa. 4. Use una llave de combinación de 3⁄8" para sacar la - Amana AGG222VDB | Installation Instruction - Page 32
de llama. Complete la conversión 1. Vea la sección "Conexión del suministro de gas" para conectar la estufa debidamente al suministro de gas. 2. Gire la válvula de cierre manual en la línea de suministro de gas a la posición abierta. 3. Vea la sección "Verifique el funcionamiento" para los ajustes
-
 1
1 -
 2
2 -
 3
3 -
 4
4 -
 5
5 -
 6
6 -
 7
7 -
8
-
9
-
10
-
11
-
12
-
13
-
14
-
15
-
16
-
17
-
18
-
19
-
20
-
21
-
22
-
23
-
24
-
25
-
26
-
27
-
28
-
29
-
30
-
31
-
32
 |
 |

To the installer: Please leave this instruction book with the unit.
To the consumer: Please read and keep this book for future
reference.
Para el instalador: favor de dejar este manual de instrucciones
con la unidad.
Para el consumidor: favor de leer y guardar este manual para
futura referencia.
INSTALLATION INSTRUCTIONS
20" (50.8 CM) FREESTANDING GAS RANGE
with standard clean oven
INSTRUCCIONES DE INSTALACIÓN
ESTUFA AUTÓNOMA A GAS DE 20" (50,8 CM)
con horno de limpieza estándar
W10173755
D
Table of Contents
/Índice
............................
.
.............
2