Amana NFW7300WW Use and Care
Amana NFW7300WW Manual
 |
UPC - 883049162218
View all Amana NFW7300WW manuals
Add to My Manuals
Save this manual to your list of manuals |
Amana NFW7300WW manual content summary:
- Amana NFW7300WW | Use and Care - Page 1
FRONT-LOADING AUTOMATIC WASHER Use & Care Guide For questions about features, operation/performance, parts, accessories, or service, call: 1-800-843-0304 or visit our website at... www.amana.com In Canada, call: 1-800-807-6777 or visit our website at... www.amanacanada.ca LAVEUSE AUTOMATIQUE À - Amana NFW7300WW | Use and Care - Page 2
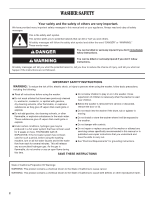
WASHER SAFETY Your safety and the safety of others are very important. We have provided many important safety messages in this manual and if you don't immediately follow instructions. WARNING You can be killed or seriously injured if you don't follow instructions. All safety messages will tell - Amana NFW7300WW | Use and Care - Page 3
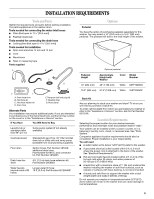
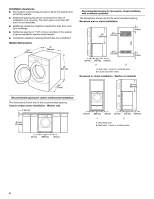
add to the total height of the washer. Optional pedestal Pedestal Height Approximate Height with Washer Color Model Number 10" (254 mm) 46" (1168 mm) White MHP1000SQ 15.5" (394 mm) 51.5" (1308 mm) White XHP1550VW Stack Kit Are you planning to stack your washer and dryer? To do so you will - Amana NFW7300WW | Use and Care - Page 4
3" (76 mm) B A. Side view - closet or confined area B. Closet door with vents Recessed or closet installation - Washer on pedestal 301/2" (775 mm) 38" min. (965 mm) Recommended spacing for custom undercounter installation The dimensions shown are for the recommended spacing. Custom undercounter - Amana NFW7300WW | Use and Care - Page 5
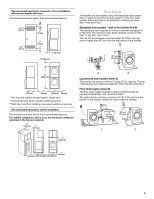
recessed or closet installation, with stacked washer and dryer The dimensions shown are for the recommended spacing. 48 in.2* (310 cm2) 24 in.2* (155 cm2) 3" (76 mm) 3" (76 mm) 1" (25 mm) 12" (305 mm) Drain System The washer can be installed using the standpipe drain system (floor or wall), the - Amana NFW7300WW | Use and Care - Page 6
adapter. Do not use an extension cord. Failure to follow these instructions can result in death, fire, or electrical shock. ■ A only this appliance be provided. ■ This washer is equipped with a power supply cord having outlet, grounded in accordance with local codes and ordinances. If a mating outlet - Amana NFW7300WW | Use and Care - Page 7
panel of the washer that support the suspension system during transportation. These bolts also retain the power cord inside the washer until the bolts If the washer is to be transported at a later date, call your local service center. To avoid suspension and structural damage, your machine must be - Amana NFW7300WW | Use and Care - Page 8
back into the washer ■ Use the drain hose form, and do not force excess drain hose into standpipe. Hose should be secure, but loose enough to provide a gap for air. ■ Do not lay excess hose on the bottom of the laundry tub. Floor drain You may need additional parts. See Floor drain under "Tools and - Amana NFW7300WW | Use and Care - Page 9
amount of High Efficiency (HE) detergent for a medium-size load. Pour the detergent into the detergent dispenser. Select Clean Washer with AFFRESH™ cycle, then press START/PAUSE button for 3 seconds to start washer. Allow washer to complete one cycle. Use only HE High Efficiency detergent. If the - Amana NFW7300WW | Use and Care - Page 10
, reducing drying time. Add Garment This option is available in all wash cycles except Rinse & Spin, Drain & Spin, and Clean Washer with AFFRESH™ cycle. When this option is available at the beginning of the cycle, the Add Garment status light will illuminate for approximately the first 7 minutes - Amana NFW7300WW | Use and Care - Page 11
a lock check at the beginning of the cycle, the washer door will remain locked during the wash cycle. NOTE: After any wash cycle is completed, the door must be opened and then closed before a new cycle can begin. The door can be opened only if START/PAUSE is selected while the Add Garment light - Amana NFW7300WW | Use and Care - Page 12
shut off if you do not press START/PAUSE within 5 minutes of selecting a cycle. ■ When the wash cycle is done, the COMPLETE status light illuminates, the door unlocks, and the wash load can be removed from the washer. To power down the washer after the wash cycle is done and the COMPLETE status - Amana NFW7300WW | Use and Care - Page 13
the machine will beep. 3. Press and hold START/PAUSE (for approximately 3 seconds) to continue the cycle. To drain the washer manually 1. Press START/PAUSE. 2. Select DRAIN & SPIN. 3. Press and hold START/PAUSE (for approximately 3 seconds) to begin the drain. 4. When the spin is complete, the door - Amana NFW7300WW | Use and Care - Page 14
the fabric softener dispenser. Drain & Spin Use this cycle to drain your washer or to drain and spin your wash load. The spin speed is present to high. Using Drain & Spin: 1. Select Drain & Spin cycle. Clean Washer with AFFRESH™ cycle Use the Clean Washer with AFFRESH™ cycle once a month to keep - Amana NFW7300WW | Use and Care - Page 15
clothes from washer after the cycle is completed. Metal objects such as zippers, snaps, and buckles may rust if left in the washer basket for a long time. ■ When unloading garments, occasionally check under the colored seal at the front of the tub for small items. Loading Loading suggestions - Amana NFW7300WW | Use and Care - Page 16
Stain Use Liquid Chlorine or Color-Safe Bleach ✔ Stain Removal Guide Use suggested Wash Cycle Stain Heavy Duty Use Liquid Chlorine or Color-Safe Bleach ✔ Use suggested Wash Cycle Heavy Duty Ink ✔ Blood ✔ Coffee/ Chocolate Grass Cold or Warm ✔ Normal Tomato Products Warm ✔ Heavy Duty - Amana NFW7300WW | Use and Care - Page 17
product damage over time. 3. Close the washer door and dispenser drawer. 4. Select the CLEAN WASHER with AFFRESH™ cycle. 5. Press START/PAUSE. NOTE: The basket will rotate, then the door will unlock, lock again, and then the cycle will continue. ■ The machine will not fill, but the basket will - Amana NFW7300WW | Use and Care - Page 18
load, to clean the washer and remove the antifreeze, if used. To transport the washer: 1. If washer will be moved during freezing weather, put in 1 qt (1 L) of R.V.-type antifreeze in the drum. Run washer on a Rinse & Spin cycle. 2. Unplug the power cord. 3. Disconnect the drain hose from the drain - Amana NFW7300WW | Use and Care - Page 19
" error code. If you are still experiencing problems, please call the numbers at the front of the book, or call for service. Check the list below for potential problem and troubleshooting checks. ■ "F8E1" on display (Long Fill - no water or insufficient water supply) Press POWER to cancel the cycle - Amana NFW7300WW | Use and Care - Page 20
circuit breaker. If the problem continues, call an electrician. ■ Is your voltage low? Check electrical source or call electrician. Washer cycle won't start ■ Is the washer door firmly shut? The door must be closed during operation. ■ Has a cycle been selected, but START/PAUSE has not been selected - Amana NFW7300WW | Use and Care - Page 21
routine will start to redistribute the load. This extends the cycle. ■ Are you washing a single item or bulky load? Spin time is added if an unbalanced load is detected. The washer will attempt to redistribute the load with additional tumbling. ■ Did you wash a large load in a delicate cycle? When - Amana NFW7300WW | Use and Care - Page 22
drum, and start a Rinse & Spin and Drain & Spin cycle. If the laundry is still wet, take half of the load out of the washer and try again. ■ Did you use HE detergent? Suds during rinse and spin cycles can reduce spin speed. Use HE detergent. Residue, lint, stains on load; gray whites, dingy colors - Amana NFW7300WW | Use and Care - Page 23
Guide. If you are unable to resolve the problem after checking "Troubleshooting," additional help can be found by checking the "Assistance or Service" section or by calling Amana. In the U.S.A., call 1800843-0304. In the Canada, call 1800807-6777. 12/08 Keep this book and your sales slip - Amana NFW7300WW | Use and Care - Page 24
le danger potentiel et vous disent comment réduire le risque de blessure et ce qui peut se produire en cas de non-respect des instructions. Avertissements de la proposition 65 de l'État de Californie : AVERTISSEMENT : Ce produit contient un produit chimique connu par l'État de Californie pour être - Amana NFW7300WW | Use and Care - Page 25
èces supplémentaires. Pour acheter l'un des articles indiqués ici, composer le numéro sans frais indiqué sur la couverture ou à la section "Assistance ou service". Si vous avez Vous devrez acheter Évier de buanderie ou tuyau rigide de rejet à l'égout plus haut que 96" (2,4 m) Système de pompe de - Amana NFW7300WW | Use and Care - Page 26
(25 mm) 27" (686 mm) 1" (25 mm) Espacement recommandé pour une installation dans un encastrement ou dans un placard, avec ou sans piédestal Les dimensions indiquées sont pour l'espacement recommandé. Installation dans un encastrement ou placard 48" (1220 mm) 48 in.2 (310 cm2) 3" (76 mm) 24 in - Amana NFW7300WW | Use and Care - Page 27
de porte et de plancher et les plinthes peuvent nécessiter un espace supplémentaire. Espacement recommandé pour l'installation dans un placard Les dimensions indiquées sont pour l'espacement recommandé. Pour l'installation dans un placard avec porte, on doit prévoir des ouvertures minimums d'entr - Amana NFW7300WW | Use and Care - Page 28
adaptateur. Ne pas utiliser un câble de rallonge. Le non-respect de ces instructions peut causer un décès, un incendie ou un choc électrique. ■ Une alimentation de une prise de courant correctement reliée à la terre. ■ Si les codes le permettent et si on utilise un conducteur distinct de liaison à la - Amana NFW7300WW | Use and Care - Page 29
la laveuse. Le non-respect de cette instruction peut causer une blessure au dos ou d' arrière de la laveuse 4 boulons de transport qui supportent le système de suspension durant le transport. Ces boulons une date ultérieure, appeler le centre de service local. Pour éviter des dommages concernant la - Amana NFW7300WW | Use and Care - Page 30
Connecter les tuyaux d'alimentation à la laveuse IMPORTANT : S'assurer que les rondelles plates ont été placées dans les raccords de tuyau. 2. Faire glisser le tuyau de vidange sur le raccord de la laveuse. CH 3. Une fois le tuyau de vidange en place, relâcher la prise de la pince. H. Tuyau d' - Amana NFW7300WW | Use and Care - Page 31
un adaptateur. Ne pas utiliser un câble de rallonge. Le non-respect de ces instructions peut causer un décès, un incendie ou un choc électrique. 7. Brancher sur une le programme Clean Washer with AFFRESH™ (nettoyage de la laveuse avec AFFRESH™), puis appuyer sur le bouton START/PAUSE (mise en - Amana NFW7300WW | Use and Care - Page 32
Add Garment (ajouter vêtement) Cette option est disponible avec tous les programmes de lavage sauf Rinse & Spin (rinçage et essorage), Drain & Spin (vidange et essorage), et Clean Washer with AFFRESH™ (nettoyage de la laveuse avec AFFRESH™). Lorsque cette option est disponible au début du programme - Amana NFW7300WW | Use and Care - Page 33
INSTRUCTIONS IMPORTANTES DE SÉCURITÉ avant de faire fonctionner cet appareil. Le texte suivant est un guide est susceptible d'occasionner des erreurs de la part de la laveuse, des durées de porte ne peut être ouverte que si l'on sélectionne START/PAUSE alors que le témoin Add Garment (ajouter vê - Amana NFW7300WW | Use and Care - Page 34
CYCLE SIGNAL (signal de programme) pour sélectionner signal activé ou signal désactivé. 7. Pour commencer le programme de lavage immédiatement Appuyer sur START susceptible d'occasionner des erreurs de la part de la laveuse, des durées meilleur rendement. Suivre les instructions du fabricant pour dé - Amana NFW7300WW | Use and Care - Page 35
ne pas utiliser une quantité approximative. Suivre les instructions du fabricant pour une utilisation correcte. ■ Ne pas Spin (rinçage et essorage), Drain & Spin (vidange et essorage) et Clean Washer with AFFRESH™ (nettoyage de la laveuse avec AFFRESH™). Pour ajouter des articles 1. Appuyer sur START - Amana NFW7300WW | Use and Care - Page 36
tout moment avant d'avoir appuyé sur START/PAUSE. Toutes les options une durée, (service intense) Normal Delicate (articles délicats) Rinse & Spin (rinçage et essorage) Drain & Spin ( Drain & Spin (vidange et essorage) : 1. Sélectionner le programme Drain & Spin (vidange et essorage). Clean Washer - Amana NFW7300WW | Use and Care - Page 37
pendant le programme Clean Washer with AFFRESH™. Utiliser ce chaude sans danger pour les tissus. Suivre les instructions sur l'étiquette des vêtements. Le rinçage rinçages à froid économisent de l'énergie. Guide de température Temp Tissus suggérés HOT CYCLE SIGNAL (signal de fin de programme) pour le - Amana NFW7300WW | Use and Care - Page 38
ordinaire est susceptible d'occasionner des erreurs de la part de la laveuse, des durées de programmes Tri ■ Séparer les articles très sales des articles légèrement sales, même si on les lave normalement -gorge 2 chemises de nuit Programme Small Load (petite charge) (2-3 vêtements) 2 chemises - Amana NFW7300WW | Use and Care - Page 39
(tiède) Heavy Duty (service intense) Heavy Duty (service intense) Heavy Duty (service intense) Produits de beauté Déodorants Warm (tiède) ✔ Heavy Duty (service intense) Huile de moteur usagée Anneau autour du col Ne pas faire culbuter des articles secs sales ou tachés. La chaleur risque - Amana NFW7300WW | Use and Care - Page 40
de la laveuse. REMARQUES : ■ Lire ces instructions complètement avant de débuter la procédure de pas le programme tout de suite. La machine effectue encore plusieurs rinçages et vidanges afin le programme CLEAN WASHER with AFFRESH™ (nettoyage de la laveuse). 5. Appuyer sur START/PAUSE (mise en - Amana NFW7300WW | Use and Care - Page 41
câble de rallonge. Le non-respect de ces instructions peut causer un décès, un incendie ou un choc . Faire exécuter à la laveuse un programme Drain & Spin (vidange/essorage). 2. Débrancher le cordon d'alimentation . 6. IMPORTANT : Faire un appel de service. Ne pas réutiliser les boulons de transport - Amana NFW7300WW | Use and Care - Page 42
service. Aux É.-U., www.whirlpool.com/help Au Canada, www.whirlpool.ca Codes DRAIN & SPIN (vidange et essorage) en cas d'excès d'eau dans la laveuse. Sélectionner à nouveau le programme et appuyer sur START/ PAUSE. Si le problème persiste, faire un appel de service Instructions de la machine ont-ils - Amana NFW7300WW | Use and Care - Page 43
fois que le programme CLEAN WASHER with AFFRESH™ (nettoyage laveuse durant l'essorage? Sélectionner DRAIN & SPIN (vidange et essorage) pour enlever de rallonge. Le non-respect de ces instructions peut causer un décès, un incendie ou sur START/PAUSE pendant 3 secondes? Appuyer sur START/PAUSE pendant - Amana NFW7300WW | Use and Care - Page 44
Le module de commande n'accepte pas les sélections effectuées ou ne s'éteint pas ■ Les touches tactiles du tableau de commande sont-elles verrouillées? Appuyer sur le bouton pendant 3 secondes pour verrouiller/ déverrouiller les commandes. ■ Les boutons tactiles ne répondent pas? Appuyer deux fois - Amana NFW7300WW | Use and Care - Page 45
importante en utilisant un programme délicat? Avec le programme de lavage Small Load (petite charge) ou Delicate (articles délicats), il faut laver de dans le tambour, et commencer un programme Rinse & Spin (rinçage et essorage) et Drain & Spin (vidange et essorage). Si la lessive est encore mouill - Amana NFW7300WW | Use and Care - Page 46
■ Utilisez-vous un programme de lavage à basse vitesse? Les détergents en poudre peuvent ne pas se dissoudre correctement durant un programme à basse vitesse. Pour des résultats optimaux, utiliser un détergent liquide pour les programmes à basse vitesse tels que Delicate (articles délicats). ■ Avez- - Amana NFW7300WW | Use and Care - Page 47
Si vous résidez à l'extérieur du Canada et des 50 États des États-Unis, contactez votre marchand Amana autorisé pour déterminer si une autre garantie s'applique. Si vous avez besoin d'un service de réparation, voir d'abord la section "Dépannage" du Guide d'utilisation et d'entretien. Si vous n'êtes - Amana NFW7300WW | Use and Care - Page 48
service, please check "Troubleshooting" or visit www.amana.com/help. ASSISTANCE OR SERVICE It may save you the cost of a service call. If you still need help, follow the instructions below. When calling, please know the purchase date and the complete model and serial 2sh:elp Maytag STerhveicsesp,
-
 1
1 -
 2
2 -
 3
3 -
 4
4 -
 5
5 -
 6
6 -
 7
7 -
8
-
9
-
10
-
11
-
12
-
13
-
14
-
15
-
16
-
17
-
18
-
19
-
20
-
21
-
22
-
23
-
24
-
25
-
26
-
27
-
28
-
29
-
30
-
31
-
32
-
33
-
34
-
35
-
36
-
37
-
38
-
39
-
40
-
41
-
42
-
43
-
44
-
45
-
46
-
47
-
48
 |
 |

www.amana.com
www.amanacanada.ca
www.amana.ca
TABLE OF CONTENTS
Page
WASHER SAFETY
.......................................................................................
2
INSTALLATION REQUIREMENTS
.............................................................
3
Tools and Parts
.........................................................................................
3
Options
......................................................................................................
3
Location Requirements
.............................................................................
3
Drain System
.............................................................................................
5
Electrical Requirements
............................................................................
6
INSTALLATION INSTRUCTIONS
...............................................................
7
Remove Transport System
.......................................................................
7
Connect the Inlet Hoses
...........................................................................
7
Connect the Drain Hose
...........................................................................
8
Secure the Drain Hose
..............................................................................
9
Level the Washer
......................................................................................
9
Complete Installation
................................................................................
9
FEATURES AND BENEFITS
.....................................................................
10
WASHER USE
............................................................................................
11
Starting Your Washer
..............................................................................
11
Using the Proper Detergent
....................................................................
11
Using the Dispenser
................................................................................
12
Pausing or Restarting
.............................................................................
13
Changing Cycles and Options
................................................................
13
Status Lights
...........................................................................................
13
Cycles
.....................................................................................................
13
Normal Sounds
.......................................................................................
14
Options
....................................................................................................
14
LAUNDRY TIPS
..........................................................................................
15
WASHER CARE
.........................................................................................
17
TROUBLESHOOTING
...............................................................................
19
WARRANTY
...............................................................................................
23
ASSISTANCE OR SERVICE
..................................................
BACK COVER
W10252719A
TABLE DES MATIÈRES
Page
SÉCURITÉ DE LA LAVEUSE
....................................................................
24
EXIGENCES D'INSTALLATION
................................................................
25
Outillage et pièces
..................................................................................
25
Options
...................................................................................................
25
Exigences d'emplacement
.....................................................................
25
Système de vidange
...............................................................................
27
Spécifications électriques
.......................................................................
28
INSTRUCTIONS D'INSTALLATION
.........................................................
29
Élimination des accessoires de transport
..............................................
29
Raccordement des tuyaux d'alimentation
.............................................
29
Raccordement du tuyau de vidange
......................................................
30
Immobilisation du tuyau de vidange
......................................................
31
Réglage de l'aplomb de la laveuse
........................................................
31
Achever l'installation
...............................................................................
31
CARACTÉRISTIQUES ET AVANTAGES
..................................................
32
UTILISATION DE LA LAVEUSE
................................................................
33
Mise en marche de la laveuse
................................................................
33
Utilisation du détergent approprié
..........................................................
33
Utilisation du distributeur
........................................................................
34
Pause ou remise en marche
...................................................................
35
Modification des programmes et options
..............................................
35
Témoins lumineux
...................................................................................
35
Programmes
...........................................................................................
36
Sons normaux
.........................................................................................
37
Options
...................................................................................................
37
CONSEILS DE LESSIVAGE
......................................................................
38
ENTRETIEN DE LA LAVEUSE
..................................................................
40
DÉPANNAGE
.............................................................................................
42
GARANTIE
..................................................................................................
47
ASSISTANCE OU SERVICE
...............................
COUVERTURE ARRIÈRE
FRONT-LOADING
AUTOMATIC WASHER
Use & Care Guide
For questions about features, operation/performance, parts,
accessories, or service, call:
1-800-843-0304
or visit our website at...
In Canada, call:
1-800-807-6777
or visit our website at...
LAVEUSE AUTOMATIQUE
À CHARGEMENT
FRONTAL
Guide d'utilisation et d'entretien
Pour assistance, installation, ou service, composez le :
1-800-807-6777
ou visitez notre site internet à..