Apple Z0FS0LL User Guide
Apple Z0FS0LL - MacBook Air - Core 2 Duo 1.8 GHz Manual
 |
UPC - 885909222360
View all Apple Z0FS0LL manuals
Add to My Manuals
Save this manual to your list of manuals |
Apple Z0FS0LL manual content summary:
- Apple Z0FS0LL | User Guide - Page 1
Congratulations, you and your MacBook Air were made for each other. - Apple Z0FS0LL | User Guide - Page 2
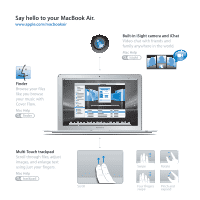
Say hello to your MacBook Air. www.apple.com/macbookair Built-in iSight camera and iChat Video chat with friends and family anywhere in the world. Mac Help isight Finder Browse your files like you browse your music with Cover Flow. Mac Help finder MacBook Air Multi-Touch trackpad Scroll through - Apple Z0FS0LL | User Guide - Page 3
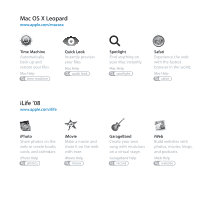
time machine Quick Look Instantly preview your files. Mac Help quick look Spotlight Find anything on your Mac instantly. Mac Help spotlight Safari Experience the web with the fastest browser in the world. Mac Help safari iLife '08 www.apple.com/ilife iPhoto Share photos on the web or create - Apple Z0FS0LL | User Guide - Page 4
- Apple Z0FS0LL | User Guide - Page 5
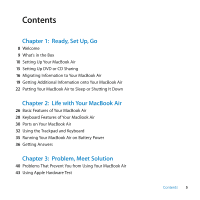
Your MacBook Air 28 Keyboard Features of Your MacBook Air 30 Ports on Your MacBook Air 32 Using the Trackpad and Keyboard 35 Running Your MacBook Air on Battery Power 36 Getting Answers Chapter 3: Problem, Meet Solution 40 Problems That Prevent You from Using Your MacBook Air 43 Using Apple Hardware - Apple Z0FS0LL | User Guide - Page 6
Software Using Remote Install Mac OS X 49 Reinstalling Software Using the MacBook Air SuperDrive 50 Problems with AirPort Extreme Wireless Communication 50 Problems with Your Internet Connection 52 Keeping Your Software Up to Date 52 Learning More, Service, and Support 55 Locating Your Product - Apple Z0FS0LL | User Guide - Page 7
1 Ready, Set Up, Go 1 www.apple.com/macbookair Mac Help Migration Assistant - Apple Z0FS0LL | User Guide - Page 8
can set up one or more Mac or Windows computers to partner with your MacBook Air. Then follow the Setup Assistant and use DVD or CD Sharing to use your MacBook Air and the information from the other computer. Important: Read all the installation instructions (and the safety information starting on - Apple Z0FS0LL | User Guide - Page 9
well as install applications and access data from other optical discs, using the optical disc drive on another Mac or Windows computer and the Remote Disc feature on your MacBook Air. You can also use the optional MacBook Air SuperDrive, an external optical disc drive. Chapter 1 Ready, Set Up, Go 9 - Apple Z0FS0LL | User Guide - Page 10
Assistant to access a network and configure a user account and other settings  Setting up the Mac OS X desktop and preferences Step 1: Plug in the 45W MagSafe Power Adapter to provide power to the MacBook Air and charge the battery. Insert the AC plug of your power adapter into a power outlet and - Apple Z0FS0LL | User Guide - Page 11
the power adapter from an outlet or from the computer, pull the plug, not the cord. When you connect the power adapter to your MacBook Air, an indicator light on the MagSafe connector starts to glow. An amber light indicates that the battery is charging. A green light indicates that the - Apple Z0FS0LL | User Guide - Page 12
Step 2: Press the power (®) button briefly to turn on your MacBook Air. When you turn on the computer, you'll hear a tone and see the Assistant opens automatically. If your computer doesn't turn on, see "If your MacBook Air doesn't turn on or start up" on page 42. 12 Chapter 1 Ready, Set Up, Go - Apple Z0FS0LL | User Guide - Page 13
the Applications folder, open Utilities, and double-click Migration Assistant. To set up your MacBook Air: 1 In the Setup Assistant, follow the onscreen instructions until you get to the "Do You Already Own a Mac?" screen. 2 Do a basic setup or a setup with migration: Â To do a basic setup, select - Apple Z0FS0LL | User Guide - Page 14
desktop look the way you want using System Preferences. Choose Apple () > System Preferences from the menu bar or click the System Preferences icon in the Dock. System Preferences is your command center for most settings on your MacBook Air. Menu bar Help menu Spotlight search icon Dock Finder - Apple Z0FS0LL | User Guide - Page 15
and is on the same wired or wireless network. Use this other computer to: Â Migrate information to your MacBook Air, if the other computer is a Mac (see "Migrating Information to Your MacBook Air" on page 16) Â Share the contents of DVDs or CDs or install applications (see "Sharing Discs with DVD - Apple Z0FS0LL | User Guide - Page 16
you install the DVD or CD Sharing Setup package on your other Mac, make sure you have the latest software by choosing Apple () > Software Update. Install any available Mac OS X updates. Migrating Information to Your MacBook Air You can migrate existing user accounts, files, applications, and other - Apple Z0FS0LL | User Guide - Page 17
2 On your MacBook Air, follow the Setup Assistant onscreen instructions until you get to the "Do You Already Own a Mac?" screen. Select "from another Mac" as the source of the information you want to transfer. On the next screen, choose your wireless network, and then click Continue. 3 When you see - Apple Z0FS0LL | User Guide - Page 18
items (user accounts, documents, movies, music, photos, and so on) that you want to migrate to your MacBook Air. 8 Click Continue to start the migration. Important: Don't use the other Mac for anything else until the migration is complete. If the connection is terminated during migration, you can - Apple Z0FS0LL | User Guide - Page 19
disc drive available separately at www.apple.com/store) to the USB port on your MacBook Air, and insert your installation disc. Sharing Discs with DVD or CD Sharing You can enable DVD or CD Sharing on a Mac or Windows computer to use the Remote Disc feature of MacBook Air. Remote Disc allows you to - Apple Z0FS0LL | User Guide - Page 20
CD Sharing" in the Service list. If you want other users to request permission to share a DVD or CD, select "Ask me before allowing others to use my DVD drive." To enable DVD or CD Sharing, if your other computer is a Windows computer: 1 Make sure your MacBook Air and the Windows computer are - Apple Z0FS0LL | User Guide - Page 21
computer, insert a DVD or CD into the optical disc drive. 2 On your MacBook Air, select the Remote Disc when it appears under Devices in the Finder sidebar. , when prompted, click Accept to allow your MacBook Air to use the DVD or CD. 4 On your MacBook Air, use the disc as you normally would once - Apple Z0FS0LL | User Guide - Page 22
. When the computer is in sleep, you can quickly wake it and bypass the startup process. To put your MacBook Air to sleep, do one of the following: Â Close the display. Â Choose Apple () > Sleep from the menu bar. Â Press the power (®) button and click Sleep in the dialog that appears. Â Choose - Apple Z0FS0LL | User Guide - Page 23
two, it's best to shut it down. The sleep indicator light goes on briefly during the shutdown process. To shut down your MacBook Air, do one of the following: Â Choose Apple () > Shut Down from the menu bar. Â Press the power (®) button and click Shut Down in the dialog that appears. If you plan - Apple Z0FS0LL | User Guide - Page 24
- Apple Z0FS0LL | User Guide - Page 25
2 Life with Your MacBook Air 2 www.apple.com/macosx Mac Help Mac OS X - Apple Z0FS0LL | User Guide - Page 26
Basic Features of Your MacBook Air Ambient light sensor iSight camera Camera indicator light Microphone Mono speaker (under keyboard) Battery (built-in) Trackpad Trackpad button Sleep indicator light Infrared (IR) receiver ® ® Power button 26 Chapter 2 Life with Your MacBook Air - Apple Z0FS0LL | User Guide - Page 27
an optional Apple Remote (available separately) with the IR receiver to control Front Row and Keynote on your MacBook Air. ® Power button Turn your MacBook Air on or off, or put it to sleep. Press and hold to restart your MacBook Air during troubleshooting. Chapter 2 Life with Your MacBook Air 27 - Apple Z0FS0LL | User Guide - Page 28
Keyboard Features of Your MacBook Air ® Function (fn) key Exposé key Dashboard key ' Media keys C Media Eject key esc F1 F2 F3 F4 F5 F6 F7 F8 F9 F10 F11 F12 Brightness keys Keyboard illumination keys - Mute key - Volume keys 28 Chapter 2 Life with Your MacBook Air - Apple Z0FS0LL | User Guide - Page 29
keys (F1 to F12). To learn how to customize function keys, choose Help > Mac Help from the menu bar and search for "function keys." ¤ Brightness keys (F1, F2) Increase ( ) or decrease ( ) the brightness of your MacBook Air display. Exposé key (F3) Open Exposé for quick access to all your open - Apple Z0FS0LL | User Guide - Page 30
Ports on Your MacBook Air ® Port hatch f Headphone jack ¯ MagSafe power port d USB 2.0 port £ Mini DisplayPort 30 Chapter 2 Life with Your MacBook Air - Apple Z0FS0LL | User Guide - Page 31
your MacBook Air. You can also connect USB 1.1 devices. £ Mini DisplayPort (video out) Connect an external display or projection device that uses a DVI or VGA connector. You can purchase adapters for supported video formats. Note: Adapters and other accessories are sold separately at www.apple.com - Apple Z0FS0LL | User Guide - Page 32
your finger across the trackpad. To fine-tune the tracking speed and set other trackpad options, choose Apple () > System Preferences and then click Trackpad. Here are some useful keyboard and trackpad tips and shortcuts window. This option is on by default. 32 Chapter 2 Life with Your MacBook Air - Apple Z0FS0LL | User Guide - Page 33
these gestures, slide your fingers lightly on the surface of the trackpad. For more information, see Trackpad preferences or choose Help > Mac Help and search for "trackpad." Â Two-finger pinching lets you zoom in or out on PDFs, images, photos, and more. Chapter 2 Life with Your MacBook Air 33 - Apple Z0FS0LL | User Guide - Page 34
 Two-finger rotating lets you rotate photos, pages, and more.  Three-finger swiping lets you rapidly page through documents, move to the previous or next photo, and more. 34 Chapter 2 Life with Your MacBook Air - Apple Z0FS0LL | User Guide - Page 35
® wireless technology can help conserve battery charge. If the battery runs low while you are working, attach the power adapter that came with your MacBook Air and let the battery recharge. When the power adapter is connected, the battery recharges whether the computer is on, off, or in sleep. The - Apple Z0FS0LL | User Guide - Page 36
.html. Important: The battery is replaceable only by an Apple Authorized Service Provider. Getting Answers Much more information about using your MacBook Air is available in Mac Help and on the Internet at www.apple.com/support/macbookair. To get Mac Help: 1 Click the Finder icon in the Dock (the - Apple Z0FS0LL | User Guide - Page 37
For more information about using your MacBook Air, see the following: To learn about Troubleshooting your MacBook Air if you have a problem Finding service and support for your MacBook Air Using Mac OS X Moving from a PC to a Mac Using iLife applications Changing System Preferences Using - Apple Z0FS0LL | User Guide - Page 38
bar, and then click More Info. Apple news, free downloads, and online catalogs of software and hardware The Apple website at www.apple.com. Instructions, technical support, The Apple Support website at www.apple.com/support. and manuals for Apple products 38 Chapter 2 Life with Your MacBook Air - Apple Z0FS0LL | User Guide - Page 39
3 Problem, Meet Solution 3 www.apple.com/support Mac Help help - Apple Z0FS0LL | User Guide - Page 40
find some solutions to try when you have a problem. You can also find more troubleshooting information in Mac Help and on the MacBook Air Support website at www.apple.com/support/macbookair. If you experience a problem with your MacBook Air, there's usually a simple and quick solution. Think about - Apple Z0FS0LL | User Guide - Page 41
't respond. If the problem occurs only when you use a particular application, check with the application's manufacturer to see if it is compatible with your computer. To get support and contact information for the software that came with your MacBook Air, go to www.apple.com/guide. If you know an - Apple Z0FS0LL | User Guide - Page 42
and R keys simultaneously until you hear the startup sound a second time. This resets the parameter RAM (PRAM). Â If you still can't start up your MacBook Air, see "Learning More, Service, and Support" on page 52 for information about contacting Apple for service. 42 Chapter 3 Problem, Meet Solution - Apple Z0FS0LL | User Guide - Page 43
your router documentation to make sure it supports bridging a wireless to wired connection. Using Apple Hardware Test If you suspect a problem with the MacBook Air hardware, you can use the Apple Hardware Test application to help determine if there's a problem with one of the computer's components - Apple Z0FS0LL | User Guide - Page 44
installation instructions for this and other components of the DVD or CD Sharing Setup software are on page 15) when you want to do one of the following tasks on your MacBook Air:  Reinstall Mac OS X and other software that came with your MacBook Air  Reset your password 44 Chapter 3 Problem, Meet - Apple Z0FS0LL | User Guide - Page 45
 Use Disk Utility to repair the MacBook Air hard disk Note: You can also do these tasks using a MacBook Air SuperDrive (available separately at www.apple.com/store). See page 49. To use Remote Install Mac OS X: 1 Insert the Mac OS X Install DVD into the optical disc drive of the other computer. 2 - Apple Z0FS0LL | User Guide - Page 46
step 5, when you see the AirPort status icon indicating signal strength, click Continue in Remote Install Mac OS X. 10 On your MacBook Air, click the arrow button beneath the installer icon and then do one of the following: Â Up DVD or CD Sharing" on page 15. 46 Chapter 3 Problem, Meet Solution - Apple Z0FS0LL | User Guide - Page 47
MacBook Air SuperDrive and burning important information to DVDs or CDs, or by attaching an external hard drive to the USB port on your MacBook Air. Apple 4 Follow the onscreen instructions, selecting your MacBook Air as the destination volume for installation. Note: To restore Mac OS X on your - Apple Z0FS0LL | User Guide - Page 48
Utility from a partner computer: 1 Follow the procedure for using Remote Install Mac OS X beginning on page 45. 2 Click Continue in Remote Install Mac OS X. 3 On your MacBook Air, choose Installer > Open Disk Utility and then follow the instructions in the First Aid pane to see if Disk Utility can - Apple Z0FS0LL | User Guide - Page 49
the menu bar. Follow the onscreen instructions. To use Disk Utility from a MacBook Air SuperDrive: 1 Connect the MacBook Air SuperDrive to your MacBook Air and insert the Mac OS X Install DVD. 2 Restart your MacBook Air and hold down the C key as it starts up. Chapter 3 Problem, Meet Solution 49 - Apple Z0FS0LL | User Guide - Page 50
location. Â See AirPort Help (choose Help > Mac Help, and then choose Library > AirPort Help from the menu bar). Also see the instructions that came with the wireless device for more information. Problems with Your Internet Connection Your MacBook Air has a Network Setup Assistant application to - Apple Z0FS0LL | User Guide - Page 51
Diagnostics: 1 Choose Apple () > System Preferences. 2 Click Network and then click "Assist me." 3 Click Diagnostics to open Network Diagnostics. 4 Follow the onscreen instructions. If Network Diagnostics can't resolve the problem, there may be a problem with the Internet service provider (ISP) you - Apple Z0FS0LL | User Guide - Page 52
icon and follow the instructions on the screen. Â For more information, search for "Software Update" in Mac Help. Â For the latest information about Mac OS X, go to www.apple.com/macosx. Learning More, Service, and Support Your MacBook Air does not have any user-serviceable or user-replaceable parts - Apple Z0FS0LL | User Guide - Page 53
instructions and troubleshooting information, in Mac Help. Choose Help > Mac Help. System Profiler To get information about your MacBook Air, Apple () > About This Mac from the menu bar and then click More Info. AppleCare Service and Support Your MacBook Air comes with 90 days of technical support - Apple Z0FS0LL | User Guide - Page 54
ca/fr/support www.apple.com/ie/support www.apple.com/nz/support www.apple.com/uk/support Telephone numbers are subject to change, and local and national telephone rates may apply. A complete list is available on the web: www.apple.com/contact/phone_contacts.html 54 Chapter 3 Problem, Meet Solution - Apple Z0FS0LL | User Guide - Page 55
your computer's serial number:  Turn your MacBook Air over. The serial number is etched into the case, near the hinge. Serial number  Choose Apple () > About This Mac, and then click the version number beneath the words "Mac OS X" to cycle through the Mac OS X version number, the build version - Apple Z0FS0LL | User Guide - Page 56
- Apple Z0FS0LL | User Guide - Page 57
4 Last, but Not Least 4 www.apple.com/environment Mac Help ergonomics - Apple Z0FS0LL | User Guide - Page 58
. Important Safety Information WARNING: Failure to follow these safety instructions could result in fire, electric shock, or other injury or damage. Proper handling Set up your MacBook Air on a stable work surface that allows for adequate air circulation under and around the computer. Do not operate - Apple Z0FS0LL | User Guide - Page 59
. Use only the power adapter that came with your MacBook Air, or an Apple-authorized power adapter that is compatible with this product. or liquid spilled into the case. Â Your MacBook Air or power adapter has been dropped, the case has been damaged, or you suspect that service or repair is required. - Apple Z0FS0LL | User Guide - Page 60
. Do not expose the battery to temperatures above 212° F or 100° C. Do not remove the battery from your MacBook Air. The battery should be replaced only by an Apple Authorized Service Provider. Hearing damage Permanent hearing loss may occur if earbuds or headphones are used at high volume. You can - Apple Z0FS0LL | User Guide - Page 61
Important Handling Information NOTICE: Failure to follow these handling instructions could result in damage to your MacBook Air or other property. Carrying your MacBook Air If you carry your MacBook Air in a bag or briefcase, make sure that there are no loose items (such as paper clips or coins) - Apple Z0FS0LL | User Guide - Page 62
Cleaning your MacBook Air screen To clean your MacBook Air screen, first shut down your MacBook Air and unplug the power adapter. Then use the cleaning cloth that came with your MacBook Air to wipe the screen. Dampen the cloth with water if necessary. Do not spray liquid directly on the screen. - Apple Z0FS0LL | User Guide - Page 63
. Adjust the height of the chair so your thighs are horizontal and your feet are flat on the floor. The back of the chair should support your lower back (lumbar region). Follow the manufacturer's instructions for adjusting the backrest to fit your body properly. Chapter 4 Last, but Not Least 63 - Apple Z0FS0LL | User Guide - Page 64
if the lighting in your work area changes. More information about ergonomics is available on the web: www.apple.com/about/ergonomics Apple and the Environment Apple Inc. recognizes its responsibility to minimize the environmental impacts of its operations and products. More information is available - Apple Z0FS0LL | User Guide - Page 65
not installed and used properly-that is, in strict accordance with Apple's instructions-it may cause interference with radio and television reception. This equipment has consult an Apple Authorized Service Provider or Apple. See the service and support information that came with your Apple product. - Apple Z0FS0LL | User Guide - Page 66
classe B est conforme à la norme NMB-003 du Canada. This device complies with RSS 210 of Industry Canada. Europe-EU Declaration of Conformity See: www.apple.com/euro/compliance Korea Warning Statements Singapore Wireless Certification Taiwan Wireless Statements Taiwan Class B Statement Russia 66 - Apple Z0FS0LL | User Guide - Page 67
Modem Information When connecting your MacBook Air to the phone line using an external USB modem, refer to the telecommunications agency information in the documentation that came with your modem. ENERGY STAR® Compliance As an ENERGY STAR® partner, Apple has determined that standard configurations - Apple Z0FS0LL | User Guide - Page 68
laws and regulations. When your product reaches its end of life, contact Apple or your local authorities to learn about recycling options. For information about Apple's recycling program, go to www.apple.com/environment/recycling. Battery Disposal Information Dispose of batteries according to your - Apple Z0FS0LL | User Guide - Page 69
Looking for Something? - Apple Z0FS0LL | User Guide - Page 70
adjusting your display 29 AirPort Extreme troubleshooting 50 ambient light sensor 27 AppleCare 53 Apple Hardware Test, using 43 Apple Remote 27, 38 application freeze 22 shutting down 23 turning on 12 won't turn on 42 connection problems with another computer 43 Control-click 33 cord, AC power 11 - Apple Z0FS0LL | User Guide - Page 71
partner computer connection problems 43 Disk Utility 48 DVD or CD Sharing Setup software 16 installing Mac OS X 44 resetting your password 48 password, resetting 48, 49 pinching to zoom 33 Play/Pause key 29 plug, AC 10, 11 port hatch 31 ports hatch 31 headphone 31 MagSafe power 31 Mini - Apple Z0FS0LL | User Guide - Page 72
objects using trackpad 34 S safety general safety instructions 58 important information 8 power adapter 59 screen. See display scrolling trackpad feature 27 scrolling with two fingers 32 secondary click 33 serial number, locating 55 service and support 53 Setup Assistant 13 shared optical disc 19 - Apple Z0FS0LL | User Guide - Page 73
service and support 52 using Mac Help 53 See also problems turning on your computer 12 two-finger pinching 33 two-finger rotating 34 typing position 62 U updating software 52 USB connections 38 ports 31 V verifying a disk 48 video camera indicator light 27 Mini DisplayPort 31 volume control keys 29 - Apple Z0FS0LL | User Guide - Page 74
- Apple Z0FS0LL | User Guide - Page 75
Mac, MacBook, Macintosh, Mac OS, MagSafe, Photo Booth, and SuperDrive are trademarks of Apple Inc., registered in the U.S. and other countries. Finder, iWeb, MacBook Air, Multi-Touch, Spotlight, and Time Machine are trademarks of Apple Inc. AppleCare, Apple Store, and iTunes Store are service manual - Apple Z0FS0LL | User Guide - Page 76
-
 1
1 -
 2
2 -
 3
3 -
 4
4 -
 5
5 -
 6
6 -
 7
7 -
8
-
9
-
10
-
11
-
12
-
13
-
14
-
15
-
16
-
17
-
18
-
19
-
20
-
21
-
22
-
23
-
24
-
25
-
26
-
27
-
28
-
29
-
30
-
31
-
32
-
33
-
34
-
35
-
36
-
37
-
38
-
39
-
40
-
41
-
42
-
43
-
44
-
45
-
46
-
47
-
48
-
49
-
50
-
51
-
52
-
53
-
54
-
55
-
56
-
57
-
58
-
59
-
60
-
61
-
62
-
63
-
64
-
65
-
66
-
67
-
68
-
69
-
70
-
71
-
72
-
73
-
74
-
75
-
76
 |
 |

Congratulations, you and your MacBook Air
were made for each other.