Asko D5233 User manual Use & Care Guide Asko D5233 EN - Page 29
Installation checklist
 |
View all Asko D5233 manuals
Add to My Manuals
Save this manual to your list of manuals |
Page 29 highlights
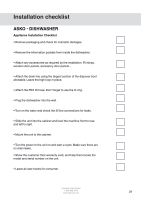
Installation checklist ASKO - DISHWASHER Appliance Installation Checklist • Remove packaging and check for cosmetic damages. • Remove the information packets from inside the dishwasher. • Attach any accessories as required by the installation. Fill strips, wooden door panels, accessory door panels... • Attach the drain line using the largest section of the disposer boot allowable. Leave the high loop in place. • Attach the PEX fill hose. Don't forget to use the O-ring. • Plug the dishwasher into the wall. • Turn on the water and check the fill line connections for leaks. • Slide the unit into the cabinet and level the machine front to rear, and left to right. • Mount the unit to the cabinet. • Turn the power to the unit on and start a cycle. Make sure there are no drain leaks. • Show the customer their warranty card, and help them locate the model and serial number on the unit. • Leave all user books for consumer. Customer Care Center 1-800-898-1879 www.askousa.com 29
-
 1
1 -
2
-
3
-
4
-
5
-
6
-
7
-
8
-
9
-
10
-
11
-
12
-
13
-
14
-
15
-
16
-
17
-
18
-
19
-
20
-
21
-
22
-
23
-
 24
24 -
 25
25 -
 26
26 -
 27
27 -
 28
28 -
 29
29 -
 30
30 -
 31
31 -
 32
32
 |
 |