Asko D5636XXLSHI Installation instructions EN
Asko D5636XXLSHI Manual
 |
View all Asko D5636XXLSHI manuals
Add to My Manuals
Save this manual to your list of manuals |
Asko D5636XXLSHI manual content summary:
- Asko D5636XXLSHI | Installation instructions EN - Page 1
CONTENTS INTRODUCTION...2 WHAT YOU NEED...2 SAFETY INSTRUCTIONS...3 BEFORE STARTING THE INSTALLATION 3 XXL DISHWASHERS...4 - UNIT DIMENSIONS...4 - PREPARING THE LOCATION 4 ADA AND XL DISHWASHERS...5 - UNIT DIMENSIONS...5 - PREPARING THE LOCATION 5 CORNER INSTALLATION...6 EASYINSTALL CONNECTIONS - Asko D5636XXLSHI | Installation instructions EN - Page 2
damage must be reported to the ASKO dealer within five days from the date of purchase. As soon as you unpack the dishwasher, thoroughly check it for cosmetic damage the best height. To eliminate potential drain problems, leave this hose in place. 2 CUSTOMER CARE CENTER 1-800-898-1879 • WWW.ASKONA. - Asko D5636XXLSHI | Installation instructions EN - Page 3
instructions provided here. • An incorrect or defective installation can lead to higher consumption of energy, water and dishwashing mm). • Attach the light shielding film (see FITTING THE DISHWASHER IN PLACE). Only select models. NOTE: Check that the fitting and connection measurements are correct - Asko D5636XXLSHI | Installation instructions EN - Page 4
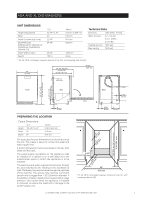
873 to 927 mm 610 mm 610 mm The best place for your dishwasher is in the kitchen near the sink. This makes it easier to connect the water and drain supply lines. A built-in dishwasher must be enclosed on the top, both sides and the back. The power-supply - Asko D5636XXLSHI | Installation instructions EN - Page 5
819 to 864 mm 610 mm 610 mm The best place for your dishwasher is in the kitchen near the sink. This makes it easier to connect the water and drain supply lines. A built-in dishwasher must be enclosed on the top, both sides and the back. The power-supply - Asko D5636XXLSHI | Installation instructions EN - Page 6
3/8˝ compression fitting PEX tubing has a 95-year spec life. Fits American dishwasher water supply valves. Be sure to install the O-Ring which is attached water line inlet valve is on the right rear of the machine. For service convenience, a shut-off valve (not supplied) should be installed in the - Asko D5636XXLSHI | Installation instructions EN - Page 7
LOOP The high loop is necessary for proper draining. Therefore, all ASKO dishwashers have the drain hoses attached to the drain pump and fastened to potential drain problems, simply leave this hose in place. DO NOT REMOVE THE HIGH LOOP ATTACHED TO THE BACK OF THE DISHWASHER! IMPORTANT THINGS - Asko D5636XXLSHI | Installation instructions EN - Page 8
wiring do not touch any exposed terminals of dishwasher wiring. CORD-CONNECTED APPLIANCE GROUNDING INSTRUCTIONS This appliance must be grounded. In the event a risk of electric shock. Check with a qualified electrican or service representative if you are in doubt whether the appliance is properly - Asko D5636XXLSHI | Installation instructions EN - Page 9
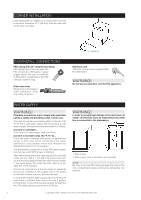
the toe kick and toe kick insulation (only on certain models) from the top of the dishwasher. Be sure to remove the transport protection for the door when unpacking the dishwasher. ATTACH THE LIGHT SHIELDING FILM (Only certain models.) Attach the light shielding film (packed in the document bag - Asko D5636XXLSHI | Installation instructions EN - Page 10
feet into place on all steel feet (included in document bag). (Only certain models.) 3. Start by measuring the height from the floor to the bottom edge with edge protectors/rubber grommets. 12. Place the spirit level on the dishwasher door to check that the machine is level and adjust if necessary. - Asko D5636XXLSHI | Installation instructions EN - Page 11
into position. TESTING FOR LEAKS 1. Turn on the water supply and check for leaks. 2. Turn the power on at breaker/fuse box and test the dishwasher operation by running a Rinse & Hold cycle. (This should take about six minutes.) 3. Turn off the electrical power and check for leaks under the - Asko D5636XXLSHI | Installation instructions EN - Page 12
TO THE CABINET It's necessary to fasten the dishwasher to the cabinet so it won't tilt when the is level. 4 3 2x 2x 1" (25 mm) *5 NOTE: When it is not possible to attach the dishwasher to the cabinet or the underside of*th6e counter top, you should install tip guards to prevent the machine from - Asko D5636XXLSHI | Installation instructions EN - Page 13
INSTALLING THE TOE KICK TYPE A 7 Insulation material 1. 2. 3. The toe kick is attached with two screws that can only be adjusted vertically. NOTE: or CUSTOMER CARE CENTER 1-800-898-1879 • WWW.ASKONA.COM 13 - Asko D5636XXLSHI | Installation instructions EN - Page 14
INSTALLING THE TOE KICK TYPE B 7 Insulation material 1. 4. 5. x x 6. 2. 3. 14 CUSTOMER CARE CENTER 1-800-898-1879 • WWW.ASKONA.COM - Asko D5636XXLSHI | Installation instructions EN - Page 15
NOTES CUSTOMER CARE CENTER 1-800-898-1879 • WWW.ASKONA.COM 15 - Asko D5636XXLSHI | Installation instructions EN - Page 16
ASKO - DISHWASHER Appliance Installation Checklist • Remove packaging and check for cosmetic damages. • Remove the information packets from inside the dishwasher drain • Show the customer their warranty card, and help them locate the model and serial number on the unit. • Leave all user books for
-
 1
1 -
 2
2 -
 3
3 -
 4
4 -
 5
5 -
 6
6 -
 7
7 -
8
-
9
-
10
-
11
-
12
-
13
-
14
-
15
-
16
 |
 |

Installation Instructions
Dishwasher
INTRODUCTION
.........................................................................................................................
2
WHAT YOU NEED
......................................................................................................................
2
SAFETY INSTRUCTIONS
............................................................................................................
3
BEFORE STARTING THE INSTALLATION
..................................................................................
3
XXL DISHWASHERS
...................................................................................................................
4
– UNIT DIMENSIONS
...............................................................................................................
4
– PREPARING THE LOCATION
................................................................................................
4
ADA AND XL DISHWASHERS
....................................................................................................
5
– UNIT DIMENSIONS
...............................................................................................................
5
– PREPARING THE LOCATION
................................................................................................
5
CORNER INSTALLATION
...........................................................................................................
6
EASYINSTALL CONNECTIONS
..................................................................................................
6
WATER SUPPLY
..........................................................................................................................
6
DRAIN CONNECTIONS
..............................................................................................................
7
ELECTRICAL CONNECTIONS
...................................................................................................
8
PREPARING THE DISHWASHER FOR INSTALLATION
..............................................................
9
MOVING THE MACHINE INTO PLACE
......................................................................................
9
CONNECTING THE ELECTRIC CABLE
...................................................................................
11
CONNECTING THE WATER SUPPLY
.......................................................................................
11
FASTENING THE DISHWASHER TO THE CABINET
................................................................
12
INSTALLING THE TOE KICK
....................................................................................................
12
INSTALLATION CHECKLIST
.....................................................................................................
16
CONTENTS
IMPORTANT!
READ ALL OF THESE INSTRUCTIONS BEFORE INSTALLING THE DISHWASHER.
SAVE THESE INSTRUCTIONS FOR FUTURE REFERENCE.