Asus A7V400-MX SE Motherboard DIY Troubleshooting Guide
Asus A7V400-MX SE Manual
 |
View all Asus A7V400-MX SE manuals
Add to My Manuals
Save this manual to your list of manuals |
Asus A7V400-MX SE manual content summary:
- Asus A7V400-MX SE | Motherboard DIY Troubleshooting Guide - Page 1
U1942 A7V400-MX SE Quick Start Guide Français Deutsch Italiano Español Português First Edition V1 Published January 2005 Copyright © 2005 ASUSTeK COMPUTER INC. All Rights Reserved. 15-063509100 - Asus A7V400-MX SE | Motherboard DIY Troubleshooting Guide - Page 2
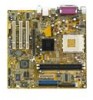
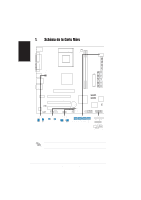
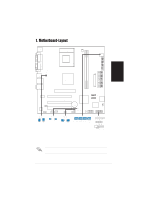
Français 1. Schéma de la Carte Mère PS/2KBMS T: Mouse -MX SE PCI2 CR2032 3V Lithium Cell CMOS Power VIA VT8237 PCI3 CLRTC USBPWR56 USBPWR78 SB_PWR AUX CD USB56 USB78 2Mbit ISA BIOS SATA2 SATA1 Super I/O CHA_FAN1 GAME PANEL 1 GHz sur cette carte mère. 2 Carte mère ASUS A7V400-MX SE - Asus A7V400-MX SE | Motherboard DIY Troubleshooting Guide - Page 3
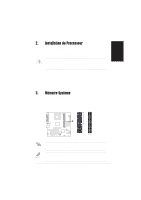
) supportant jusqu'à 2 Go de DIMM SDRAM DDR 400*/333/266/200 unbuffered non-ECC. Chaque emplacement DIMM est double face. Vous pouvez installer n'importe quelle DIMM DDR de 64Mo, 128Mo, 256Mo, 512Mo et 1Go dans les emplacements DIMM. 104 Pins 80 Pins A7V400-MX SE DIMM1 DIMM2 A7V400-MX SE 184 - Asus A7V400-MX SE | Motherboard DIY Troubleshooting Guide - Page 4
est activé dans votre ordinateur, le CD affiche automatiquement l'écran de bienvenue et les menus d'installation. Si l'écran de bienvenue n'apparaît pas automatiquement, localisez le fichier ASSETUP.EXE dans le dossier BIN du CD technique et double-cliquez dessus. 4 Carte mère ASUS A7V400-MX SE - Asus A7V400-MX SE | Motherboard DIY Troubleshooting Guide - Page 5
-MX SE PCI2 CR2032 3V Lithium Cell CMOS Power VIA VT8237 PCI3 CLRTC USBPWR56 USBPWR78 SB_PWR AUX CD USB56 USB78 2Mbit ISA BIOS SATA2 SATA1 Super I/O CHA_FAN1 GAME PANEL USBPWR12 USBPWR34 2 Taktfrequenz von kleiner 1 GHz dürfen nicht verwendet werden. ASUS A7V400-MX SE-Motherboard 5 - Asus A7V400-MX SE | Motherboard DIY Troubleshooting Guide - Page 6
Sie die CPU auf den Sockel aus, so daß ihre markierte Ecke in Richtung des Hebelgelenks zeigt. 4. Setzen Sie die CPU vorsichtig in den Sockel, bis sie richtig sitzt verwenden.Besuchen Sie bitte die ASUS-Website für die Liste der qualifizierten Arbeitsspeicher (QVL). 6 ASUS A7V400-MX SE-Motherboard - Asus A7V400-MX SE | Motherboard DIY Troubleshooting Guide - Page 7
Aktualisieren des BIOS Verwenden des AwardBIOS Flash-Utility zum Aktualisieren des BIOS Das Basic Input/Output System (BIOS) kann mit Hilfe des integrierten AwardBIOS Flash Memory ASSETUP.EXE in dem BIN-Ordner auf der Support CD, um das Installationsmenü aufzurufen. ASUS A7V400-MX SE-Motherboard 7 - Asus A7V400-MX SE | Motherboard DIY Troubleshooting Guide - Page 8
-MX SE PCI2 CR2032 3V Lithium Cell CMOS Power VIA VT8237 PCI3 CLRTC USBPWR56 USBPWR78 SB_PWR AUX CD USB56 USB78 2Mbit ISA BIOS SATA2 SATA1 Super I/O CHA_FAN1 GAME PANEL USBPWR12 USBPWR34 2 1 +5V di utilizzo inferiori ad 1 GHz su questa scheda madre. 8 Scheda madre ASUS A7V400-MX SE - Asus A7V400-MX SE | Motherboard DIY Troubleshooting Guide - Page 9
MHz (DDR333). Per poter garantire la perfetta compatibilità dei moduli, si raccomanda di utilizzare moduli di memoria acquistati presso lo stesso venditore. Visitare il sito ASUS per ottenere un elenco di venditori autorizzati. Scheda madre ASUS A7V400-MX SE 9 - Asus A7V400-MX SE | Motherboard DIY Troubleshooting Guide - Page 10
(OS) Windows 2000/XP. Installate sempre se Autorun è attivato nel vostro computer. Se lo schermo di benvenuto non compare automaticamente, trovate e cliccate due volte il file ASSETUP.EXE dalla cartella BIN nel CD di supporto per mostrare i menu. Italiano 10 Scheda madre ASUS A7V400-MX SE - Asus A7V400-MX SE | Motherboard DIY Troubleshooting Guide - Page 11
1. Distribución de placa base PS/2KBMS T: Mouse B: -MX SE PCI2 CR2032 3V Lithium Cell CMOS Power VIA VT8237 PCI3 CLRTC USBPWR56 USBPWR78 SB_PWR AUX CD USB56 USB78 2Mbit ISA BIOS SATA2 SATA1 Super I/O CHA_FAN1 GAME PANEL una velocidad inferior a 1 GHz. Placa base ASUS A7V400-MX SE 11 - Asus A7V400-MX SE | Motherboard DIY Troubleshooting Guide - Page 12
Sin embargo, un DIMM DDR400 sólo podría ejecutar a velocidades de hasta 333MHZ (DDR333). Para una compatibilidad óptima, se recomienda que obtenga módulos de memoria del mismo proveedor. Visite el sitio web de ASUS para obtener la lista de Proveedores cualificados. 12 Placa base ASUS A7V400-MX SE - Asus A7V400-MX SE | Motherboard DIY Troubleshooting Guide - Page 13
y los menús de instalación si su equipo tiene activada la función de reproducción automática. Si la pantalla de bienvenida no aparece automáticamente, localice y haga doble clic sobre el archivo ASSETUP.EXE de la carpeta BIN del CD para mostrar los menús. Español Placa base ASUS A7V400-MX SE 13 - Asus A7V400-MX SE | Motherboard DIY Troubleshooting Guide - Page 14
-MX SE PCI2 CR2032 3V Lithium Cell CMOS Power VIA VT8237 PCI3 CLRTC USBPWR56 USBPWR78 SB_PWR AUX CD USB56 USB78 2Mbit ISA BIOS SATA2 SATA1 Super I/O CHA_FAN1 GAME PANEL USBPWR12 USBPWR34 2 1 + HDLED PWRBTN SMI * Requires an ATX power supply. усский 1 ц. 14 ASUS A7V400-MX SE - Asus A7V400-MX SE | Motherboard DIY Troubleshooting Guide - Page 15
*/333/266/200 DDR SDRAM DIMM DIMM DIMM DDR DIMM 64 байт, 128 байт, 256 байт, 512 1 байт. 104 Pins усский 80 Pins DIMM1 DIMM2 A7V400-MX SE A7V400-MX SE 184-pin DDR DIMM sockets DDR400 DIMM DDR400 DIMM 333 ц (DDR333). ASUS.. ASUS A7V400-MX SE 15 - Asus A7V400-MX SE | Motherboard DIY Troubleshooting Guide - Page 16
Delete POST. BIOS AwardBIOS Flash BIOS BIOS AwardBIOS Flash Memory Writer AWDFLASH.EXE AwardBIOS Flash Memory Writer Alt> + - Asus A7V400-MX SE | Motherboard DIY Troubleshooting Guide - Page 17
-MX SE PCI2 CR2032 3V Lithium Cell CMOS Power VIA VT8237 PCI3 CLRTC USBPWR56 USBPWR78 SB_PWR AUX CD USB56 USB78 2Mbit ISA BIOS SATA2 SATA1 Super I/O CHA_FAN1 GAME PANEL USBPWR12 processadores com velocidades inferiores a 1 GHz nesta placa-principal. Português ASUS A7V400-MX SE 17 - Asus A7V400-MX SE | Motherboard DIY Troubleshooting Guide - Page 18
(s) ranhura(s). No entanto, a velocidade máxima dos DIMMs DDR400 é de apenas 333 MHz (DDR333). Para uma óptima compatibilidade, recomendamos-lhe a obtenção de módulos de memória junto do mesmo vendedor. Visite o web site da ASUS para consultar a lista de Vendedores Aprovados. 18 ASUS A7V400-MX SE - Asus A7V400-MX SE | Motherboard DIY Troubleshooting Guide - Page 19
de instalação caso a função de execução automática esteja activada no computador. Se o ecrã de boas-vindas não aparecer automaticamente, procure e faça um duplo clique sobre o ficheiro ASSETUP.EXE existente na pasta BIN do CD de suporte para poder aceder aos menus. Português ASUS A7V400-MX SE - Asus A7V400-MX SE | Motherboard DIY Troubleshooting Guide - Page 20
www.asus.com
-
 1
1 -
 2
2 -
 3
3 -
 4
4 -
 5
5 -
 6
6 -
 7
7 -
8
-
9
-
10
-
11
-
12
-
13
-
14
-
15
-
16
-
17
-
18
-
19
-
20
 |
 |
A7V400-MX SE
Quick Start Guide
First Edition V1 Published January 2005
Copyright © 2005 ASUSTeK COMPUTER INC. All Rights Reserved.
15-063509100
U1942
Français
Deutsch
Italiano
Español
±усский
Português