Asus CM1745 CM1745 User's Manual - Page 56
Nero 9, Installing Nero 9 - update
 |
View all Asus CM1745 manuals
Add to My Manuals
Save this manual to your list of manuals |
Page 56 highlights
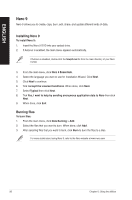
ENGLISH Nero 9 Nero 9 allows you to create, copy, burn, edit, share, and update different kinds of data. Installing Nero 9 To install Nero 9: 1. Insert the Nero 9 DVD into your optical drive. 2. If Autorun is enabled, the main menu appears automatically. If Autorun is disabled, double-click the SeupX.exe file from the main directory of your Nero 9 DVD. 3. From the main menu, click Nero 9 Essentials. 4. Select the language you want to use for Installation Wizard. Click Next. 5. Click Next to continue. 6. Tick I accept the License Conditions. When done, click Next. 7. Select Typical then click Next. 8. Tick Yes, I want to help by sending anonymous application data to Nero then click Next. 9. When done, click Exit. Burning files To burn files: 1. From the main menu, click Data Burning > Add. 2. Select the files that you want to burn. When done, click Add. 3. After selecting files that you want to burn, click Burn to burn the files to a disc. For more details about using Nero 9, refer to the Nero website at www.nero.com 56 Chapter 6: Using the utilities
-
 1
1 -
2
-
3
-
4
-
5
-
6
-
7
-
8
-
9
-
10
-
11
-
12
-
13
-
14
-
15
-
16
-
17
-
18
-
19
-
20
-
21
-
22
-
23
-
24
-
25
-
26
-
27
-
28
-
29
-
30
-
31
-
32
-
33
-
34
-
35
-
36
-
37
-
38
-
39
-
40
-
41
-
42
-
43
-
44
-
45
-
46
-
47
-
48
-
49
-
50
-
 51
51 -
 52
52 -
 53
53 -
 54
54 -
 55
55 -
 56
56 -
 57
57 -
 58
58 -
 59
59 -
 60
60 -
 61
61 -
62
-
63
-
64
-
65
-
66
 |
 |