Asus ET2040IUK ASUS AIO Win10 manual for English
Asus ET2040IUK Manual
 |
View all Asus ET2040IUK manuals
Add to My Manuals
Save this manual to your list of manuals |
Asus ET2040IUK manual content summary:
- Asus ET2040IUK | ASUS AIO Win10 manual for English - Page 1
E10684 First Edition July 2015 User Guide for Windows® 10 System requirements To facilitate a smoother transition from your previous operating system, read the system requirements below before upgrading to Windows® 10 Processor 1 - Asus ET2040IUK | ASUS AIO Win10 manual for English - Page 2
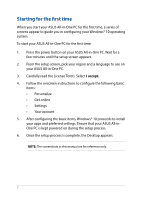
PC for the first time, a series of screens appear to guide you in configuring your Windows® 10 operating system. To start read the License Terms. Select I accept. 4. Follow the onscreen instructions to configure the following basic items: • Personalize • Get online • manual are for reference only. 2 - Asus ET2040IUK | ASUS AIO Win10 manual for English - Page 3
Start menu The Start menu is the main gateway to your ASUS All-in-One PC's programs, Windows® apps, folders, and settings. Change account settings, lock, or sign out from your account Launch an app from the Start screen Launch Taskview Launch an app from the taskbar Launch Search Launch the - Asus ET2040IUK | ASUS AIO Win10 manual for English - Page 4
Launching the Start menu Tap the Start button your desktop. in the lower-left corner of Position your mouse pointer over the Start button in the lower-left corner of your desktop then click it. Press the Windows logo key on your keyboard. Opening programs from the Start menu One of the most - Asus ET2040IUK | ASUS AIO Win10 manual for English - Page 5
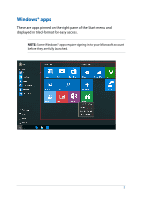
Windows® apps These are apps pinned on the right pane of the Start menu and displayed in tiled-format for easy access. NOTE: Some Windows® apps require signing in to your Microsoft account before they are fully launched. 5 - Asus ET2040IUK | ASUS AIO Win10 manual for English - Page 6
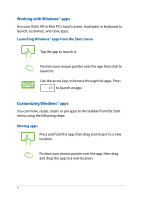
Working with Windows® apps Use your ASUS All-in-One PC's touch screen, touchpad, or keyboard to launch, customize, and close apps. Launching Windows® apps from the Start menu Tap the app to launch it. Position your mouse pointer over the app then click to launch it. Use the arrow keys to browse - Asus ET2040IUK | ASUS AIO Win10 manual for English - Page 7
Resizing apps Press and hold the app, then tap tile size. and select an app Position your mouse pointer over the app and right-click it, then click Resize and select an app tile size. Use the arrow keys to navigate to the app. Press , then select Resize and select an app tile size. Unpinning - Asus ET2040IUK | ASUS AIO Win10 manual for English - Page 8
Pinning apps to the taskbar Press and hold the app, then tap Pin to taskbar. Position your mouse pointer over the app and right-click it, then click Pin to taskbar. Use the arrow keys to navigate to the app. Press , then select Pin to taskbar. Pinning more apps to the Start menu From All apps, - Asus ET2040IUK | ASUS AIO Win10 manual for English - Page 9
Task view Quickly switch between opened apps and programs using the task view feature, you can also use task view to switch between desktops. Launching task view Tap the icon on the taskbar or swipe form the left edge of the screen. Position your mouse pointer over the taskbar and click it. icon - Asus ET2040IUK | ASUS AIO Win10 manual for English - Page 10
Snap feature The Snap feature displays apps side-by-side, allowing you to work or switch between apps. Snap hotspots You can drag and drop apps to these hotspots to snap them into place. 10 - Asus ET2040IUK | ASUS AIO Win10 manual for English - Page 11
Using Snap 1. 2. or 3. Launch the app you wish to snap. Drag the title bar of your app and drop the app to the edge of the screen to snap. Launch another app and repeat the above steps to snap another app. 1. Launch the app you wish to snap. 2. Press and hold the key, then use the arrow keys to - Asus ET2040IUK | ASUS AIO Win10 manual for English - Page 12
Action Center Action Center consolidates notifications from apps and presents a single place where you can interact with them. It also has a really useful Quick Actions section at the bottom. Launching Action Center Click the icon on the taskbar or swipe from the right edge of the screen. - Asus ET2040IUK | ASUS AIO Win10 manual for English - Page 13
Other keyboard shortcuts Using the keyboard, you can also use the following shortcuts to help you launch applications and navigate Windows® 10. \ Launches Start menu Launches Action Center Launches the desktop Launches the File Explorer Opens the Share panel Launches Settings Launches - Asus ET2040IUK | ASUS AIO Win10 manual for English - Page 14
Launches Search Launches Project panel Opens the Run window Opens Ease of Access Center Opens the context menu of the Start button Launches the magnifier icon and zooms in your screen Zooms out your screen Opens Narrator Settings 14 - Asus ET2040IUK | ASUS AIO Win10 manual for English - Page 15
Connecting to wireless networks Wi-Fi Access emails, surf the Internet, and share applications via social networking sites using your ASUS All-in-One PC's Wi-Fi connection. Connecting Wi-Fi Connect your ASUS All-in-One PC to a Wi-Fi network by using the following steps: 1. Select the icon from the - Asus ET2040IUK | ASUS AIO Win10 manual for English - Page 16
Bluetooth Use Bluetooth to facilitate wireless data transfers with other Bluetoothenabled devices. Pairing with other Bluetooth-enabled devices You need to pair your ASUS All-in-One PC with other Bluetooth-enabled devices to enable data transfers. Connect your devices by using the following steps: - Asus ET2040IUK | ASUS AIO Win10 manual for English - Page 17
, such as local area networks and broadband Internet connection, using your ASUS All-in-One PC's LAN port. NOTE: Contact your Internet Service Provider (ISP) for details or your network administrator for assistance in setting up your Internet connection. To configure your settings, refer to the - Asus ET2040IUK | ASUS AIO Win10 manual for English - Page 18
under Configuring a dynamic IP/PPPoE network connection. 2 Select Use the following IP address. or 3. Type the IP address, Subnet mask and Default gateway from your service provider. 4. If needed, you can also type the preferred DNS server address and alternate DNS server address then select OK. 18 - Asus ET2040IUK | ASUS AIO Win10 manual for English - Page 19
Turning your ASUS All-in-One PC off You can turn off your ASUS All-in-One PC by doing either of the following procedures: • Launch the Start menu, then select > Shut down to do a normal shutdown. or • From the log-in screen, select > Shut down. • Press to launch Shut Down Windows. Select - Asus ET2040IUK | ASUS AIO Win10 manual for English - Page 20
Putting your ASUS All-in-One PC to sleep To put your ASUS All-in-One PC to Sleep mode: • Launch the Start menu, then select > Sleep to put your ASUS All-in-One PC to sleep. or • From the log-in screen, select > Sleep. Press to launch Shut Down Windows. Select Sleep from the drop-down list - Asus ET2040IUK | ASUS AIO Win10 manual for English - Page 21
! Inappropriate BIOS settings may result to instability or boot failure. We strongly recommend that you change the BIOS settings only with the help of a trained service personnel. Quickly enter the BIOS To access the BIOS: • When your ASUS All-in-One PC is off, press the power button for at least - Asus ET2040IUK | ASUS AIO Win10 manual for English - Page 22
Recovering your system Using recovery options on your ASUS All-in-One PC allows you to restore the system to its original state or simply refresh its settings to help improve performance. IMPORTANT! • Backup all your data files before doing any recovery option on your ASUS All-in-One PC. • Note down - Asus ET2040IUK | ASUS AIO Win10 manual for English - Page 23
All-in-One PC such as: - Using a USB drive, network connection or Windows recovery DVD to startup your ASUS All-in-One PC. - Using Troubleshoot to enable any of these advanced recovery options: System Restore, System Image Recovery, Startup Repair, Command Prompt, UEFI Firmware Settings, and Startup - Asus ET2040IUK | ASUS AIO Win10 manual for English - Page 24
2. Under the Update and security option, select Recovery then select the recovery option you would like to perform. 24 - Asus ET2040IUK | ASUS AIO Win10 manual for English - Page 25
Using touch screen panel gestures (on selected models) NOTE: The following screenshots are for reference only. The touch screen panel's appearance may vary depending on model. The gestures allow you to launch programs and access the settings of your ASUS All-in-One PC. The functions can be - Asus ET2040IUK | ASUS AIO Win10 manual for English - Page 26
Tap/Double-tap Press and hold • Tap an app to select it. • Double-tap an app to launch it. Press and hold to open the rightclick menu. Zoom in Zoom out Spread apart your two fingers on the touch screen panel. Bring together your two fingers on the touch screen panel. 26 - Asus ET2040IUK | ASUS AIO Win10 manual for English - Page 27
Finger slide Drag Slide your finger to scroll up and • down and slide your finger to pan the screen left or right. • Drag to create a selection box around multiple items. Drag and drop an item to move it to a new location. 27 - Asus ET2040IUK | ASUS AIO Win10 manual for English - Page 28
Note: Download the multi-language versions of this user manual from the ASUS Support site at http://support. asus.com
-
 1
1 -
 2
2 -
 3
3 -
 4
4 -
 5
5 -
 6
6 -
 7
7 -
8
-
9
-
10
-
11
-
12
-
13
-
14
-
15
-
16
-
17
-
18
-
19
-
20
-
21
-
22
-
23
-
24
-
25
-
26
-
27
-
28
 |
 |
1
User Guide for Windows
®
10
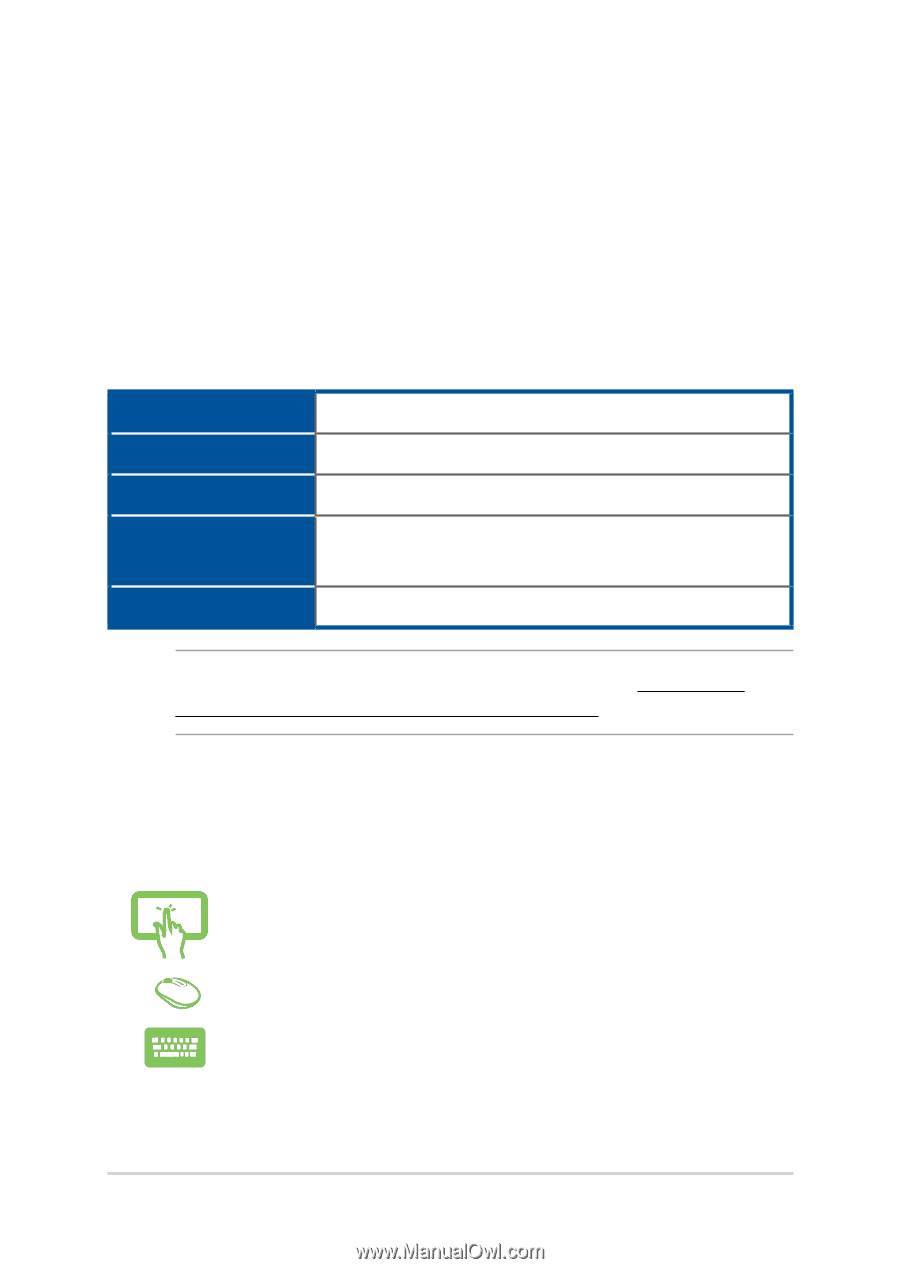
System requirements
To facilitate a smoother transition from your previous operating system,
read the system requirements below before upgrading to Windows
®
10
Processor
1 GHz or faster
RAM
1GB (32-bit) or GB (64-bit)
Hard disk space
16 GB (32-bit) or 20 GB (64-bit)
Graphics card
Microsoft DirectX9 (or higher) graphics device
with WDDM 1.0 driver
Screen resolution
1024 x 600
NOTE:
For updates on these system requirements, visit
http://www.
microsoft.com/en-us/windows/windows-10-faq
Icons
The icons below indicate the devices you can use for completing a
series of tasks or procedures on your ASUS All-in-One PC.
= (optional) Use the touch screen panel.
= Use the wireless / wired mouse.
= Use the wireless / wired keyboard.
E10684
First Edition
July 2015