Asus ET2411IUKI User's Manual for English Edition
Asus ET2411IUKI Manual
 |
View all Asus ET2411IUKI manuals
Add to My Manuals
Save this manual to your list of manuals |
Asus ET2411IUKI manual content summary:
- Asus ET2411IUKI | User's Manual for English Edition - Page 1
English User Manual ET2411/ ET2210 Series - Asus ET2411IUKI | User's Manual for English Edition - Page 2
, except documentation kept by the purchaser for backup purposes, without the express written permission of ASUSTeK COMPUTER, INC. ("ASUS"). Products and corporate names mentioned in this manual may or may not be registered trademarks or copyrights of their respective companies, and are used for - Asus ET2411IUKI | User's Manual for English Edition - Page 3
product 11 Notes for this manual...11 Safety information...12 Setting up your system...12 Care during use...12 Sound Pressure Warning...13 TV Tuner (on selected models 13 Adapter...13 DC Fan Warning...13 Welcome 14 Package contents...14 Getting to know your All-in-one PC 15 Front view...15 Rear - Asus ET2411IUKI | User's Manual for English Edition - Page 4
English Positioning your All-in-one PC 23 Placing on the desktop...23 Mounting to the wall...24 Setting up your All-in-one PC 26 Connecting the wired keyboard and mouse 26 Connecting the wireless keyboard and mouse 26 Powering on the system...27 Powering off...27 Configuring a wireless - Asus ET2411IUKI | User's Manual for English Edition - Page 5
warning This equipment must be installed and operated in accordance with provided instructions and the antenna(s) used for this transmitter must be installed to installation instructions and transmitter operating conditions for satisfying RF exposure compliance. All-in-one PC ET2411/ ET2210 Series - Asus ET2411IUKI | User's Manual for English Edition - Page 6
the transmitting antenna during transmitting. End users must follow the specific operating instructions for satisfying RF exposure compliance. Operation is subject to the following two spectrum as in [Article 3.2] • Radio test suites according to [EN 300 328-2] 6 All-in-one PC ET2411/ ET2210 Series - Asus ET2411IUKI | User's Manual for English Edition - Page 7
Domains N. America 2.412-2.462 GHz Ch01 through CH11 Japan 2.412-2.484 GHz Ch01 through Ch14 Europe ETSI 2.412-2.472 GHz Ch01 through Ch13 All-in-one PC ET2411/ ET2210 Series 7 - Asus ET2411IUKI | User's Manual for English Edition - Page 8
an EIRP of less than 100mW indoors and less than 10mW outdoors: 01 Ain 02 Aisne 03 Allier 05 Hautes Alpes 08 Ardennes 09 Ariège 11 Aude 12 Aveyron 16 Charente 24 Dordogne 25 Doubs 26 Dr Your WLAN Card transmits less than 100mW, but more than 10mW. 8 All-in-one PC ET2411/ ET2210 Series - Asus ET2411IUKI | User's Manual for English Edition - Page 9
recommended by the manufacturer. Dispose of used batteries according to the manufacturer's instructions. No Exposure to Liquids DO NOT expose to or use near liquids, substances in our products at ASUS REACH website at http://csr.asus.com/english/REACH.htm. All-in-one PC ET2411/ ET2210 Series 9 - Asus ET2411IUKI | User's Manual for English Edition - Page 10
EU REACH SVHC Korea RoHS Swiss Energy Laws ASUS Recycling/Takeback Services ASUS recycling and takeback programs come from our commitment -in-one PC must be mounted to a bracket which guarantees the necessary stability considering the weight of the All-in-one PC. The All-in-one PC shall - Asus ET2411IUKI | User's Manual for English Edition - Page 11
information for special situations. All illustrations and screenshots in this manual are for reference only. Actual product specifications and software screen images may vary with territories. Visit the ASUS website at www.asus.com for the latest information. All-in-one PC ET2411/ ET2210 Series 11 - Asus ET2411IUKI | User's Manual for English Edition - Page 12
English Safety information Your All-in-one PC ET2411/ ET2210 Series is designed and tested to meet the latest standards of safety for information technology equipment. However, to ensure your safety, it is important that you read the following safety instructions. Setting up your system • Read and - Asus ET2411IUKI | User's Manual for English Edition - Page 13
: 50-60Hz Rating output current: 120W (19V, 6.32A) Rating output voltage: 19Vdc 2. The socket outlet must be near to the unit and easily accessible. DC Fan Warning Please note that the DC fan is a moving part that may cause DANGER. Ensure to keep your body from the moving - Asus ET2411IUKI | User's Manual for English Edition - Page 14
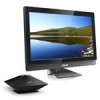
is damaged or missing, contact your retailer. Package contents All-in-one PC ET2411/ ET2210 Series Keyboard (wired or wireless) Mouse (wired or wireless) Quick Guide AC adapter Power cord Quick Start Guide Remote Control (optional) Warranty Card Subwoofer (optional) KBM USB receiver dongle - Asus ET2411IUKI | User's Manual for English Edition - Page 15
English Getting to know your All-in-one PC Front view Refer to the following diagram to identify the components on this side of the system. 1 2 3 12 11 4 5 6 10 9 8 7 All-in-one PC ET2411/ ET2210 Series 15 - Asus ET2411IUKI | User's Manual for English Edition - Page 16
to decrease the volume. 10 MODE Button Press to switch the display signal source.When switched to HDMI-in and VGA-in, the All-in-one PC can be used as a standard desktop LCD monitor. 11 12 Audio Speaker The built-in stereo speaker system allows you to hear audio without additional - Asus ET2411IUKI | User's Manual for English Edition - Page 17
to identify the components on this side of the system. English 123 4 5 6 78 9 1 Kensington® Lock port The Kensington® lock port allows the computer to be secured using Kensington® compatible security products. These security products usually include a metal cable and lock that prevent the - Asus ET2411IUKI | User's Manual for English Edition - Page 18
-top box or DVD player. 8 HDMI Output Port Please connect this port with devices equipped with HDMI input port, such as LCD monitor or projector. 9 Display (Monitor) Input (on selected models) The display input port supports a standard VGA cable and helps turn your All-in-one PC into - Asus ET2411IUKI | User's Manual for English Edition - Page 19
Serial-ATA hard disk drive. 2 3 DO NOT insert a different connector to the external SATA 4 port. 5 6 3 Memory card reader This All-in-one PC has a built-in memory card reader that supports SD cards used in devices like digital cameras, MP3 players, mobile phones, and PDAs. 4 Headphone - Asus ET2411IUKI | User's Manual for English Edition - Page 20
The subwoofer jack can ONLY be connected to All-in-one PC subwoofers or sound devices by ASUS. DO NOT connect other devices to this jack. clicking the optical drive in Windows "Computer" and selecting Eject. 8 Optical Drive The built-in optical drive may support compact discs (CD) and/or - Asus ET2411IUKI | User's Manual for English Edition - Page 21
brings digital life to your fingertips. With a few touches, you can make All-in-one PC work at your command. Your touch functions like a mouse device: • Touch = left-click on the From the Windows® desktop, click Start > Control Panel > View Devices and Printer. All-in-one PC ET2411/ ET2210 Series 21 - Asus ET2411IUKI | User's Manual for English Edition - Page 22
English 2. Click Change touch input settings. 3. Click the Touch tab on the top and click 4. You will see a virtual mouse on the screen the box before Show the touch pointer screen. • Do not use an abrasive cleaner or a coarse cloth when cleaning the screen. 22 All-in-one PC ET2411/ ET2210 Series - Asus ET2411IUKI | User's Manual for English Edition - Page 23
English Positioning your All-in-one PC Placing on the desktop Place your All-in-one PC on a flat surface such as a table or desk by setting the stand on the platform.Tilt and potential breakage by tilting the display panel within the given range. 20O -5O All-in-one PC ET2411/ ET2210 Series 23 - Asus ET2411IUKI | User's Manual for English Edition - Page 24
mount adapter and a wall mount kit (VESA100 with pad and bracket). Install the wall mount components according to the following instructions. 1. To release the stand, place the All-in-one PC face-down first, resting the display panel on a flat even surface. Lift the stand upwards. Take off the back - Asus ET2411IUKI | User's Manual for English Edition - Page 25
the kit, noting the correct orientation. 5. By following the instructions in the installation manual that came with your wall mount kit (VESA100), fasten the manual carefully before mounting your All-in-one PC to the wall. 4. At least two persons are required to install or remove the All-in-one PC - Asus ET2411IUKI | User's Manual for English Edition - Page 26
English Setting up your All-in-one PC Connecting the wired keyboard and mouse Connect the keyboard 1 and the mouse 2 to the USB port on the rear panel . Actual appearances and specifications (wired or wireless) of the keyboard and mouse may vary by territory. 26 All-in-one PC ET2411/ ET2210 Series - Asus ET2411IUKI | User's Manual for English Edition - Page 27
mouse, touch the display or press any key on the keyboard. • To shut down the system completely, follow the normal Windows shutdown process. All-in-one PC ET2411/ ET2210 Series 27 - Asus ET2411IUKI | User's Manual for English Edition - Page 28
a connection has been established, the connection is shown on the list. 4. You can see the wireless network icon in the Notification area. 28 All-in-one PC ET2411/ ET2210 Series - Asus ET2411IUKI | User's Manual for English Edition - Page 29
triangle in the Windows® Notification area and select Open Network and Sharing Center. Ensure that you have connected the LAN cable to the All-in-one PC. 2. Click Change adapter settings in the left panel. 3. Right-click Local Area Connection and select Properties. All-in - Asus ET2411IUKI | User's Manual for English Edition - Page 30
Default gateway. 7. If needed, enter the Preferred DNS server address. 8. After entering all the related values, click OK to finish the configuration. 30 All-in-one PC ET2411/ ET2210 Series - Asus ET2411IUKI | User's Manual for English Edition - Page 31
to the Network and Sharing Center and then click Set up a new connection or network. 4. Select Connect to the Internet and click Next. All-in-one PC ET2411/ ET2210 Series 31 - Asus ET2411IUKI | User's Manual for English Edition - Page 32
English 5. Select Broadband (PPPoE) and click Next. 6. Enter User name, Password, and Connection name. Click Connect. 7. Click Close to finish the configuration. 32 All-in-one PC ET2411/ ET2210 Series - Asus ET2411IUKI | User's Manual for English Edition - Page 33
English 8. Click the network icon in the notification area and click the connection you just created. 9. Enter your user name and password. Click Connect to connect to the Internet. All-in-one PC ET2411/ ET2210 Series 33 - Asus ET2411IUKI | User's Manual for English Edition - Page 34
Description Audio Out; Connects to headphones. Mic In; Connects to microphone Connects to ASUS All-in-one PC subwoofer (optional) The subwoofer jack can ONLY be connected to All-in-one PC subwoofers or sound devices by ASUS. DO NOT connect other devices to this jack. Doing so may damage the device - Asus ET2411IUKI | User's Manual for English Edition - Page 35
English 2. Select a playback device and click Properties to configure the settings. 3. Do the advanced configurations, such as adjusting the speaker level and output rate. Click OK to finish the configurations. All-in-one PC ET2411/ ET2210 Series 35 - Asus ET2411IUKI | User's Manual for English Edition - Page 36
recovery partition includes an image of the operating system, drivers, and utilities installed on your system at the factory actual size may vary with your PC model. 4. Select a desired USB storage device if more than one USB storage device is connected to your All-in-one PC and click Next. If there - Asus ET2411IUKI | User's Manual for English Edition - Page 37
factory default partition will be displayed. Click Next again. • Restore the Whole Hard Disk Select this option if you want to restore your All-in-one PC to the factory default state.This option deletes all data from your hard disk and creates a new system partition as drive "C" , an empty partition - Asus ET2411IUKI | User's Manual for English Edition - Page 38
English Manufacturer ASUSTek COMPUTER INC. Address, City No. 150, LI-TE RD., PEITOU, TAIPEI 112, TAIWAN R.O.C Country TAIWAN Authorized Representative in Europe ASUS COMPUTER GmbH Address, City HARKORT STR. 21-23, 40880 RATINGEN Country GERMANY 38 All-in-one PC ET2411/ ET2210 Series
-
 1
1 -
 2
2 -
 3
3 -
 4
4 -
 5
5 -
 6
6 -
 7
7 -
8
-
9
-
10
-
11
-
12
-
13
-
14
-
15
-
16
-
17
-
18
-
19
-
20
-
21
-
22
-
23
-
24
-
25
-
26
-
27
-
28
-
29
-
30
-
31
-
32
-
33
-
34
-
35
-
36
-
37
-
38
 |
 |

English
User Manual
ET2411/ ET2210 Series