Asus ITX 220 User Manual
Asus ITX 220 - Motherboard - Mini ITX Manual
 |
UPC - 610839171019
View all Asus ITX 220 manuals
Add to My Manuals
Save this manual to your list of manuals |
Asus ITX 220 manual content summary:
- Asus ITX 220 | User Manual - Page 1
ITX-220 Motherboard - Asus ITX 220 | User Manual - Page 2
Product warranty or service will not be extended if: (1) the product is repaired, modified or altered, unless such repair, modification of alteration is authorized in writing by ASUS; or (2) the serial number of the product is defaced or missing. ASUS PROVIDES THIS MANUAL "AS IS" WITHOUT WARRANTY - Asus ITX 220 | User Manual - Page 3
Contents Notices...v Safety information vi About this guide vii ITX-220 specifications summary viii Chapter 1: Product introduction 1.1 Before you proceed 1-1 1.2 Motherboard overview 1-2 1.2.1 Motherboard layout 1-2 1.2.2 Layout contents 1-2 1.3 Central Processing Unit (CPU 1-3 1.4 System - Asus ITX 220 | User Manual - Page 4
2-7 2.4.2 TPM Configuration 2-7 2.4.3 USB Configuration 2-8 2.4.4 CPU Configuration 2-9 2.4.5 Chipset 2-9 2.4.6 Onboard Devices Configuration 2-10 2.4.7 PCI PnP 2-10 2.5 Power menu 2-11 2.5.1 Suspend Mode 2-11 2.5.2 ACPI 2.0 Support 2-11 2.5.3 ACPI APIC Support 2-11 2.5.4 APM Configuration - Asus ITX 220 | User Manual - Page 5
that may cause undesired operation. This equipment has been tested and found to comply with the limits for a and used in accordance with manufacturer's instructions, may cause harmful interference to radio at ASUS REACH website at http://green.asus.com/english/REACH.htm. DO NOT throw the motherboard - Asus ITX 220 | User Manual - Page 6
outlet you are using, contact your local power company. • If the power supply is broken, do not try to fix it by yourself. Contact a qualified service technician or your retailer. • The optical S/PDIF is an optional component (may or may not be included in your motherboard) and is defined as a CLASS - Asus ITX 220 | User Manual - Page 7
need when installing and configuring the motherboard. How this guide is organized This guide contains the following parts: • Chapter 1: Product introduction This chapter describes the features of the motherboard and the new technology it supports. • Chapter 2: BIOS information This chapter tells how - Asus ITX 220 | User Manual - Page 8
ITX-220 specifications summary CPU Chipset CPU Fan Front Side Bus Memory Graphics Expansion slot Storage Audio LAN USB ASUS special features Rear panel ports Integrated Intel® Celeron® 220 processor Supports Intel® EM64T technology Northbridge: Intel® 945GC Southbridge: Intel® ICH7 Fan Dimensions: - Asus ITX 220 | User Manual - Page 9
connector 1 x 24-pin EATX power connector 1 x 4-pin ATX 12V power connector 8 Mb Flash ROM, AMI BIOS, PnP, DMI v2.0, WfM 2.0, SMBIOS 2.5, ACPI v2.0a 1 x Serial ATA cable 1 x I/O shield Drivers ASUS PC Probe II ASUS Update Anti-virus software (OEM version) User Manual Mini ITX form factor: 6.75 in - Asus ITX 220 | User Manual - Page 10
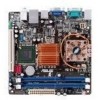
the system is ON, in sleep mode, or in soft-off mode. This is a reminder that you must shut down the system and unplug the power cable before removing or plugging in any motherboard component. The illustration below shows the location of the onboard LED. ASUS ITX-220 1-1 - Asus ITX 220 | User Manual - Page 11
/LED 1. Keyboard/mouse power (3-pin PS2_USBPW1-6) 1-7 8. Standby power LED (SB_PWR) 2. ATX power connectors (24-pin EATXPWR, 4-pin ATX12V) 1-9 9. System panel connector (10-1 pin F_PANEL) 3. Speaker connector (4-pin SPEAKER) 1-10 10. Clear RTC RAM (3-pin CLRTC) 4. USB connector (10-1 pin - Asus ITX 220 | User Manual - Page 12
1.3 Central Processing Unit (CPU) The motherboard comes with an onboard Intel® Celeron® 220 processor and a specially designed CPU heatsink and fan. Ensure that the CPU fan cable is connected to the onboard CPU_Fan connector. ASUS ITX-220 1-3 - Asus ITX 220 | User Manual - Page 13
® OS when you want to install 4GB or more memory on the motherboard. • This motherboard does not support DIMMs made up of 256 megabits (Mb) chips or less. This motherboard supports up to 4GB on Windows® XP Professional x64 and Windows® Vista x64 editions. You may install a maximum of 2GB DIMMs on - Asus ITX 220 | User Manual - Page 14
• A*: Supports one module inserted into either slot as the single-channel memory configuration. • B*: Supports one pair of modules inserted into both the blue slots as one pair of dual-channel memory configuration. Visit the ASUS website at www.asus.com for the latest QVL. ASUS ITX-220 1-5 - Asus ITX 220 | User Manual - Page 15
settings, if any. See Chapter 2 for information on BIOS setup. 2. Assign an IRQ to the card. 3. Install the software drivers for the expansion card. 1.5.3 PCI slot The PCI slot supports cards such as a LAN card, SCSI card, USB card, and other cards that comply with PCI specifications. 1-6 Chapter - Asus ITX 220 | User Manual - Page 16
1-2. 3. Plug the power cord and turn ON the computer. 4. Hold down the key during the boot process and enter BIOS setup to re-enter USB device. This feature requires an ATX power supply that can supply at least 1A on the +5VSB lead, and a corresponding setting in the BIOS. ASUS ITX-220 - Asus ITX 220 | User Manual - Page 17
BLINKING Data activity SPEED LED Status OFF ORANGE GREEN Description 10 Mbps connection 100 Mbps connection 1 Gbps connection ACT/LINK SPEED LED LED LAN port 3. Line In port (light blue). This port connects the tape, CD, DVD player, or other audio sources. 4. Line Out port (lime). This - Asus ITX 220 | User Manual - Page 18
, the system will not boot. • We recommend that you use a PSU with a higher power output when configuring a system with more power-consuming devices or when you intend to install additional devices. The system may become unstable or may not boot up if the power is inadequate. ASUS ITX-220 1-9 - Asus ITX 220 | User Manual - Page 19
at the back of the system chassis. This USB connector complys with USB 2.0 specification that supports up to 480 Mbps connection speed. Never connect a 1394 cable to the USB connector. Doing so will damage the motherboard! The USB module cable is purchased separately. 3. Speaker connector (4-pin - Asus ITX 220 | User Manual - Page 20
The fan connectors support cooling fans of 350 mA~2000 mA (24 W max.) or a total of 1 A~3.48 A (41.76 W max.) at +12V. Connect the fan cables to the fan connectors on the motherboard, ensuring that the caps only when you intend to use the chassis intrusion detection feature. ASUS ITX-220 1-11 - Asus ITX 220 | User Manual - Page 21
supports several chassis-mounted functions. • System power LED (2-pin PLED) This 2-pin connector is for the system power LED. Connect the chassis power LED cable to this connector. The system power soft-off mode depending on the BIOS settings. Pressing the power switch for more than four seconds - Asus ITX 220 | User Manual - Page 22
to this connector, set the Front Panel Support Type item in the BIOS setup to [HD Audio]. If you want to connect an AC'97 front panel audio module to this connector, set the item to [AC97]. By default, this connector is set to [HD Audio]. See section 2.4.5 Chipset for details. ASUS ITX-220 1-13 - Asus ITX 220 | User Manual - Page 23
you install Windows® XP Service Pack 3 or later versions / Windows® Vista Service Pack 1 or later versions before installing the drivers for better compatibility and system stability. 1.8.2 Support DVD information The Support DVD that comes with the motherboard package contains the drivers, software - Asus ITX 220 | User Manual - Page 24
applications before you update the BIOS using this utility. Updating the BIOS To update the BIOS: 1. From the Windows® desktop, click Start > Programs > ASUS > ASUSUpdate > ASUSUpdate to launch the ASUS Update utility. 2. From the dropdown list, select any of the updating process: ASUS ITX-220 2-1 - Asus ITX 220 | User Manual - Page 25
file to the USB port, then launch EZ Flash 2 in any of these two ways: • Press + during POST to display the following: ASUSTek EZ Flash 2 BIOS ROM Utility V3.36 FLASH TYPE: WOINBOND W25X80 Current ROM BOARD: ITX-220 VER: 0209 (H:00 B:05) DATE: 04/01/2009 Update ROM BOARD: Unknown VER - Asus ITX 220 | User Manual - Page 26
system boot failure! 2.1.3 ASUS CrashFree BIOS 3 utility The ASUS CrashFree BIOS 3 is an auto recovery tool that allows you to restore the BIOS file when it fails or gets corrupted during the updating process. You can update a corrupted BIOS file using the motherboard support DVD or a USB flash - Asus ITX 220 | User Manual - Page 27
support ASUS CrashFree BIOS 3. The device size should be smaller than 8GB. • DO NOT shut down or reset the system while updating the BIOS! Doing so can cause system boot failure! The recovered BIOS may not be the latest BIOS version for this motherboard. Download the latest BIOS file from the ASUS - Asus ITX 220 | User Manual - Page 28
Main Advanced Power BIOS SETUP UTILITY Boot Tools Exit System Time [00:31:48] System Date [Mon 01/21/2002 supports multi-sector transfer feature. When set to [Disabled], the data transfer from and to the device occurs one sector at a time. Configuration options: [Disabled] [Auto] ASUS ITX-220 - Asus ITX 220 | User Manual - Page 29
Monitoring, Analysis, and Reporting as Windows® 2000/XP. BIOS automatically detects the items in this menu. AMI BIOS Displays the auto-detected BIOS information. Processor Displays the auto-detected CPU specification. System Memory Displays the auto-detected system memory. 2-6 Chapter 2: BIOS - Asus ITX 220 | User Manual - Page 30
Power BIOS SETUP UTILITY Boot Tools Exit JumperFree Configuration TPM Configuration USB when you set the AI Overclocking item to [Manual]. CPU Frequency [xxx] Displays motherboard. TCG/TPM SUPPORT [NO] Allows you to enable or disable TPM/TCG setting. Configuration options: [Yes] [No] ASUS ITX-220 - Asus ITX 220 | User Manual - Page 31
USB functions. Configuration options: [Disabled] [Enabled] Legacy USB Support [Auto] Allows you to enable or disable support for Legacy USB storage devices, including USB flash drives and USB to set the maximum time that the BIOS waits for the USB storage device to initialize. Configuration options: - Asus ITX 220 | User Manual - Page 32
BIOS automatically detects. Max CPUID Value Limit [Disabled] Allows you to determine whether to limit CPUID maximum value. Set this item to [Disabled] for Windows XP . Configuration options: [Enabled] [Disabled] Boot Graphic Adapter Priority [PCI/Int-VGA] Allows selection [Disabled] ASUS ITX-220 2-9 - Asus ITX 220 | User Manual - Page 33
LAN controller. Configuration options: [Enabled] [Disabled] LAN Option ROM [Disabled] Allows you to enable or disable the boot ROM in the onboard LAN controller. This item appears only when the Onboard LAN and Play O/S [No] When set to [No], BIOS configures all the devices in the system. When set to - Asus ITX 220 | User Manual - Page 34
Allows you to enable or disable the Advanced Configuration and Power Interface (ACPI) support in the Application-Specific Integrated Circuit (ASIC). When set to Enabled, the ACPI APIC table pointer is included in the RSDT pointer list. Configuration options: [Disabled] [Enabled] ASUS ITX-220 2-11 - Asus ITX 220 | User Manual - Page 35
an ATX power supply that provides at least 1A on the +5VSB lead. Configuration options: [Disabled] [Enabled] 2.5.5 Hardware Monitor CPU Temperature [xxxºC/xxxºF] or [Ignored] MB Temperature [xxxºC/xxxºF] or [Ignored] The onboard hardware monitor automatically detects and displays the motherboard and - Asus ITX 220 | User Manual - Page 36
to the motherboard, the field Boot [Enabled] Enabling this item allows the BIOS to skip some power on self tests (POST) while booting to decrease the time needed to boot the system. When set to [Disabled], BIOS performs all the POST items. Configuration options: [Disabled] [Enabled] ASUS ITX-220 - Asus ITX 220 | User Manual - Page 37
use the ASUS MyLogo2™ feature. AddOn ROM Display Mode [Force BIOS] Sets the display mode for option ROM. Configuration options: [Force BIOS] [Keep Current] Bootup Num-Lock [On] Allows you to select the power-on state for the NumLock. Configuration options: [Off] [On] PS/2 Mouse Support [Auto] Allows - Asus ITX 220 | User Manual - Page 38
to clear the user password. Password Check [Setup] When set to [Setup], BIOS checks for user password when accessing the Setup utility. When set to [Always], BIOS checks for user password both when accessing Setup and booting the system. Configuration options: [Setup] [Always] ASUS ITX-220 2-15 - Asus ITX 220 | User Manual - Page 39
display the sub-menu. Main Advanced Power BIOS SETUP UTILITY Boot Tools Exit AI NET 2 ASUS EZ Flash 2 LAN Cable Status 2.7.1 AI NET 2 Check Realtek LAN cable [Disabled] Enables or disables checking of the Realtek LAN cable during the Power-On Self‑Test (POST). Configuration options: [Disabled
-
 1
1 -
 2
2 -
 3
3 -
 4
4 -
 5
5 -
 6
6 -
 7
7 -
8
-
9
-
10
-
11
-
12
-
13
-
14
-
15
-
16
-
17
-
18
-
19
-
20
-
21
-
22
-
23
-
24
-
25
-
26
-
27
-
28
-
29
-
30
-
31
-
32
-
33
-
34
-
35
-
36
-
37
-
38
-
39
 |
 |

Motherboard
ITX-220