Asus K43U User Guide for English Edition
Asus K43U Manual
 |
View all Asus K43U manuals
Add to My Manuals
Save this manual to your list of manuals |
Asus K43U manual content summary:
- Asus K43U | User Guide for English Edition - Page 1
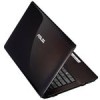
E7495 Notebook PC User Guide for Windows® 8 e7495_Win8_User_Guide.indd 1 8/13/12 2:47:52 PM - Asus K43U | User Guide for English Edition - Page 2
INFORMATIONAL USE ONLY, AND ARE SUBJECT TO CHANGE AT ANY TIME WITHOUT NOTICE, AND SHOULD NOT BE CONSTRUED AS A COMMITMENT BY ASUS. ASUS ASSUMES NO RESPONSIBILITY OR LIABILITY FOR ANY ERRORS OR INACCURACIES THAT MAY APPEAR IN THIS MANUAL, INCLUDING THE PRODUCTS AND SOFTWARE DESCRIBED IN IT. Copyright - Asus K43U | User Guide for English Edition - Page 3
duties under this Warranty Statement, up to the listed contract price of each product. ASUS will only be responsible for or indemnify you for loss IF ASUS, ITS SUPPLIERS OR YOUR RESELLER IS INFORMED OF THEIR POSSIBILITY. Service and Support Visit our multi-language web site at http://support.asus.com - Asus K43U | User Guide for English Edition - Page 4
Contents About this user guide 5 Icons ...5 Messages...5 Typography...5 Before upgrading to Windows® 8 6 Using Windows® 8 for the first time 7 Starting up Windows® 8 8 Windows® UI...9 Start screen...9 Windows® apps 9 Hotspots...10 Working with Windows® apps 12 Launching apps 12 Closing apps - Asus K43U | User Guide for English Edition - Page 5
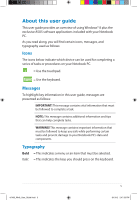
this user guide This user guide provides an overview of using Windows® 8 plus the exclusive ASUS software applications included with your Notebook PC. As you on your Notebook PC. = Use the touchpad. = Use the keyboard. Messages To highlight key information in this user guide, messages are presented - Asus K43U | User Guide for English Edition - Page 6
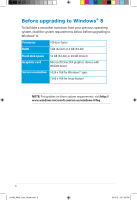
to Windows® 8: Processor 1GHz or faster RAM 1GB (32-bit) or 2 GB (64-bit) Hard disk space 16 GB (32-bit) or 20 GB (64-bit) Graphics card Microsoft DirectX9 graphics device with WDDM driver Screen resolution 1024 x 768 for Windows® apps 1366 x 768 for Snap feature NOTE: For updates on - Asus K43U | User Guide for English Edition - Page 7
account and Using a local account. If you choose to Connect to a wireless network later, you will only be prompted to create a local account during the setup process. Step 5: Settings Step 6: Sign in to your Notebook PC NOTE: Windows® 8 prompts you to sign in using your local account or Microsoft - Asus K43U | User Guide for English Edition - Page 8
, Sleep, or Hibernate mode, refer to the following steps: 1. Press the power button on your Notebook PC . 2. The Windows® 8 lock screen appears after the Notebook PC boots up. Click on the touchpad or press any key on the keyboard to proceed. 3. Sign in using your local account or Microsoft account - Asus K43U | User Guide for English Edition - Page 9
a one-stop hub for work and play on your Notebook PC. Each of them represent a specific function that you can use and share through network connections. IMPORTANT! A screen resolution of 1024 x 768 pixels or higher is required to run Windows® apps. NOTE: Some apps require signing in to your - Asus K43U | User Guide for English Edition - Page 10
to launch programs and access the settings of your Notebook PC. The functions in these hotspots can be activated using all launched apps. Hover your mouse pointer then click on the Start screen's thumbnail to revert back to the Start screen. Hover your mouse pointer until it changes to a hand icon. - Asus K43U | User Guide for English Edition - Page 11
Hotspots on the Start screen Hotspot upper left corner lower left corner upper and lower right corner Action (1) Hover your mouse pointer then click on the recent app's thumbnail to - Asus K43U | User Guide for English Edition - Page 12
Working with Windows® apps Use your Notebook PC's touchpad or keyboard to launch and customize your apps. Launching apps activate its settings then click on the icon. To unpin an app from the Start screen, right-click on the app to activate its settings then click on the icon. 12 e7495_Win8_User_Guide.indd 12 - Asus K43U | User Guide for English Edition - Page 13
open other applications like the exclusive ASUS Software apps bundled with your Notebook PC through the All Apps screen. Horizontal scroll bar Launching the All Apps screen Right-click on the Start screen then click the All Apps icon. From the Start screen, press Windows key + Z. The All Apps icon - Asus K43U | User Guide for English Edition - Page 14
Adding more apps on the Start screen 1. Position the mouse pointer over the app you want to add on the Start screen. 2. Right-click on the app to activate its settings. 3. Click on the icon. 14 e7495_Win8_User_Guide.indd 14 8/13/12 2:48:00 PM - Asus K43U | User Guide for English Edition - Page 15
white icons. The image above shows how the Charm bar looks like once activated. Use your Notebook PC's touchpad or keyboard to launch the Charm bar. Move your mouse pointer on the upper or lower right corner of the screen. Press Windows key + C. e7495_Win8_User_Guide.indd 15 15 8/13/12 2:48:01 PM - Asus K43U | User Guide for English Edition - Page 16
you to look for files, applications, or programs in your Notebook PC. Share This tool allows you to share applications via social networking sites or email. Start This tool reverts the display back to the Start screen. From the Start screen, you can also use this to revert back to a recently opened - Asus K43U | User Guide for English Edition - Page 17
is required to use the Snap feature. Snap bar Activating Snap Use your Notebook PC's touchpad or keyboard to activate Snap onscreen. 1. Click on an app to launch it. 2. Hover the mouse pointer on the top side of your screen. 3. Once the pointer changes to a hand icon, drag then drop the app to - Asus K43U | User Guide for English Edition - Page 18
Wi-Fi connection. IMPORTANT! The Airplane mode should be turned off to enable this function. Disabling Airplane mode Use your Notebook PC's touchpad or keyboard to disable this mode. 1. Launch the Charm bar. 2. Click Settings then click on the icon. 3. Slide the settings bar to the left to turn - Asus K43U | User Guide for English Edition - Page 19
3. Select an access point from the list of available Wi-Fi connections. 4. The access point you chose gets activated as below. Click Connect to start the network connection. NOTE: You may be prompted to enter a security key to activate the Wi-Fi connection. e7495_Win8_User_Guide.indd 19 19 8/13/ - Asus K43U | User Guide for English Edition - Page 20
, the Airplane mode disables all wireless connectivity. fn + f3 (on selected models) decreases keyboard brightness for Notebook PC models with a keyboard backlight fn + f4 (on selected models) increases keyboard brightness for Notebook PC models with a keyboard backlight fn + f5 decreases display - Asus K43U | User Guide for English Edition - Page 21
Function keys for ASUS Apps Your Notebook PC also comes with a special set of function keys that can be used to launch ASUS apps. fn + C fn + V toggles the ASUS Splendid Video Enhancement Technology app to switch between these display color enhancement modes: Gamma Correction, Vivid Mode, Theater - Asus K43U | User Guide for English Edition - Page 22
Featured ASUS Apps LifeFrame Enhance your webcam functions through the LifeFrame app. Create snapshots, edit photos, record videos, record audio files, use your webcam as a security monitoring device, and play games using this app. NOTE: Some Notebook PC models might require you to enable the camera - Asus K43U | User Guide for English Edition - Page 23
you use your webcam as a security video monitor as it automatically detects movement then captures it on photo. Voice Recorder Use this function to record audio files in your Notebook PC. Game This function lets you play games using the webcam. e7495_Win8_User_Guide.indd 23 23 8/13/12 2:48:10 PM - Asus K43U | User Guide for English Edition - Page 24
performance of your Notebook PC using the power saving modes in Power4Gear. NOTE: Unplugging the Notebook PC from its power adapter automatically switches Power4Gear Hybrid to Battery Saving mode. To launch Power4Gear Hybrid Press fn + spacebar Select from these power plan modes. Settings Allows - Asus K43U | User Guide for English Edition - Page 25
Performance icon inside the Power4Gear Hybrid window then click on Settings. Battery Saving mode This mode extends your Notebook PC's battery life while plugged in to the power adapter or while running on battery power only. To customize, click the Battery Saving icon inside the Power4Gear Hybrid - Asus K43U | User Guide for English Edition - Page 26
immediately. Using the USB Charger+ Settings The USB Charger+ Settings lets you set the charge limit when your ASUS Notebook PC is running on battery power. This also allows you to charge devices while your Notebook PC is on sleep, hibernate, or shutdown mode. 1. Right-click on the USB Charger+ icon - Asus K43U | User Guide for English Edition - Page 27
options. You can deselect these two options, if necessary. 4. Move the percentage slider to the left or to the right to set the limit for charging devices. 5. Click OK to save the settings made. Otherwise, click Cancel. e7495_Win8_User_Guide.indd 27 27 8/13/12 2:48:12 PM - Asus K43U | User Guide for English Edition - Page 28
On. NOTE: Deep S3 is a technology that lets you save more battery power while your ASUS Notebook PC is on sleep mode. IMPORTANT! The standby time varies according to your Notebook PC's remaining battery capacity, computer model, configuration, and operating conditions. Performance mode This mode - Asus K43U | User Guide for English Edition - Page 29
Launch the Charm bar. 2. Click Settings > Change PC Settings >General. 3. Scroll down to view the Remove everything and reinstall Windows option. Under this option, click Get Started. 4. Follow the onscreen instructions to complete the reinstallation and reset process. e7495_Win8_User_Guide.indd - Asus K43U | User Guide for English Edition - Page 30
Shutting down your Notebook PC Shutting down your Notebook PC can be done on the Start screen or from the desktop. 1. Launch the Charm bar. 2. Click Settings > Power > Shutdown. To shut down from the desktop, press alt + f4 to launch the Shut Down window. Select Shut Down from the drop-down list
-
 1
1 -
 2
2 -
 3
3 -
 4
4 -
 5
5 -
 6
6 -
 7
7 -
8
-
9
-
10
-
11
-
12
-
13
-
14
-
15
-
16
-
17
-
18
-
19
-
20
-
21
-
22
-
23
-
24
-
25
-
26
-
27
-
28
-
29
-
30
 |
 |

Notebook PC
User Guide for Windows® 8
E7495
e7495_Win8_User_Guide.indd
1
8/13/12
2:47:52 PM