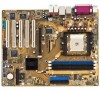
Asus K8N-E Deluxe K8 series Quick Setup Guide
Asus K8N-E Deluxe Manual
 |
View all Asus K8N-E Deluxe manuals
Add to My Manuals
Save this manual to your list of manuals |
Asus K8N-E Deluxe manual content summary:
- Asus K8N-E Deluxe | K8 series Quick Setup Guide - Page 1
Guide when using this Quick Setup Guide. For detailed setup instructions, refer to the User Guide. What's in the box? Check your motherboard package for the following items. Motherboard jumper caps Motherboard support CD Quick Setup Guide User Guide SAFETY INFORMATION Computer components are - Asus K8N-E Deluxe | K8 series Quick Setup Guide - Page 2
WARNING! Do not connect any power cable to live AC outlets until configuration and setup is complete. 1 Install memory modules 1. Unlock the DIMM socket by pressing the retaining clips outward. 2. Align a DIMM on the socket such that the notch on the DIMM matches the - Asus K8N-E Deluxe | K8 series Quick Setup Guide - Page 3
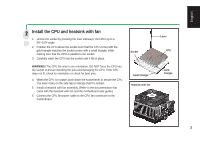
to indicate that it is locked. 5. Install a heatsink with fan assembly. (Refer to the documentation that came with the heatsink with fan and the motherboard user guide.) 6. Connect the CPU fan power cable to the CPU fan connector on the motherboard. Socket Small triangle Heatsink with fan Lever - Asus K8N-E Deluxe | K8 series Quick Setup Guide - Page 4
screw holes on the chassis. 2. Remove the temporary metal shield on the rear panel that covers the rear I/O slot opening. 3. Install the rear I/O shield that came with the motherboard package. Orient the I/O shield such that the openings for the keyboard and mouse ports are aligned to the top of the - Asus K8N-E Deluxe | K8 series Quick Setup Guide - Page 5
for the jumper settings. 2. Mount the drives in the chassis. 3. Connect the floppy disk signal cable and power cable. 4. If installing IDE hard disk drives, connect the IDE signal cable and power cable. 5. If installing SATA hard disk drives, connect the SATA signal cable and power cable. Floppy - Asus K8N-E Deluxe | K8 series Quick Setup Guide - Page 6
sure the side of the cable with the colored stripe is plugged into pin 1 of the IDE connector. 3. If you're using SATA hard disk drives, connect the SATA signal cable. The SATA connector fits only in one orientation. If the connector doesn't fit, try reversing it. Floppy disk IDE Serial ATA 6 - Asus K8N-E Deluxe | K8 series Quick Setup Guide - Page 7
chassis, you will find some LED and power switch leads. Connect these leads to the panel connector on the motherboard. 7 Install expansion cards 1. Remove the slot covers from the chassis where you wish to install the expansion cards. 2. Install your AGP graphics card in the proper slot. 3. Press - Asus K8N-E Deluxe | K8 series Quick Setup Guide - Page 8
the plastic clip on the side matches the plastic tab on motherboard power connector. The plug is in place when the clip snaps over the tab. 2. Follow step 1 to connect the 4-pin ATX 12V power plug. IMPORTANT! Make sure that your ATX 12V power supply can provide 8A on the +12V lead and at least 1A - Asus K8N-E Deluxe | K8 series Quick Setup Guide - Page 9
9 Connect the peripherals and accessories Power strip AC Keyboard Digital Speakers PDA cradle PS/2 S/PDIF Serial Storage device USB Microphone Mic Speakers Line Out PS/2 Mouse Parallel Printer IEEE 1394 RJ-45 Line in Mobile HDD Switch Hub Tape recorder VGA CRT Monitor DVI - Asus K8N-E Deluxe | K8 series Quick Setup Guide - Page 10
make sure they are corrected properly. • Make sure that the device drivers are installed. • Enter BIOS setup and load default settings. • Make sure that the power cable is connected properly to the motherboard. • Make sure that the drive cables are connected properly. • Update the motherboard BIOS.
-
 1
1 -
 2
2 -
 3
3 -
 4
4 -
 5
5 -
 6
6 -
 7
7 -
8
-
9
-
10
 |
 |

1
English
Getting Started
This Quick Setup Guide will help you get your motherboard up and running quickly. Refer to the Quick Reference Card included in
the User Guide when using this Quick Setup Guide. For detailed setup instructions, refer to the User Guide.
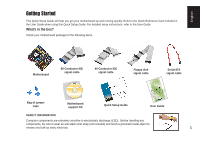
What’s in the box?
Check your motherboard package for the following items.
Motherboard
80-Conductor IDE
signal cable
Floppy disk
signal cable
Bag of jumper
caps
User Guide
Motherboard
support CD
40-Conductor IDE
signal cable
Quick Setup Guide
SAFETY INFORMATION
Computer components are extremely sensitive to electrostatic discharge (ESD).
Before handling any
components, be sure to wear an anti-static wrist strap (not included) and touch a grounded metal object to
release any built-up static electricity.
Serial ATA
signal cable