Asus M2N68 SE User Manual
Asus M2N68 SE Manual
 |
View all Asus M2N68 SE manuals
Add to My Manuals
Save this manual to your list of manuals |
Asus M2N68 SE manual content summary:
- Asus M2N68 SE | User Manual - Page 1
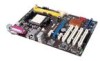
M2N68 SE Motherboard - Asus M2N68 SE | User Manual - Page 2
express written permission of ASUSTeK Computer Inc. ("ASUS"). Product warranty or service will not be extended if: (1) the ASUS HAS BEEN ADVISED OF THE POSSIBILITY OF SUCH DAMAGES ARISING FROM ANY DEFECT OR ERROR IN THIS MANUAL OR PRODUCT. SPECIFICATIONS AND INFORMATION CONTAINED IN THIS MANUAL - Asus M2N68 SE | User Manual - Page 3
About this guide vii M2N68 SE specifications summary ix Chapter 1: Product introduction 1.1 Welcome 1-1 1.2 Package contents 1-1 1.3 Special features 1-1 1.3.1 Product highlights 1-1 1.3.2 Innovative ASUS features 1-2 1.4 Before you proceed 1-4 1.5 Motherboard overview 1-5 1.5.1 Placement - Asus M2N68 SE | User Manual - Page 4
Support DVD information 1-26 Chapter 2: BIOS information 2.1 Managing and updating your BIOS 2-1 2.1.1 ASUS Update utility 2-1 2.1.2 Creating a bootable floppy disk 2-2 2.1.3 ASUS EZ Flash 2 utility 2-3 2.1.4 AFUDOS utility 2-4 2.1.5 ASUS CrashFree BIOS 3 utility 2-5 2.2 BIOS CPU - Asus M2N68 SE | User Manual - Page 5
Contents 2.4.6 USB Configuration 2-17 2.5 Power menu 2-18 2.5.1 Suspend Mode 2-18 2.5.2 ACPI Version Features 2-18 2.5.3 ACPI APIC Support 2-18 2.5.4 APM Configuration 2-18 2.5.5 Hardware Monitor 2-19 2.6 Boot menu 2-20 2.6.1 Boot Device Priority 2-20 2.6.2 Boot Settings Configuration 2-20 - Asus M2N68 SE | User Manual - Page 6
and used in accordance with manufacturer's instructions, may cause harmful interference to radio determined by turning the equipment off and on, the user is encouraged to try to correct the interference by Canadian ICES-003. DO NOT throw the motherboard in municipal waste. This product has been - Asus M2N68 SE | User Manual - Page 7
. • If you encounter technical problems with the product, contact a qualified service technician or your retailer. About this guide This user guide contains the information you need when installing and configuring the motherboard. How this guide is organized This guide contains the following parts - Asus M2N68 SE | User Manual - Page 8
. IMPORTANT: Instructions that you MUST follow to complete a task. NOTE: Tips and additional information to help you complete a task. Where to find more information Refer to the following sources for additional information and for product and software updates. 1. ASUS websites The ASUS website - Asus M2N68 SE | User Manual - Page 9
M2N68 SE specifications summary CPU Chipset System bus Memory Expansion slots Storage Audio USB LAN ASUS special features AMD® Socket AM2, AM2+ for AMD Phenom™FX / Phenom / Athlon™ / Sempron™ processor modules * DDR2 1066 is supported by AM2+ CPU only. ** Refer to www.asus.com for the latest Memory - Asus M2N68 SE | User Manual - Page 10
PnP, DMI2.0, WfM2.0, ACPI2.0a, SM BIOS 2.5 1 x Serial ATA cable 1 x UltraDMA 133/100/66/33 cable 1x I/O Shield User manual ATX form factor: 12'' x 8'' (30.5cm x 20.3cm) Drivers ASUS LiveUpdateUtility ASUS PC Probe II Anti-Virus software (OEM version) *Specifications are subject to change without - Asus M2N68 SE | User Manual - Page 11
DVD Documentation ASUS M2N68 SE motherboard 1 x Serial ATA cable 1 x Ultra DMA 133/100/66/33 cable 1 x I/O shield ASUS motherboard support DVD User guide If any of the above items is damaged or missing, contact your retailer. 1.3 Special features 1.3.1 Product highlights AMD® Socket AM2+ Phenom - Asus M2N68 SE | User Manual - Page 12
now talk to your partners on the headphone while playing a multi-channel network game. All of these are done on one computer. 1.3.2 Innovative ASUS features ASUS MyLogo2™ Turn your favorite photos into 256-color boot logos to personalize your system. See page 2-20 for details. 1-2 ASUS M2N68 SE - Asus M2N68 SE | User Manual - Page 13
the cost and hassle of buying a replacement BIOS chip. See page 2-5 for details. ASUS EZ Flash 2 EZ Flash 2 is a user-friendly BIOS update utility. Simply launch this tool and update BIOS from a USB flash disk before entering the OS. You can update your BIOS only in a few clicks without preparing an - Asus M2N68 SE | User Manual - Page 14
. This is a reminder that you should shut down the system and unplug the power cable before removing or plugging in any motherboard component. The illustration below shows the location of the onboard LED. M2N68 SE SB_PWR M2N68 SE Onboard LED ON OFF Standy Power Powered Off 1-4 ASUS M2N68 SE - Asus M2N68 SE | User Manual - Page 15
the image below. 1.5.2 Screw holes Place six (6) screws into the holes indicated by circles to secure the motherboard to the chassis. Do not overtighten the screws! Doing so can damage the motherboard. Place this side towards the rear of the chassis. M2N68 SE Chapter 1: Product introduction 1-5 - Asus M2N68 SE | User Manual - Page 16
1.5.3 Motherboard layout 1 2 20.3cm(8.0in) KBMS ATX12V COM LPT DDR2 DIMM_A1 (64bit, 240-pin module) DDR2 DIMM_B1 (64bit, 240-pin module) SOCKET AM2 14 USB34 LAN1_USB12 CPU_FAN 30.5cm(12.0in) EATXPWR AUDIO PCIEX1_1 M2N68 SE 3 Realtek 8211CL PCIEX16 PCIEX1_2 Lithium Cell CMOS Power - Asus M2N68 SE | User Manual - Page 17
for the AM2/AM2+ socket. The CPU fits in only one correct orientation. DO NOT force the CPU into the socket to prevent bending the connectors on the socket and damaging the CPU! 1.6.1 Installing the CPU To install a CPU: 1. Locate the CPU socket on the motherboard. M2N68 SE M2N68 SE CPU socket 940 - Asus M2N68 SE | User Manual - Page 18
section 1.6.2 Installing heatsink and fan for instructions. Gold triangle 7. Connect the CPU fan cable to the CPU_FAN connector on the motherboard. CPU_FAN Do not forget to connect the CPU CPU FAN PWM CPU FAN IN fan connector! Hardware monitoring M2N68 SE CPU FAN PWR GND errors can occur if - Asus M2N68 SE | User Manual - Page 19
Retention bracket lock Retention Module Base Your boxed CPU heatsink and fan assembly should come with installation instructions for the CPU, heatsink, and the retention mechanism. If the instructions in this section do not match the CPU documentation, follow the latter. 2. Attach one end of - Asus M2N68 SE | User Manual - Page 20
is in place, connect the CPU fan cable to the connector on the motherboard labeled CPU_FAN. Do not forget to connect the CPU fan connector! Hardware monitoring errors DIMM_B1 M2N68 SE M2N68 SE 240-pin DDR2 DIMM sockets Channel Channel 1 Channel 2 Sockets DIMM_A1 DIMM_B1 1-10 ASUS M2N68 SE - Asus M2N68 SE | User Manual - Page 21
modules made up of 128 Mb chips. The motherboard can support 4 GB physical memory on the operating system listed below. You may install a maximum of 2 GB DIMMs on each slot. 64-bit Windows® XP Professional x64 Edition Windows® Vista x64 Edition M2N68 SE Motherboard Qualified Vendors Lists (QVL - Asus M2N68 SE | User Manual - Page 22
DS D3216TLSAKL3U HYB18T256800AF3SW65 33154 E5108AGBG-6E-E D6408TEBGGL3U E5108AGBG-6E-E K4T51083QC K4T56083QF-ZCE6 K4T51083QC-ZCE6 K4T51083QC-ZCE6 K4T51083QC-ZCE6 DIMM support A* B* • • • • • • • • • • • • • • • • • • • • (continued on the next page) 1-12 ASUS M2N68 SE - Asus M2N68 SE | User Manual - Page 23
-3C DIMM support A* B* • • • • • • • • • • • • • • • • • • • • • • • • • • • • • • • • • • • • • • • • • • • • • • • • • • • • • • • • • • • • • • • • • • • • • • • • • • • • • • • • • • • • Chapter 1: Product - Asus M2N68 SE | User Manual - Page 24
one module inserted into any slot as Single-channel memory configuration. • B*: Supports one pair of modules inserted into either the yellow slots as one pair of Dual-channel memory configuration. Visit the ASUS website for the latest DDR2-533/667/800/1066MHz QVL. 1-14 ASUS M2N68 SE - Asus M2N68 SE | User Manual - Page 25
components. Failure to do so can cause severe damage to both the motherboard and the components. 1. Unlock a DDR2 DIMM socket by pressing the 1. Simultaneously press the retaining clips outward to unlock the DIMM. Support the DIMM lightly with your fingers when pressing the retaining clips. - Asus M2N68 SE | User Manual - Page 26
x1 slots This motherboard supports PCI Express x1 network cards, SCSI cards and other cards that comply with the PCI Express specifications. 1.8.6 PCI Express x16 slot This motherboard supports a PCI Express x16 graphics card that complies with the PCI Express specifications. 1-16 ASUS M2N68 SE - Asus M2N68 SE | User Manual - Page 27
failure! M2N68 SE CLRTC 12 23 Normal (Default) M2N68 SE Clear RTC RAM Clear RTC You do not need to clear the RTC when the system hangs due to overclocking. For system failure due to overclocking, use the CPU Parameter Recall (C.P.R) feature. Shut down and reboot the system so the BIOS can - Asus M2N68 SE | User Manual - Page 28
printer, a scanner, or other devices. 3. LAN (RJ-45) port. This port allows Gigabit connection to a Local Area Network (LAN) through a network hub. LAN port LED indications Activity/Link LED Speed LED Panel > Sounds and Audio Devices > Sound Playback to configure the setting. 1-18 ASUS M2N68 SE - Asus M2N68 SE | User Manual - Page 29
FDD cable with a covered Pin 5. • The Floppy Disk Drive singal cable is purchased separately. M2N68 SE FLOPPY PIN1 NOTE:Orient the red markings on the floppy ribbon cable to PIN 1. M2N68 SE Floppy disk drive connector 2. Speaker connector (4- pin SPEAKER) This 4-pin connector is for the chassis - Asus M2N68 SE | User Manual - Page 30
signal cable: blue, black, and gray. Connect the blue connector to the motherboard's IDE connector, then select one of the following modes to configure your device(s). , or MPEG card. CD M2N68 SE Right Audio Channel GND GND Left Audio Channel M2N68 SE Internal audio connector 1-20 ASUS M2N68 SE - Asus M2N68 SE | User Manual - Page 31
RSATA_TXN1 RSATA_TXP1 GND SATA1 M2N68 SE SATA connectors Important note on Serial ATA Install the Windows® XP Service Pack 1 before using Serial ATA. • For detailed instructions on how to configure RAID 0, RAID 1, and RAID 0+1, RAID 5, and JBOD, refer to the RAID manual in the support DVD. • If you - Asus M2N68 SE | User Manual - Page 32
back of the system chassis. These USB connectors comply with USB 2.0 specification that supports up to 480 Mbps connection speed. USB+5V USB_P6USB_P6+ GND NC USB+5V USB_P8USB_P8+ GND NC USB+5V USB_P10USB_P10+ GND NC M2N68 SE USB56 USB78 USB910 PIN 1 PIN 1 PIN 1 USB+5V USB_P5USB_P5+ GND USB - Asus M2N68 SE | User Manual - Page 33
M2N68 SE ATX power connectors GND +5 Volts +5 Volts +5 Volts -5 Volts GND GND GND PSON# GND -12 Volts +3 Volts • We recommend that you use an ATX 12 V Specification the Recommended Power Supply Wattage Calculator at http://support.asus. com/PowerSupplyCalculator/PSCalculator.aspx?SLanguage=en-us - Asus M2N68 SE | User Manual - Page 34
connectors. Insufficient air flow inside the system may damage the motherboard components. These are not jumpers! Do not place jumper caps on the fan connectors! M2N68 SE CPU_FAN CPU FAN PWM CPU FAN IN CPU FAN PWR GND M2N68 SE CPU fan connector 10. Digital audio connector (4-1 pin SPDIF_OUT) This - Asus M2N68 SE | User Manual - Page 35
supports several chassis-mounted functions. PWR LED PWR BTN PLED+ PLEDPWR GND M2N68 SE F_PANEL PIN 1 IDE_LED+ IDE_LED- Ground Reset +HD_LED RESET M2N68 SE or puts the system in SLEEP or SOFT-OFF mode depending on the BIOS settings. Pressing the power switch for more than four seconds while the - Asus M2N68 SE | User Manual - Page 36
only. Click an icon to display Support DVD/ motherboard information Click an item to install If Autorun is NOT enabled in your computer, browse the contents of the Support DVD to locate the file ASSETUP.EXE from the BIN folder. Double-click the ASSETUP.EXE to run the DVD. 1-26 ASUS M2N68 SE - Asus M2N68 SE | User Manual - Page 37
DVD that comes with the motherboard package. ASUS Update requires an Internet connection either through a network or an Internet Service Provider (ISP). Installing ASUS Update To install ASUS Update: 1. Place the support DVD in the optical drive. The Drivers menu appears. 2. Click the Utilities - Asus M2N68 SE | User Manual - Page 38
Next. 3. Select the ASUS FTP site nearest you to avoid network traffic, or click Auto Select then click Next. 4. From the FTP site, select the BIOS version that you wish to download then click Next. 5. Follow the screen instructions to complete the update process. The ASUS Update utility is capable - Asus M2N68 SE | User Manual - Page 39
update the BIOS using EZ Flash 2: 1. Visit the ASUS website at www.asus.com to download the latest BIOS file for this motherboard. 2. Save the BIOS ASUSTek EZ Flash 2 BIOS ROM Utility V3.06 FLASH TYPE: MXIC 25L8005 Current ROM BOARD: M2N68 SE VER: 0306 DATE: 10/17/2008 Update ROM BOARD: Unknown - Asus M2N68 SE | User Manual - Page 40
disk. We recommend that you write the BIOS filename on a piece of paper; you will need to key in the exact BIOS filename at the DOS prompt later. 2. Copy the AFUDOS utility (afudos.exe) from the motherboard support DVD to a bootable floppy disk. 3. Boot the system in DOS mode. 2-4 ASUS M2N68 SE - Asus M2N68 SE | User Manual - Page 41
, a floppy disk or a USB flash disk that contains the updated BIOS file. • Prepare the motherboard support DVD, the floppy disk or the USB flash disk containing the updated motherboard BIOS before using this utility. • For the M2N68 SE motherboard, this utility will not function when you use a PATA - Asus M2N68 SE | User Manual - Page 42
found! Reading file "M2N68SE.ROM". Completed. Start flashing... 4. Restart the system after the utility completes the updating process. The recovered BIOS may not be the latest BIOS version for this motherboard. Visit the ASUS website (www.asus.com) to download the latest BIOS file. Recovering the - Asus M2N68 SE | User Manual - Page 43
and single partition can support ASUS CrashFree BIOS 3. The device size should be smaller than 8GB. • DO NOT shut down or reset the system while updating the BIOS! Doing so can cause system boot failure! 2.2 BIOS setup program This motherboard supports a programmable Serial Peripheral Interface - Asus M2N68 SE | User Manual - Page 44
key on the keyboard until the desired item is highlighted. • The BIOS setup screens shown in this chapter are for reference purposes only, and may not exactly match what you see on your screen. • Visit the ASUS website at www.asus.com to download the latest BIOS information. 2-8 ASUS M2N68 SE - Asus M2N68 SE | User Manual - Page 45
The highlighted item on the menu bar displays the specific items for that menu. For example, selecting Main shows for the menu items. If an item is user‑configurable, you can change the value of the BIOS SETUP UTILITY Power Boot Tools Exit Suspend Mode ACPI Version Features ACPI APIC support - Asus M2N68 SE | User Manual - Page 46
for information on the menu screen items and how to navigate through them. Main Advanced Power BIOS SETUP UTILITY Boot Tools Exit System Time 19:34:30] System Date [Wed 08/27/2008] SATA Mode select [SATA Mode] Configuration options: [SATA Mode] [RAID Mode] [AHCI Mode] 2-10 ASUS M2N68 SE - Asus M2N68 SE | User Manual - Page 47
display the IDE device information. The BIOS automatically detects the values opposite the Select [CDROM] if you are specifically configuring a CD-ROM drive. the LBA mode if the device supports this mode, and if the device monitoring). These values are not user-configurable. These items show Not - Asus M2N68 SE | User Manual - Page 48
if the device supports multi-sector transfer specifications. The BIOS automatically detects the items in this menu. AMI BIOS Displays the auto-detected BIOS information Processor Displays the auto-detected CPU specification System Memory Displays the auto-detected system memory 2-12 ASUS M2N68 SE - Asus M2N68 SE | User Manual - Page 49
malfunction. Main Advanced Power BIOS SETUP UTILITY Boot Tools Exit JumperFree Configuration CPU Configuration Chipset Onboard Devices following item appears only when the CPU Overclocking item is set to [Manual]. CPU Frequency [200] Allows you to set the CPU frequency. The valid value is from - Asus M2N68 SE | User Manual - Page 50
should remain disabled for the normal operation. The driver developer may enable it for testing purpose. Configuration options: [Disabled] [Enabled] Microcode Updation [Enabled] Allows you to enable or disable the microcode updation. Configuration options: [Disabled] [Enabled] 2-14 ASUS M2N68 SE - Asus M2N68 SE | User Manual - Page 51
] C1E Configuration [Disabled] Allows you to enable or disable C1E Dual-Core related CPU power State. Configuration options: [Disabled] [Auto] 2.4.3 Chipset The Chipset menu allows automatically. Configuration options: [Disabled] [Basic] [Good] [Super] [Max] [User] Chapter 2: BIOS setup 2-15 - Asus M2N68 SE | User Manual - Page 52
mode. Configuration options: [AC97] [HD Audio] Onboard LAN [Auto] Allows you to set or disable the Onboard LAN. Configuration options: [Auto] [Disabled] OnBoard LAN Boot ROM [Disabled] Allows you to enable or disable . Incorrect field values can cause the system to malfunction. 2-16 ASUS M2N68 SE - Asus M2N68 SE | User Manual - Page 53
[Yes], BIOS assigns an IRQ to PCI VGA card if the card requests for an IRQ. When set to [No], BIOS does not PCI Device] When set to [PCI Device], the specific IRQ is free for use of PCI/PnP devices USB device is detected, the legacy USB support is disabled. Configuration options: [Disabled] [Enabled - Asus M2N68 SE | User Manual - Page 54
Interface (ACPI) 2.0 specifications. Configuration options: [Disabled] [Enabled] 2.5.3 ACPI APIC Support [Enabled] Allows you to LAN or modem card. This feature requires an ATX power supply that provides at least 1A on the +5VSB lead. Configuration options: [Disabled] [Enabled] 2-18 ASUS M2N68 SE - Asus M2N68 SE | User Manual - Page 55
CPU Temperature [xxxºC/xxxºF] MB Temperature [xxxºC/xxxºF] The onboard hardware monitor automatically detects and displays the motherboard and CPU [Disabled] Allows you to enable or disable the ASUS Q-Fan feature that smartly adjusts the fan speeds [73ºC] [74ºC] [75ºC] Chapter 2: BIOS setup 2-19 - Asus M2N68 SE | User Manual - Page 56
: [Force BIOS] [Keep Current] Bootup Num-Lock [On] Allows you to select the power-on state for the NumLock. Configuration options: [Off] [On] PS/2 Mouse Support [Auto] Allows you to enable or disable support for PS/2 mouse. Configuration options: [Disabled] [Enabled] [Auto] 2-20 ASUS M2N68 SE - Asus M2N68 SE | User Manual - Page 57
. The message "Password Uninstalled" appears. If you forget your BIOS password, you can clear it by erasing the CMOS Real Time Clock , the other items appear to allow you to change other security settings. User Access Level [Full Access] This item allows you to select the access restriction - Asus M2N68 SE | User Manual - Page 58
for user password both when accessing Setup and booting the system. Configuration options: [Setup] [Always] 2.7 Tools menu Main Advanced Power BIOS SETUP UTILITY Boot Tools Exit ASUS EZ Flash 2 AI NET2 Press ENTER to run the utility to select and update BIOS. This utility doesn't support - Asus M2N68 SE | User Manual - Page 59
the changes that you made to the Setup program. If you made changes to fields other than System Date, System Time, and Password, the BIOS asks for a confirmation before exiting. Discard Changes This option allows you to discard the selections you made and restore the previously saved values. After - Asus M2N68 SE | User Manual - Page 60
2-24 ASUS M2N68 SE
-
 1
1 -
 2
2 -
 3
3 -
 4
4 -
 5
5 -
 6
6 -
 7
7 -
8
-
9
-
10
-
11
-
12
-
13
-
14
-
15
-
16
-
17
-
18
-
19
-
20
-
21
-
22
-
23
-
24
-
25
-
26
-
27
-
28
-
29
-
30
-
31
-
32
-
33
-
34
-
35
-
36
-
37
-
38
-
39
-
40
-
41
-
42
-
43
-
44
-
45
-
46
-
47
-
48
-
49
-
50
-
51
-
52
-
53
-
54
-
55
-
56
-
57
-
58
-
59
-
60
 |
 |

Motherboard
M2N68 SE