Asus M4A88TD-M User Manual
Asus M4A88TD-M Manual
 |
View all Asus M4A88TD-M manuals
Add to My Manuals
Save this manual to your list of manuals |
Asus M4A88TD-M manual content summary:
- Asus M4A88TD-M | User Manual - Page 1
M4A88TD-M Motherboard - Asus M4A88TD-M | User Manual - Page 2
including the GPL Software and/or LGPL Software, which will be no earlier than December 1, 2011, either (1) for free by downloading it from http://support.asus.com/download; or (2) for the cost of reproduction and shipment, which is dependent on the preferred carrier and the location where you want - Asus M4A88TD-M | User Manual - Page 3
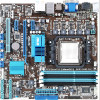
About this guide vii M4A88TD-M specifications summary ix Chapter 1: Product introduction 1.1 Welcome 1-1 1.2 Package contents 1-1 1.3 Special features 1-1 1.3.1 Product highlights 1-1 1.3.2 Innovative ASUS features 1-3 1.4 Before you proceed 1-5 1.5 Motherboard overview 1-6 1.5.1 Placement - Asus M4A88TD-M | User Manual - Page 4
LEDs 1-31 1.13 Software support 1-32 1.13.1 Installing an operating system 1-32 1.13.2 Support DVD information 1-32 Chapter 2: BIOS information 2.1 Managing and updating your BIOS 2-1 2.1.1 ASUS Update utility 2-1 2.1.2 ASUS EZ Flash 2 2-2 2.1.3 ASUS CrashFree BIOS 3 2-3 2.1.4 ASUS BIOS - Asus M4A88TD-M | User Manual - Page 5
2-19 2.5.1 CPU Configuration 2-19 2.5.2 Chipset 2-20 2.5.3 Onboard Devices Configuration 2-21 2.5.4 PCIPnP 2-22 2.5.5 USB Configuration 2-22 2.6 Power menu 2-24 2.6.1 Suspend Mode 2-24 2.6.2 ACPI 2.0 Support 2-24 2.6.3 ACPI APIC Support 2-24 2.6.4 APM Configuration 2-24 2.6.5 HW Monitor - Asus M4A88TD-M | User Manual - Page 6
and used in accordance with manufacturer's instructions, may cause harmful interference to radio use of shielded cables for connection of the monitor to the graphics card is required to assure compliance at ASUS REACH website at http://green.asus.com/english/REACH.htm. DO NOT throw the motherboard - Asus M4A88TD-M | User Manual - Page 7
. • If you encounter technical problems with the product, contact a qualified service technician or your retailer. About this guide This user guide contains the information you need when installing and configuring the motherboard. How this guide is organized This guide contains the following parts - Asus M4A88TD-M | User Manual - Page 8
IMPORTANT: Instructions that you MUST follow to complete a task. NOTE: Tips and additional information to help you complete a task. Where to find more information Refer to the following sources for additional information and for product and software updates. 1. ASUS websites The ASUS website - Asus M4A88TD-M | User Manual - Page 9
® 880G / SB850 Up to 5200MT/s; HyperTransport™ 3.0 interface Dual-channel memory architecture 4 x DIMM, max. 16GB, DDR3 2000(O.C.)/1600(O.C.)/1333/1066MHz, ECC, non-ECC, unbuffered memory* * Due to CPU spec., AMD® 100 and 200 series CPUs support up to DDR3 1066MHz. With ASUS design, this motherboard - Asus M4A88TD-M | User Manual - Page 10
M4A88TD-M specifications summary USB ASUS unique features ASUS exclusive overclocking features Other features Back panel I/O ports Supports up to 14 USB 2.0/1.1 ports (8 ports at mid-board, 6 ports at back panel) ASUS Xtreme Design ASUS Hybrid Processor - TurboV EVO - Turbo Unlocker, TurboV, - Asus M4A88TD-M | User Manual - Page 11
SPI, SM BIOS 2.5, ASUS EZ Flash 2, ASUS CrashFree BIOS 3 WOL by PME, WOR by PME, WOR by Ring, PXE 1 x Ultra DMA 133/100/66 cable 2 x Serial ATA 3Gb/s cables 1 x Serial ATA 6Gb/s cable 1 x I/O shield 1 x User Manual Drivers ASUS Utilities ASUS Update Anti-Virus software (OEM version) uATX form factor - Asus M4A88TD-M | User Manual - Page 12
xii - Asus M4A88TD-M | User Manual - Page 13
Athlon™ II / Sempron™ 100 series CPU support This motherboard supports AMD® Socket AM3 multi-core processors with unique L3 cache and delivers better overclocking capabilities with less power consumption. It features dual-channel DDR3 1333 MHz memory support and accelerates data transfer rate up to - Asus M4A88TD-M | User Manual - Page 14
speed and PCI Express 2.0 x16 graphics. It is optimized with AMD's latest AM3 multi-core CPUs to provide excellent system performance and overclocking capabilities. DDR3 2000(O.C.)/1333/1066 support This motherboard supports DDR3 memory that features data transfer rates of 2000(O.C.)/1333/1066 MHz - Asus M4A88TD-M | User Manual - Page 15
features Core Unlocker ASUS Core Unlocker simplifies the activation of a latent AMD® CPU- with just a simple switch. Enjoy an instant performance boost by simply unlocking the extra cores, without performing complicated BIOS changes. GPU Boost GPU Boost overclocks the integrated GPU in real time - Asus M4A88TD-M | User Manual - Page 16
file uploading from SATA HDDs, ODDs and USB drives. It supports file downloading to USB drives only. • Currently, ASUS Express Gate does not support SATA 6Gb/s devices. Visit http:// support.asus.com for future Express Gate updates. ASUS EPU ASUS EPU is a unique power saving technology that detects - Asus M4A88TD-M | User Manual - Page 17
DRAM voltage in 0.015V steps to achieve the most precise setting for the ultimate overclocking configuration. C.P.R. (CPU Parameter Recall) The BIOS C.P.R. feature automatically restores the CPU the BIOS automatically restores the CPU parameters to their default settings. Green ASUS This motherboard - Asus M4A88TD-M | User Manual - Page 18
indicated in the image below. 1.5.2 Screw holes Place eight screws into the holes indicated by circles to secure the motherboard to the chassis. DO NOT overtighten the screws! Doing so can damage the motherboard. Place this side towards the rear of the chassis. 1-6 Chapter 1: Product introduction - Asus M4A88TD-M | User Manual - Page 19
CPU_FAN and 3-pin CHA_FAN) 2. ATX power connectors (24-pin EATXPWR, 4-pin ATX12V) 3. AM3 CPU socket 4. DDR3 DIMM slots 5. Serial port connector (10-1 pin COM1) 6. LPT connector (26-1 pin LPT) 7. DRAM LED (DRAM_LED) 8. MemOK! switch 9. IDE connector (40-1 pin PRI_EIDE) Page Connectors/Jumpers/Slots - Asus M4A88TD-M | User Manual - Page 20
. Ensure that you use a CPU designed for the AM3 socket. The CPU fits in only one correct orientation. DO NOT force the CPU into the socket to prevent bending the pins and damaging the CPU! 1.6.1 Installing the CPU To install a CPU: 1. Locate the CPU socket on the motherboard. 2. Press the lever - Asus M4A88TD-M | User Manual - Page 21
. You can also refer to section 1.6.2 Installing heatsink and fan for instructions. 7. Connect the CPU fan cable to the CPU_FAN connector on the motherboard. DO NOT forget to connect the CPU fan connector! Hardware monitoring errors can occur if you fail to plug this connector. ASUS M4A88TD-M 1-9 - Asus M4A88TD-M | User Manual - Page 22
that you use only AMD-certified heatsink and fan assembly. To install the CPU heatsink and fan: 1. Place the heatsink on top of the installed CPU, ensuring that the heatsink fits properly on the retention module base. • The retention module base is already installed on the motherboard upon purchase - Asus M4A88TD-M | User Manual - Page 23
NOT forget to connect the CPU fan connector! Hardware monitoring errors can occur if you fail to plug this connector. 1.7 System memory 1.7.1 Overview This motherboard comes with four Double Data Rate 3 (DDR3) Dual Inline Memory Modules (DIMM) sockets. A DDR3 module has the same physical dimensions - Asus M4A88TD-M | User Manual - Page 24
recommend that you obtain memory modules from the same vendor. • Due to CPU spec., AMD® 100 and 200 series CPUs support up to DDR3 1066MHz. With ASUS design, this motherboard can support up to DDR3 1333MHz. • When overclocking, some AMD CPU models may not support DDR3 1600 MHz or higher frequency - Asus M4A88TD-M | User Manual - Page 25
1.65V 1.65V 1.65V 1.65V DIMM socket support (Optional) A* B* C DDR3-1800(O.C.)MHz capability Vendor Part No. OCZ OCZ3P18004GK • • • • • • • • • • • • • • • • • - • • • - • - • 1.95V • 1.5~1.6V • - • 1.7V • • • • • • • • • • • • ASUS M4A88TD-M 1-13 - Asus M4A88TD-M | User Manual - Page 26
DDR3-1333MHz capability Vendor Part No. Size SS/ Chip DS Brand A-Data AD31333001GOU A-Data AD31333G001GOU A-Data AD31333002GOU A-Data Apacer CORSAIR 1.5~1.6V 1.5V~1.6V 1.5V 1.3V(low voltage) 1.5V 1.5V 1.6V 1.65V 1.65V 1.85V 1.75V 1.65V 1.65V 1.60V 1.5V 1.5V DIMM socket support (Optional - Asus M4A88TD-M | User Manual - Page 27
- - DIMM socket support (Optional) A* B* C* • • • •• • •• • •• • •• • •• • •• • •• • •• • •• • •• • •• • •• • •• • •• • • •• • •• • •• • •• • •• • •• • •• • •• • • •• • •• • •• • •• • •• • •• • •• • •• • •• ASUS M4A88TD-M 1-15 - Asus M4A88TD-M | User Manual - Page 28
. With ASUS design, this motherboard can support up to DDR3 1333MHz. • When overclocking, some AMD CPU models may not support DDR3 1600 MHz or higher frequency DIMMs. SS: Single-sided / DS: Double-sided DIMM support: • A*: Supports one module inserted into the A1 slot as single-channel memory - Asus M4A88TD-M | User Manual - Page 29
components. Failure to do so can cause severe damage to both the motherboard and the components. 1. Press the retaining clips outward to unlock a DIMM Simultaneously press the retaining clips outward to unlock the DIMM. 2 Support the DIMM lightly with your fingers when pressing the retaining 1 - Asus M4A88TD-M | User Manual - Page 30
system unstable and the card inoperable. 1.8.3 PCI slot The PCI slot supports cards such as a LAN card, SCSI card, USB card, and other cards that comply with PCI specifications. 1.8.4 PCI Express x1 slots This motherboard supports PCI Express x1 network cards, SCSI cards, and other cards that comply - Asus M4A88TD-M | User Manual - Page 31
Real Time Clock (RTC) RAM in CMOS. You can clear the CMOS memory of date, time, and system setup parameters by erasing the CMOS RTC RAM the CPU Parameter Recall (C.P.R) feature. Shut down and reboot the system so the BIOS can automatically reset parameter settings to default values. ASUS M4A88TD-M - Asus M4A88TD-M | User Manual - Page 32
an optical S/PDIF cable. 3. VGA port. This 15-pin port is for a VGA monitor or other VGA-compatible devices. 4. LAN (RJ-45) port. This port allows Gigabit connection port LED indications Activity/Link LED Status Description OFF No link ORANGE Linked BLINKING Data activity Speed LED Status - Asus M4A88TD-M | User Manual - Page 33
the following dual display outputs are supported on your motherboard: Dual display outputs DVI + D-Sub DVI + HDMI HDMI + D-Sub Supported • • Not supported • • During POST, only the monitor connected to the D-Sub port has display. The dual display function works only under Windows. ASUS M4A88TD - Asus M4A88TD-M | User Manual - Page 34
that you follow the system requirements listed below. CPU DIMM BIOS setup Suggested list AMD® Phenom™ II x4 805 DDR3 1333 2G x 2 Frame Buffer Size - 256MB motherboard components. These are not jumpers! DO NOT place jumper caps on the fan connectors. Only the 4-pin CPU fan supports the ASUS - Asus M4A88TD-M | User Manual - Page 35
is inadequate. • If you are uncertain about the minimum power supply requirement for your system, refer to the Recommended Power Supply Wattage Calculator at http://support.asus. com/PowerSupplyCalculator/PSCalculator.aspx?SLanguage=en-us for details. ASUS M4A88TD-M 1-23 - Asus M4A88TD-M | User Manual - Page 36
cable. There are three connectors on each Ultra DMA 133/100 signal cable: blue, black, and gray. Connect the blue connector to the motherboard's IDE connector, then select one of the following modes to configure your devices: Single device Two devices Drive jumper setting Cable-Select or Master - Asus M4A88TD-M | User Manual - Page 37
in the BIOS to [AHCI]. See section 2.3.4 SATA Configuration for details. 5. LPT connector (26-1 pin LPT) The LPT (Line Printing Terminal) connector supports devices such as a printer. LPT is standardized as IEEE 1284, which is the parallel port interface on IBM PC-compatible computers. ASUS M4A88TD - Asus M4A88TD-M | User Manual - Page 38
System panel connector (20-8 pin PANEL) This connector supports several chassis-mounted functions. • System power LED (2-pin PLED) This 2-pin connector is for the system power LED. Connect the chassis power LED cable to this connector. The system power LED lights up when you turn on the system power - Asus M4A88TD-M | User Manual - Page 39
. These USB connectors comply with USB 2.0 specification that supports up to 480Mbps connection speed. Never connect a 1394 cable to the USB connectors. Doing so will damage the motherboard! The USB 2.0 module the system chassis. The serial port module is purchased separately. ASUS M4A88TD-M 1-27 - Asus M4A88TD-M | User Manual - Page 40
a chassis-mounted front panel audio I/O module that supports either High Definition Audio or AC`97 audio standard. module to this connector to avail of the motherboard high-definition audio capability. • If you want set the Front Panel Select item in the BIOS to [HD Audio]. See section 2.5.3 Onboard - Asus M4A88TD-M | User Manual - Page 41
cores of your CPU. To ensure system performance, turn the switch setting to Enable when the system is powered off. • The O2LED1 LED near the LEDs for the exact location of the O2LED1 LED. • You may also press during the Power-On-Self-Test (POST) or enable the ASUS Core Unlocker item in the BIOS - Asus M4A88TD-M | User Manual - Page 42
settings. A message will appear during POST reminding you that the BIOS has been restored to its default settings. • We recommend that you download and update to the latest BIOS version from the ASUS website at www.asus.com after using the MemOK! function. 1-30 Chapter 1: Product introduction - Asus M4A88TD-M | User Manual - Page 43
way to locate the root problem within a second. 3. Core Unlocker LED The Core Unlocker LED lights when the Core Unclocker switch is turned to Enable. The Core Unlocker LED keeps on lighting even though the ASUS Core Unlocker item in the BIOS menu is set to [Disabled]. ASUS M4A88TD-M 1-31 - Asus M4A88TD-M | User Manual - Page 44
at www.asus.com for updates. To run the Support DVD Place the Support DVD into the optical drive. If Autorun is enabled in your computer, the DVD automatically displays the Specials screen which contains the unique features of ASUS motherboard. Click Drivers, Utilities, Make Disk, Manual, and - Asus M4A88TD-M | User Manual - Page 45
is available in the support DVD that comes with the motherboard package. Installing ASUS Update To install ASUS Update: 1. Place the support DVD into the optical drive. The Drivers menu appears. 2. Click the Utilities tab, then click ASUS Update. 3. Follow the onscreen instructions to complete the - Asus M4A88TD-M | User Manual - Page 46
onscreen instructions to complete the updating process. 2.1.2 ASUS EZ Flash 2 The ASUS EZ Flash 2 feature allows you to update the BIOS without using an OS‑based utility. Before you start using this utility, download the latest BIOS file from the ASUS website at www.asus.com. To update the BIOS - Asus M4A88TD-M | User Manual - Page 47
. • The BIOS file in the support DVD may not be the latest version. Download the latest BIOS file from the ASUS website at www.asus.com. • The removable devices that ASUS CrashFree BIOS 3 supports vary with motherboard models. For motherboards without the floppy connector, prepare a USB flash disk - Asus M4A88TD-M | User Manual - Page 48
may not be same as shown. Before updating BIOS 1. Prepare the motherboard support DVD and a USB flash drive in FAT32/16 format and single partition. 2. Download the latest BIOS file and BIOS Updater from the ASUS website at http:// support.asus.com and save them on the USB flash drive. • NTFS is not - Asus M4A88TD-M | User Manual - Page 49
to return to the DOS prompt. ASUSTek BIOS Updater for DOS V1.12 [09/11/19] Current ROM BOARD: M4A88TD-M VER: 1002 (H:00 B:20) DATE: 03/04/2010 Update ROM BOARD: Unknown VER: Unknown DATE: Unknown PATH: A:\ BIOS backup is done! Press any key to continue. Note Saving BIOS: ASUS M4A88TD-M 2-5 - Asus M4A88TD-M | User Manual - Page 50
confirm BIOS update. Are you sure to update BIOS? Yes No 4. Select Yes and press . When BIOS update is done, press to exit BIOS Updater. Restart your computer. DO NOT shut down or reset the system while updating the BIOS to prevent system boot failure! • For BIOS Updater version 1.04 - Asus M4A88TD-M | User Manual - Page 51
Defaults item under the Exit menu. See section 2.9 Exit Menu. • The BIOS setup screens in this chapter are for reference only. They may not exactly match what you see on your screen. • Visit the ASUS website at www.asus.com to download the latest BIOS file for this motherboard. ASUS M4A88TD-M 2-7 - Asus M4A88TD-M | User Manual - Page 52
M4A88TD-M BIOS Setup Advanced Power Boot Main Settings System Time [19:34:30] System Date [Tue 01/13/2099] SATA1 SATA2 SATA3 SATA4 SATA5 SATA6 SATA Configuration :[Not Detected] :[Not Detected] :[Not Detected] :[Not Detected] :[Not Detected] :[Not Detected] General help Tools Version - Asus M4A88TD-M | User Manual - Page 53
Down> arrow keys or / keys to display the other items on the screen. Advanced CPU Configuration Module Version: 13.55 AGESA Version: 3.5.2.0 M4A88TD-M BIOS Setup AMD Phenom(tm) II X4 945 Processor Revision: C2 Cache L1: 512KB Cache L2: 2048KB Cache L3: 6MB Options Speed - Asus M4A88TD-M | User Manual - Page 54
M4A88TD-M BIOS Setup Advanced Power Boot Main Settings System Time [19:34:30] System Date [Tue 01/13/2099] SATA1 SATA2 SATA3 SATA4 SATA5 SATA6 SATA Configuration :[Not Detected] :[Not Detected] :[Not Detected] :[Not Detected] :[Not Detected] :[Not Detected] Tools Version monitoring). - Asus M4A88TD-M | User Manual - Page 55
options: [Auto] SMART Monitoring [Auto] Sets the Smart Monitoring, Analysis, and Reporting Technology support SATA 6.0Gb/s HDDs with max. speed at 6.0Gb/s. OnChip SATA Channel [Enabled] Enables or disables onboard channel SATA port. Configuration options: [Disabled] [Enabled] ASUS M4A88TD - Asus M4A88TD-M | User Manual - Page 56
• For Windows® XP OS, you have to install the AHCI driver, so that you could use the SATA connectors 1-6 in AHCI mode BIOS automatically detects the items in this menu. BIOS Information Displays the auto-detected BIOS information. Processor Displays the auto-detected CPU specification. System Memory - Asus M4A88TD-M | User Manual - Page 57
on the motherboard. Main Ai Tweaker M4A88TD-M BIOS Setup Advanced Power Boot Tools Version 1002 Exit Configure System Performance Settings Target CPU Frequency: 3000MHz Target DRAM Frequency: 1333MHz CPU Level UP [Auto] CPU OverClocking [Auto] CPU Ratio [Auto] DRAM Frequency - Asus M4A88TD-M | User Manual - Page 58
to [Manual] and allows you to set the PCI Express frequency. Use the and keys to adjust the PCIE frequency. You can also key in the desired value using the numeric keypad. The values range from 100MHz to 150MHz. DRAM O.C. Profile [DDR3-1600MHz] This item appears only when you set the CPU - Asus M4A88TD-M | User Manual - Page 59
CPU model. The following two items only appear when you install a 6-core CPU. AMD Turbo CORE technology [Enbaled] Enables or disables the AMD CPU model. Configuration options: [Auto] 2.4.4 DRAM Frequency [Auto] Allows you to set the DDR3 [Turbo] [Manual] GPU Engine Clock item to [Manual]. Allows you - Asus M4A88TD-M | User Manual - Page 60
utility automatically overclocks the frequency and voltage of the CPU and DRAM. Press to start auto tuning. It takes motherboard. DRAM CAS# Latency [Auto] Configuration options: [Auto] [4 CLK] ~ [12 CLK] DRAM RAS# to CAS# Delay [Auto] Configuration options: [Auto] [5 CLK] ~ [12 CLK] DRAM - Asus M4A88TD-M | User Manual - Page 61
item setting. Configuration options: [Offset] [Manual] CPU Offset Voltage [Auto] This item appears only when you set the CPU & NB Voltage Mode item to [Offset] and allows you to set the CPU Offset voltage. The values range from 0.006250V to 0.500000V with a 0.003125V interval. ASUS M4A88TD-M 2-17 - Asus M4A88TD-M | User Manual - Page 62
item appears only when you set the CPU & NB Voltage Mode item to [Manual] and allows you to set a fixed CPU/NB voltage. 2.4.12 CPU VDDA Voltage [Auto] Allows you to set the CPU VDDA voltage. The values range from 2.50V to 2.80V with a 0.10V interval. 2.4.13 DRAM Voltage [Auto] Allows you to set the - Asus M4A88TD-M | User Manual - Page 63
can cause the system to malfunction. Main Ai Tweaker Advanced Settings M4A88TD-M BIOS Setup Advanced Power Boot Tools Exit Version 1002 Configure CPU. CPU Configuration Chipset Onboard Devices Configuration PCIPnP USB Configuration Select Screen Select Item +- Change Field Tab Select Field F1 - Asus M4A88TD-M | User Manual - Page 64
] 4th Core [On] Enables or disables the fourth CPU core. Configuration options: [On] [Off] 2.5.2 Chipset NorthBridge Configuration DRAM Controller Configuration Bank Interleaving [Auto] Allows you to enable the bank memory interleaving. Configuration options: [Disabled] [Auto] Channel Interleaving - Asus M4A88TD-M | User Manual - Page 65
Disabled] Enables or disables the DRAM ECC that allows the hardware to report and correct memory errors automatically. Configuration options: 4G] [Above 4G] AMD HDMI Audio [Enabled] Allows you to disable or enable the AMD 880 HD Audio. Configuration options ] [ECP] [EPP + ECP] ASUS M4A88TD-M 2-21 - Asus M4A88TD-M | User Manual - Page 66
devices and setting the memory size block for legacy ISA this item is set to [No], BIOS configures all the devices in the system Version and USB Devices Enabled items show the auto-detected values. If no USB device is detected, the item shows None. USB Functions [Enabled] Enables or disables the USB - Asus M4A88TD-M | User Manual - Page 67
] Sets the maximum time that the BIOS waits for the USB storage device to initialize. Configuration options: [10 Sec] [20 Sec] [30 Sec] [40 Sec] Emulation Type [Auto] Allows you to set the emulation type. Configuration options: [Auto] [Floppy] [Forced FDD] [Hard Disk] [CDROM] ASUS M4A88TD-M 2-23 - Asus M4A88TD-M | User Manual - Page 68
Ai Tweaker Power Settings M4A88TD-M BIOS Setup Advanced Power Boot Suspend Mode [Auto] ACPI 2.0 Support [Enabled] ACPI APIC support [Enabled] APM Configuration HW Monitor Configuration Anti Surge Support [Enabled] NB Thermal Protect [Enabled] Tools Version 1002 Exit Select the - Asus M4A88TD-M | User Manual - Page 69
[Enabled] 2.6.5 HW Monitor Configuration CPU / MB Temperature [xxxºC/xxxºF] or [Ignored] The onboard hardware monitor automatically detects and displays the motherboard and CPU temperatures. Select [Ignored to the Northbridge chipset. Configuration options: [Disabled] [Enabled] ASUS M4A88TD-M 2-25 - Asus M4A88TD-M | User Manual - Page 70
Boot Settings M4A88TD-M BIOS Setup Advanced Power Boot Boot Device Priority Boot Settings Configuration Security Tools Version 1002 Exit Specifies select the boot device during system startup, press when ASUS Logo appears. • To access Windows® OS in Safe Mode, do any of the following: - Asus M4A88TD-M | User Manual - Page 71
Change Supervisor Password then press twice. The message Password uninstalled appears. If you forget your BIOS password, you can clear it by erasing the CMOS Real Time Clock (RTC) RAM. See section Access allows viewing and changing all the fields in the Setup utility. ASUS M4A88TD-M 2-27 - Asus M4A88TD-M | User Manual - Page 72
Ai Tweaker M4A88TD-M BIOS Setup Advanced Power Boot Tools Settings ASUS EZ Flash 2 Express Gate Enter OS Timer Reset User Data ASUS O.C. Profile AI NET2 [Auto] [10 Seconds] [No] Tools Version 1002 Exit Press ENTER to run the utility to select and update BIOS. This utility supports: 1.FAT 12 - Asus M4A88TD-M | User Manual - Page 73
and single partition only. • DO NOT shut down or reset the system while updating the BIOS to prevent the system boot failure! • We recommend that you update the BIOS file only coming from the same memory/CPU configuration and BIOS version. • Only the CMO file can be loaded. ASUS M4A88TD-M 2-29 - Asus M4A88TD-M | User Manual - Page 74
menu items allow you to load the optimal or failsafe default values for the BIOS items, and save or discard your changes to the BIOS items. Main Advanced M4A88TD-M BIOS Setup Power Boot Tools Exit Version 1002 Exit Options Exit & Save Changes Exit & Discard Changes Discard Changes Load Setup - Asus M4A88TD-M | User Manual - Page 75
15 Li-Te Road, Peitou, Taipei, Taiwan 11259 +886-2-2894-3447 +886-2-2890-7798 [email protected] www.asus.com.tw Technical Support Telephone Online support +86-21-38429911 support.asus.com ASUS COMPUTER INTERNATIONAL (America) Address 800 Corporate Way, Fremont, CA 94539, USA Telephone - Asus M4A88TD-M | User Manual - Page 76
, TAIWAN R.O.C. Country: TAIWAN Authorized representative in Europe: ASUS COMPUTER GmbH Address, City: HARKORT STR. 21-23, 40880 RATINGEN Country: GERMANY declare the following apparatus: Product name : Motherboard Model name : M4A88TD-M conform with the essential requirements of the
-
 1
1 -
 2
2 -
 3
3 -
 4
4 -
 5
5 -
 6
6 -
 7
7 -
8
-
9
-
10
-
11
-
12
-
13
-
14
-
15
-
16
-
17
-
18
-
19
-
20
-
21
-
22
-
23
-
24
-
25
-
26
-
27
-
28
-
29
-
30
-
31
-
32
-
33
-
34
-
35
-
36
-
37
-
38
-
39
-
40
-
41
-
42
-
43
-
44
-
45
-
46
-
47
-
48
-
49
-
50
-
51
-
52
-
53
-
54
-
55
-
56
-
57
-
58
-
59
-
60
-
61
-
62
-
63
-
64
-
65
-
66
-
67
-
68
-
69
-
70
-
71
-
72
-
73
-
74
-
75
-
76
 |
 |

Motherboard
M4A88TD-M