Asus M5A87 User Manual
Asus M5A87 Manual
 |
View all Asus M5A87 manuals
Add to My Manuals
Save this manual to your list of manuals |
Asus M5A87 manual content summary:
- Asus M5A87 | User Manual - Page 1
M5A87 Motherboard - Asus M5A87 | User Manual - Page 2
including the GPL Software and/or LGPL Software, which will be no earlier than December 1, 2011, either (1) for free by downloading it from http://support.asus.com/download; or (2) for the cost of reproduction and shipment, which is dependent on the preferred carrier and the location where you want - Asus M5A87 | User Manual - Page 3
1-6 1.5.2 Screw holes 1-6 1.5.3 Motherboard layout 1-7 1.5.4 Layout contents 1-7 1.6 Central Processing Unit (CPU 1-8 1.6.1 Installing the CPU 1-8 1.6.2 Installing the heatsink and fan 1-10 1.7 System memory 1-11 1.7.1 Overview 1-11 1.7.2 Memory configurations 1-12 1.7.3 Installing a DIMM - Asus M5A87 | User Manual - Page 4
system 1-30 1.13.2 Support DVD information 1-30 Chapter 2: BIOS information 2.1 Managing and updating your BIOS 2-1 2.1.1 ASUS Update 2-1 2.1.2 ASUS EZ Flash 2 2-2 2.1.3 ASUS CrashFree BIOS 3 2-3 2.2 BIOS setup program 2-4 2.2.1 BIOS menu screen 2-5 2.2.2 Menu bar 2-5 2.2.3 Navigation - Asus M5A87 | User Manual - Page 5
Advanced menu 2-15 2.5.1 CPU Configuration 2-15 2.5.2 Chipset 2-16 2.5.3 Onboard Devices Configuration 2-17 2.5.4 PCIPnP 2-18 2.5.5 USB Configuration 2-18 2.6 Power menu 2-20 2.6.1 Suspend Mode [Auto 2-20 2.6.2 ACPI 2.0 Support [Enabled 2-20 2.6.3 ACPI APIC Support [Enabled 2-20 2.6.4 APM - Asus M5A87 | User Manual - Page 6
that may cause undesired operation. This equipment has been tested and found to comply with the limits for a Class and used in accordance with manufacturer's instructions, may cause harmful interference to radio Canadian ICES-003. ASUS Recycling/Takeback Services ASUS recycling and takeback programs - Asus M5A87 | User Manual - Page 7
ASUS REACH website at http://csr.asus.com/english/REACH.htm. DO NOT throw the motherboard motherboard service technician or your retailer. Operation safety • Before installing the motherboard and adding devices on it, carefully read all the manuals from connectors, slots, sockets and circuitry. • Avoid - Asus M5A87 | User Manual - Page 8
need when installing and configuring the motherboard. How this guide is organized This guide contains the following parts: • Chapter 1: Product introduction This chapter describes the features of the motherboard and the new technology it supports. • Chapter 2: BIOS information This chapter tells how - Asus M5A87 | User Manual - Page 9
/ RAID LAN Audio USB AMD® Socket AM3+ for AMD® FX™ / Phenom™ II / Athlon™ II / Sempron™ 100 series processors AMD® 140W CPU support AMD® Cool 'n' Quiet™ Technology * 32nm AM3+ CPU is supported by BIOS version 0401 and later. ** Refer to www.asus.com for the AMD® CPU support list AMD® 870 / SB850 - Asus M5A87 | User Manual - Page 10
frequency tuning from 100MHz up to 150MHz at 1MHz increment Overclocking Protection: - ASUS C.P.R (CPU Parameter Recall) 1 x PS/2 keyboard / mouse combo port 1 x COM port 1 x LPT port 1 x LAN (RJ-45) port 4 x USB 2.0/1.1 ports 2 x USB 3.0/2.0 ports 3 x Audio jacks (continued on the next page - Asus M5A87 | User Manual - Page 11
! button 1 x Core Unlocker switch 16Mb Flash ROM, AMI BIOS, PnP, DMI2.0, WfM2.0, ACPI2.0a, SM BIOS 2.6 2 x Serial ATA 6.0Gb/s cables 1 x I/O shield 1 x User Manual 1 x Support DVD Drivers ASUS Update ASUS utilities Anti-Virus software (OEM version) ATX form factor: 12.0 in x 8.4 in (30.5 cm x 21 - Asus M5A87 | User Manual - Page 12
xii - Asus M5A87 | User Manual - Page 13
™ II / Athlon™ II / Sempron™ 100 series CPU support This motherboard supports AMD® Socket AM3+ multi-core processors with unique L3 cache and delivers better overclocking capabilities with less power consumption. It features dual-channel DDR3 memory support and accelerates data transfer rate up to - Asus M5A87 | User Manual - Page 14
AMD® 870 Chipset The AMD® 870 Chipset is designed to support up to 5200MT/s HyperTransport™ 3.0 (HT 3.0) interface speed and PCI Express 2.0 x16 graphics. It is optimized with AMD's latest AM3 multi-core CPUs to provide excellent system performance and overclocking capabilities. HyperTransport™ 3.0 - Asus M5A87 | User Manual - Page 15
latent AMD® CPU- with just a simple switch. Enjoy an instant performance boost by simply unlocking the extra cores, without performing complicated BIOS changes. ASUS TurboV Feel the adrenaline rush of real-time OC-now a reality with the ASUS TurboV. This easy OC tool allows you to overclock without - Asus M5A87 | User Manual - Page 16
personalize your system. ASUS CrashFree BIOS 3 ASUS CrashFree BIOS 3 is an auto-recovery tool that allows you to restore a corrupted BIOS file using the bundled support DVD or a USB flash disk that contains the BIOS file. C.P.R. (CPU Parameter Recall) The BIOS C.P.R. feature automatically restores - Asus M5A87 | User Manual - Page 17
before you install motherboard components or change any motherboard settings. • Unplug the power cord from the wall socket before touching any off the ATX power supply and detach its power cord. Failure to do so may cause severe damage to the motherboard, peripherals, or components. ASUS M5A87 1-5 - Asus M5A87 | User Manual - Page 18
overview 1.5.1 Placement direction When installing the motherboard, ensure that you place it into the chassis in the correct orientation. Screw holes Place six screws into the holes indicated by circles to secure the motherboard to the chassis. DO NOT overtighten the screws! Doing so can damage the - Asus M5A87 | User Manual - Page 19
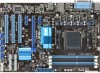
, 240-pin module) SOCKET AM3+ USB3_12 LAN1_USB12 30.5cm(12.0in) CHA_FAN AUDIO AAFP asmedia ASM1042 Realtek RTL8111E PCIEX1_1 ICS 9LPRS483 AMD® 870 M5A87 PCIEX16 PCIEX1_2 Super I/O PCI1 PCI2 2 EATXPWR AMD® SB850 Lithium Cell CMOS Power 16Mb BIOS SATA6G_1 SATA6G_3 SATA6G_5 SATA6G_2 - Asus M5A87 | User Manual - Page 20
use a CPU designed for the AM3+ socket. The CPU fits in only one correct orientation. DO NOT force the CPU into the socket to prevent bending the pins and damaging the CPU! 1.6.1 Installing the CPU To install a CPU: 1. Locate the CPU socket on the motherboard. M5A87 M5A87 CPU socket AM3+ 2. Press - Asus M5A87 | User Manual - Page 21
instructions. 7. Connect the CPU fan cable to the CPU_FAN connector on the motherboard. CPU_FAN M5A87 M5A87 CPU fan connector DO NOT forget to connect the CPU fan connector! Hardware monitoring errors can occur if you fail to plug this connector. CPU FAN PWM CPU FAN IN CPU FAN PWR GND ASUS M5A87 - Asus M5A87 | User Manual - Page 22
should come with installation instructions for the CPU, heatsink, and the retention mechanism. If the instructions in this section do not match the CPU documentation, follow the latter. 2. Attach one end of the retention bracket to the retention module base. 1 2 3 4 5 1-10 Chapter 1: Product - Asus M5A87 | User Manual - Page 23
CPU_FAN. DO NOT forget to connect the CPU fan connector! Hardware monitoring errors can occur if you fail to plug this connector. 1.7 System memory 1.7.1 Overview This motherboard comes with four Double Data Rate 3 (DDR3) Dual Inline Memory Modules (DIMM) sockets. A DDR3 module has the same physical - Asus M5A87 | User Manual - Page 24
overclocking capability. • Always install DIMMs with the same CAS latency. For optimum compatibility, we recommend that you obtain memory modules from the same vendor. • AMD® FX™ Series CPU on this motherboard supports up to DDR3 1866MHz as its standard memory frequency. • Due to CPU spec., AMD - Asus M5A87 | User Manual - Page 25
DS OCZ OCZ3P1866LV4GK 4GB(2 x 2GB) DS Chip Chip Brand NO. - - - - - - - - - - CL 9-9-9-24 - 10-10-10-27 9-9-9-27 Voltage DIMM support A* B* C* 1.65V • • 1. 1.65V 1.65V 1.6V - - • •• - - •• 9-9-9-24 - •• 9-9-9-24 1.5~1.6V • • • 7-7-7-20 1.7V • •• ASUS M5A87 1-13 - Asus M5A87 | User Manual - Page 26
capability Vendor Part No. Size SS/ Chip DS Brand Chip NO. A-Data AD31333001GOU A-Data A-Data DS - - OCZ OCZ3G1333LV6GK 6GB(3 x 2GB) DS - - (continued on the next page) CL Voltage -- DIMM support A* B* C* •• • 8-8-8-24 1.65-1.85V • • • -- •• • 9 9-9-9-24 9-9-9-24 9-9-9-24 9-9-9-24 - Asus M5A87 | User Manual - Page 27
Vendor Part No. Size SS/ Chip DS Brand Chip NO. CL Voltage OCZ OCZ3P1333LV6GK OCZ -- 9-9-9-24 1.5V -9------ -9-9- 9- 7-7-7-20 1.5V 8-8-8-24 1.5V 7-7-7-20 1.5V 8-8-8-24 1.5V 8-8-8-24 1.5V --- DIMM support A* B* C •• • •• • •• • •• • •• • •• • ASUS M5A87 1-15 - Asus M5A87 | User Manual - Page 28
up to DDR3 1866MHz as its standard memory frequency. • Due to CPU spec., AMD® 100 and 200 series CPUs support up to DDR3 1066MHz. With ASUS design, this motherboard can support up to DDR3 1333MHz. • When overclocking, some AMD CPU models may not support DDR3 1600 MHz or higher frequency DIMMs - Asus M5A87 | User Manual - Page 29
a DIMM: 1. Simultaneously press the retaining clips outward to unlock the DIMM. 2 Support the DIMM lightly with your fingers when pressing the retaining 1 clips. The DIMM might get damaged when it flips out with extra force. 1 2. Remove the DIMM from the socket. DIMM notch ASUS M5A87 1-17 - Asus M5A87 | User Manual - Page 30
the system unstable and the card inoperable. 1.8.3 PCI slots The PCI slots support cards such as a LAN card, SCSI card, USB card, and other cards that comply with PCI specifications. 1.8.4 PCI Express x1 slots This motherboard supports PCI Express x1 network cards, SCSI cards, and other cards that - Asus M5A87 | User Manual - Page 31
the battery. • You do not need to clear the RTC when the system hangs due to overclocking. For system failure due to overclocking, use the CPU Parameter Recall (C.P.R) feature. Shut down and reboot the system so the BIOS can automatically reset parameter settings to default values. ASUS M5A87 1-19 - Asus M5A87 | User Manual - Page 32
10 9 8 7 6 1. PS/2 Keyboard/Mouse Combo port (purple/green). This port is for a PS/2 keyboard or PS/2 mouse. 2. Parallel port. This 25-pin port connects a parallel printer, a scanner, or other devices. 3. LAN ACT/LINK SPEED LED LED LAN port 4. Line In port (light blue). This port connects to - Asus M5A87 | User Manual - Page 33
connectors DO NOT forget to connect the fan cables to the fan connectors. Insufficient air flow inside the system may damage the motherboard components. These are not jumpers! DO NOT place jumper caps on the fan connectors. Only the 4-pin CPU fan supports the ASUS Q-Fan feature. ASUS M5A87 1-21 - Asus M5A87 | User Manual - Page 34
+12 Volts +5V Standby Power OK M5A87 PIN 1 GND +5 Volts GND GND GND +5 Volts GND +3 Volts +3 Volts PIN 1 M5A87 ATX power connectors GND +5 Volts +5 Volts Power Supply Wattage Calculator at http://support.asus. com/PowerSupplyCalculator/PSCalculator.aspx?SLanguage=en-us - Asus M5A87 | User Manual - Page 35
before using Serial ATA hard disk drives. The Serial ATA RAID feature is available only if you are using Windows® XP SP3 or later version. • When using hot-plug and NCQ, set the type of the SATA connectors in the BIOS to [AHCI]. See section 2.3.4 SATA Configuration for details. ASUS M5A87 1-23 - Asus M5A87 | User Manual - Page 36
connector (20-8 pin PANEL) This connector supports several chassis-mounted functions. PLED SPEAKER PLED+ PLED+5V Ground Ground Speaker IDE_LED+ IDE_LED- PWR Ground Reset Ground PANEL PIN 1 M5A87 IDE_LED PWRSW RESET * Requires an ATX power supply M5A87 System panel connector • System power LED - Asus M5A87 | User Manual - Page 37
panel audio connector (10-1 pin AAFP) This connector is for a chassis-mounted front panel audio I/O module that supports either High Definition BIOS to [HD Audio]. See section 2.5.3 Onboard Devices Configuration for details. • The front panel audio I/O module is purchased separately. ASUS M5A87 - Asus M5A87 | User Manual - Page 38
USB_P14USB_P14+ GND NC M5A87 PIN 1 PIN 1 PIN 1 PIN 1 USB+5V USB_P7USB_P7+ GND USB+5V USB_P9USB_P9+ GND USB+5V USB_P11USB_P11+ GND USB+5V USB_P13USB_P13+ GND M5A87 USB2.0 connectors Never connect a 1394 cable to the USB connectors. Doing so will damage the motherboard! The USB 2.0 module is - Asus M5A87 | User Manual - Page 39
system. This is ideal for overclockers and gamers who continually change settings CPU. To ensure system performance, turn the switch setting to Enable when the system is powered off. M5A87 M5A87 the Power-On-Self-Test (POST) or enable the ASUS Core Unlocker item in the BIOS menu to activate the - Asus M5A87 | User Manual - Page 40
when each timing set is tested. If the installed DIMMs still fail to boot after the whole tuning process, the DRAM_LED lights continuously. Replace the DIMMs with ones recommended in the Memory QVL (Qualified Vendors Lists) in this user manual or on the ASUS website at www.asus.com. • If you turn - Asus M5A87 | User Manual - Page 41
provides an intuitional way to locate the root problem within a second. DRAM LED M5A87 M5A87 DRAM LED 3. Core Unlocker LED The Core Unlocker LED lights when the Core Unclocker switch is turned to Enable. O2LED1 M5A87 M5A87 Core Unlocker LED ASUS M5A87 The Core Unlocker LED keeps on lighting even - Asus M5A87 | User Manual - Page 42
time without notice. Visit the ASUS website at www.asus.com for updates. To run the Support DVD Place the Support DVD into the optical drive. If Autorun is enabled in your computer, the DVD automatically displays the Specials screen. Click Drivers, Utilities, Make Disk, Manual, and Contact tabs to - Asus M5A87 | User Manual - Page 43
and update the motherboard BIOS in Windows® environment. • ASUS Update requires an Internet connection either through a network or an Internet Service Provider (ISP). • This utility is available in the support DVD that comes with the motherboard package. Installing ASUS Update To install ASUS Update - Asus M5A87 | User Manual - Page 44
from the Open window, then click Open. 3. Follow the onscreen instructions to complete the updating process. 2.1.2 ASUS EZ Flash 2 The ASUS EZ Flash 2 feature allows you to update the BIOS without using an OS‑based utility. Before you start using this utility, download the latest BIOS file from the - Asus M5A87 | User Manual - Page 45
during the updating process. You can restore a corrupted BIOS file using the motherboard support DVD or a USB flash drive that contains the BIOS file. • Before using this utility, rename the BIOS file in the USB flash drive into M5A87.ROM. • Download the latest BIOS file from the ASUS website at - Asus M5A87 | User Manual - Page 46
under the Exit menu. See section 2.9 Exit Menu. • The BIOS setup screens in this chapter are for reference only. They may not exactly match what you see on your screen. • Visit the ASUS website at www.asus.com to download the latest BIOS file for this motherboard. 2-4 Chapter 2: BIOS information - Asus M5A87 | User Manual - Page 47
BIOS menu screen Menu items Menu bar Configuration fields Main Ai Tweaker M5A87 BIOS system Time. Select Screen Select Item +- screen has the following main items: Main For changing the basic system configuration Ai Tweaker For changing the overclocking of a menu screen are the navigation - Asus M5A87 | User Manual - Page 48
-up window. 2.2.7 Pop-up window Select a menu item then press to display a pop-up window with screen. Main Ai Tweaker M5A87 BIOS Setup Advanced Power Boot Power Settings Suspend Mode ACPI 2.0 Support ACPI APIC support APM Configuration HW Monitor Configuration Anti Surge Support - Asus M5A87 | User Manual - Page 49
information. Refer to section 2.2.1 BIOS menu screen for information on the menu screen items and how to navigate through them. Main Ai Tweaker Main Settings M5A87 BIOS Setup Advanced Power Boot System Time [Auto] [CDROM] [ARMD] This item only appears in the SATA6G_5/6 menus. ASUS M5A87 2-7 - Asus M5A87 | User Manual - Page 50
enables the LBA mode if the device supports this mode, and if the device sectors at a time if the device supports multisector transfer feature. When this item allows the onboard storage driver to enable advanced Serial POST. • For Windows® XP OS, you have to install the AHCI driver, so that you - Asus M5A87 | User Manual - Page 51
you an overview of the general system specifications. The BIOS automatically detects the items in this menu. BIOS information Displays the auto-detected BIOS information. Processor Displays the auto-detected CPU specification. System Memory Displays the auto-detected system memory. ASUS M5A87 2-9 - Asus M5A87 | User Manual - Page 52
, set CPU Overclocking to [Manual] after selecting a CPU level. Configuration options: [Auto] [Phenom II-955] [Phenom II-3.4G] [Phenom II-3.6G] • The configuration options vary depending on the CPU model you install on the motherboard. • The CPU Level UP function support depends on CPU types. 2-10 - Asus M5A87 | User Manual - Page 53
O.C. Profile you've selected. Overclock Options [Auto] This item appears only when you set the CPU OverClocking item to [Overclock Profile] and allows you to select an overclocking profile. Configuration options: [Auto] [Overclock 2%] [Overclock 5%] [Overclock 8%] [Overclock 10%] ASUS M5A87 2-11 - Asus M5A87 | User Manual - Page 54
vary according to your CPU model. The following two items only appear when you install a 6-core CPU. AMD Turbo CORE technology [Enabled] Enables or disables the AMD Turbo Core technology. [600MHz] [800MHz] [1000MHz] [1200MHz] [1400MHz] [1600MHz] [1800MHz] [2000MHz] 2-12 Chapter 2: BIOS information - Asus M5A87 | User Manual - Page 55
install on the motherboard. DRAM CAS# 10 CLK] DRAM REF Cycle Time [Auto] Configuration options: [Auto] [90ns] [110ns] [160ns] [300ns] [350ns] DRAM Refresh Rate [Auto] Configuration options: [Auto] [Every 7.8ms] [Every 3.9ms] DRAM Command Rate [Auto] Configuration options: [Auto] [1T] [2T] ASUS M5A87 - Asus M5A87 | User Manual - Page 56
install on the motherboard. CKE drive strength CPU & NB Voltage Mode item to [Manual] and allows you to set a fixed CPU voltage. CPU/NB Voltage [Auto] This item appears only when you set the CPU & NB Voltage Mode item to [Manual] and allows you to set a fixed CPU/NB voltage. 2-14 Chapter 2: BIOS - Asus M5A87 | User Manual - Page 57
the system to malfunction. Main Ai Tweaker Advanced Settings M5A87 BIOS Setup Advanced Power Boot CPU Configuration Chipset Onboard Devices Configuration PCIPnP USB Configuration Tools Exit Version 0302 Configure CPU. Select Screen Select Item +- Change Field Tab Select Field F1 General - Asus M5A87 | User Manual - Page 58
option should remain disabled for the normal operation. The driver developer may enable it for testing purpose. Configuration options: [Disabled] [Enabled] Microcode Updation [Enabled] Enables or disables Microcode Updation. Configuration options: [Disabled] [Enabled] Secure Virtual Machine Mode - Asus M5A87 | User Manual - Page 59
20:16, 9]] Enable Clock to All DIMMs [Disabled] Enables unused Clocks to DIMMs even though memory slots are not populated. Configuraiton options: [Enabled] [Disabled] MemClk Tristate C3/ATLVID [Disabled] the Parallel Port mode. Configuration options: [Normal] [EPP] [ECP] [EPP+ECP] ASUS M5A87 2-17 - Asus M5A87 | User Manual - Page 60
and USB hard drives. Setting to Auto allows the system to detect the presence of USB devices at startup. If detected, the USB controller legacy mode is enabled. If no USB device is detected, the legacy USB support is disabled. Configuration options: [Disabled] [Enabled] [Auto] 2-18 Chapter 2: BIOS - Asus M5A87 | User Manual - Page 61
20 Sec] Sets the maximum time that the BIOS waits for the USB storage device to initialize. Configuration options: [10 Sec] [20 Sec] [30 Sec] [40 Sec] Emulation Type [Auto] Allows you to set the emulation type. Configuration options: [Auto] [Floppy] [Forced FDD] [Hard Disk] [CDROM] ASUS M5A87 2-19 - Asus M5A87 | User Manual - Page 62
the configuration options. Main Ai Tweaker Power Settings M5A87 BIOS Setup Advanced Power Boot Suspend Mode [Auto] ACPI 2.0 Support [Enabled] ACPI APIC Support [Enabled] APM Configuration HW Monitor Configuration Anti Surge Support [Enabled] Tools Version 0302 Exit Select the ACPI - Asus M5A87 | User Manual - Page 63
. This feature requires an ATX power supply that provides at CPU fan speed. [Manual] Allows you to individually set the CPU fan parameters. 2.6.6 Anti Surge Support [Enabled] Allows you to enable or disable the Anti-Surge protection feature. Configuration options: [Disabled] [Enabled] ASUS M5A87 - Asus M5A87 | User Manual - Page 64
M5A87 BIOS Select Screen Select Item Enter Go to Sub Screen F1 Windows OS in Safe Mode, do any of the following: • Press when ASUS logo appears. • Press after POST. 2.7.2 Boot Settings Configuration Quick Boot [Enabled] Enabling this item allows the BIOS to skip some power on self tests - Asus M5A87 | User Manual - Page 65
the supervisor password. The Supervisor Password item on top of the screen shows the default Not Installed. After you set a password, BIOS password, you can clear it by erasing the CMOS Real Time Clock (RTC) RAM. See section 1.9 Jumpers for information on how to erase the RTC RAM. . ASUS M5A87 2-23 - Asus M5A87 | User Manual - Page 66
set or change the user password. The User Password item on top of the screen shows the default Not Installed. After you set a password, this item shows ] When set to [Setup], BIOS checks for user password when accessing the Setup utility. When set to [Always], BIOS checks for user password both when - Asus M5A87 | User Manual - Page 67
. Main Advanced Tools Settings ASUS EZ Flash 2 Power ASUS O.C. Profile M5A87 BIOS Setup Boot Tools Exit Version 0302 Press ENTER to run the utility to select and update BIOS. This utility supports: 1.FAT 12/16/32 (r/w) 2.NTFS (read only) 3.CD-DISC (read only) Select Screen Select Item Enter Go - Asus M5A87 | User Manual - Page 68
Changes Exit & Discard Changes Discard Changes Load Setup Defaults M5A87 BIOS Setup Boot Tools Exit Version 0302 Exit system setup after CMOS RAM. An onboard backup battery sustains the CMOS RAM so it stays on even when the PC is turned off. When you select this option, a confirmation window - Asus M5A87 | User Manual - Page 69
15 Li-Te Road, Peitou, Taipei, Taiwan 11259 +886-2-2894-3447 +886-2-2890-7798 [email protected] www.asus.com.tw Technical Support Telephone Online support +86-21-38429911 support.asus.com ASUS COMPUTER INTERNATIONAL (America) Address 800 Corporate Way, Fremont, CA 94539, USA Telephone - Asus M5A87 | User Manual - Page 70
112, TAIWAN R.O.C. Country: TAIWAN Authorized representative in Europe: ASUS COMPUTER GmbH Address, City: HARKORT STR. 21-23, 40880 RATINGEN Country: GERMANY declare the following apparatus: Product name : MotherBoard Model name : M5A87 conform with the essential requirements of the
-
 1
1 -
 2
2 -
 3
3 -
 4
4 -
 5
5 -
 6
6 -
 7
7 -
8
-
9
-
10
-
11
-
12
-
13
-
14
-
15
-
16
-
17
-
18
-
19
-
20
-
21
-
22
-
23
-
24
-
25
-
26
-
27
-
28
-
29
-
30
-
31
-
32
-
33
-
34
-
35
-
36
-
37
-
38
-
39
-
40
-
41
-
42
-
43
-
44
-
45
-
46
-
47
-
48
-
49
-
50
-
51
-
52
-
53
-
54
-
55
-
56
-
57
-
58
-
59
-
60
-
61
-
62
-
63
-
64
-
65
-
66
-
67
-
68
-
69
-
70
 |
 |

Motherboard
M5A87