Asus M5A99X EVO R2.0 M5A99X EVO R2.0 User's Manual - Page 84
DIGI+ Power Control, CPU Load-Line Calibration [Auto], CPU Currrent Capability [Auto] - vrm
 |
View all Asus M5A99X EVO R2.0 manuals
Add to My Manuals
Save this manual to your list of manuals |
Page 84 highlights
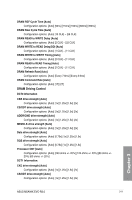
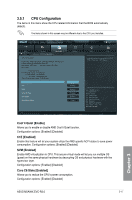
ADDR/CMD drive strength [Auto] Configuration options: [Auto] [1x] [1.25x] [1.5x] [2x] MEMCLK drive strength [Auto] Configuration options: [Auto] [1x] [1.25x] [1.5x] [2x] Data drive strength [Auto] Configuration options: [Auto] [0.75x] [1x] [1.25x] [1.5x] DQS drive strength [Auto] Configuration options: [Auto] [0.75x] [1x] [1.25x] [1.5x] Processor ODT [Auto] Configuration options: [Auto] [240 ohms +/- 20%] [120 ohms +/- 20%] [80 ohms +/20%] [60 ohms +/- 20%] DIGI+ Power Control CPU Load-Line Calibration [Auto] Load-line is defined by AMD VRM spec and affects CPU voltage. The CPU working voltage will decrease proportionally to CPU loading. Higher load-line calibration would get higher voltage and better overclocking performance, but increase the CPU and VRM thermal. This item allows you to adjust the voltage range from the following percentages to boost the system performance: 0% (Regular), 25% (Medium), 50% (High), 75% (Ultra High) and 100% (Extreme). Configuration options: [Auto] [Regular] [Medium] [High] [Ultra High] [Extreme] The actual performance boost may vary depending on your CPU specifiation. CPU/NB Load-Line Calibration [Auto] Allows you to select the CPU/NB Load-Line mode. Configuration options: [Auto] [Regular] [High] [Extreme] CPU Currrent Capability [Auto] This item provides wider total power range for overclocking. A higher value brings a wider total power range and extends the overclocking frequency range simultaneously. Configuration options: [Auto] [100%] [110%] [120%] [130%] [140%] DO NOT remove the thermal module while changing the DIGI+ Power Control related parrameters . The thermal conditions should be monitored. Some of the following items are adjusted by typing the desired values using the numeric keypad and press the key. You can also use the and keys to adjust the value. To restore the default setting, type [auto] using the keyboard and press the key. Chapter 3 3-12 Chapter 3: BIOS setup
-
 1
1 -
2
-
3
-
4
-
5
-
6
-
7
-
8
-
9
-
10
-
11
-
12
-
13
-
14
-
15
-
16
-
17
-
18
-
19
-
20
-
21
-
22
-
23
-
24
-
25
-
26
-
27
-
28
-
29
-
30
-
31
-
32
-
33
-
34
-
35
-
36
-
37
-
38
-
39
-
40
-
41
-
42
-
43
-
44
-
45
-
46
-
47
-
48
-
49
-
50
-
51
-
52
-
53
-
54
-
55
-
56
-
57
-
58
-
59
-
60
-
61
-
62
-
63
-
64
-
65
-
66
-
67
-
68
-
69
-
70
-
71
-
72
-
73
-
74
-
75
-
76
-
77
-
78
-
 79
79 -
 80
80 -
 81
81 -
 82
82 -
 83
83 -
 84
84 -
 85
85 -
 86
86 -
 87
87 -
 88
88 -
 89
89 -
90
-
91
-
92
-
93
-
94
-
95
-
96
-
97
-
98
-
99
-
100
-
101
-
102
-
103
-
104
-
105
-
106
-
107
-
108
-
109
-
110
-
111
-
112
-
113
-
114
-
115
-
116
-
117
-
118
-
119
-
120
-
121
-
122
-
123
-
124
-
125
-
126
-
127
-
128
-
129
-
130
-
131
-
132
-
133
-
134
-
135
-
136
-
137
-
138
-
139
-
140
-
141
-
142
-
143
-
144
-
145
-
146
-
147
-
148
-
149
-
150
-
151
-
152
-
153
-
154
-
155
-
156
-
157
-
158
-
159
-
160
-
161
-
162
-
163
-
164
-
165
-
166
-
167
-
168
-
169
-
170
-
171
-
172
-
173
-
174
-
175
-
176
-
177
-
178
-
179
-
180
 |
 |