Asus MW201U User Guide
Asus MW201U - 20.1" LCD Monitor Manual
 |
UPC - 610839216758
View all Asus MW201U manuals
Add to My Manuals
Save this manual to your list of manuals |
Asus MW201U manual content summary:
- Asus MW201U | User Guide - Page 1
MW221/MW201 Series LCD Monitor User Guide - Asus MW201U | User Guide - Page 2
Product warranty or service will not be extended if: (1) the product is repaired, modified or altered, unless such repair, modification of alteration is authorized in writing by ASUS; or (2) the serial number of the product is defaced or missing. ASUS PROVIDES THIS MANUAL "AS IS" WITHOUT WARRANTY OF - Asus MW201U | User Guide - Page 3
2-1 2.2 Turning the monitor on 2-1 2.3 Adjusting the monitor 2-2 2.4 Detaching the arm/stand (for VESA wall mount 2-3 Chapter 3: General Instruction 3.1 OSD (On-Screen Display) menu 3-1 3.1.1 How to reconfigure 3-1 3.1.2 OSD Function Introduction 3-1 3.2 Troubleshooting (FAQ 3-4 3.3 Supported - Asus MW201U | User Guide - Page 4
may cause undesired operation. This equipment has been tested and found to comply with the limits for used in accordance with manufacturer's instructions, may cause harmful interference to radio or television reception, which can be determined by turning the equipment off and on, the user is - Asus MW201U | User Guide - Page 5
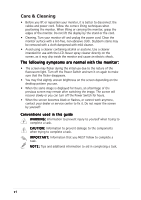
slots on the monitor cabinet. • To ensure satisfactory operation, use the monitor only with UL listed computers which have appropriate configured receptacles marked between 100-240V AC. • If you encounter technical problems with the monitor, contact a qualified service technician or your retailer - Asus MW201U | User Guide - Page 6
recover slowly or you can turn off the Power Switch for hours. • When the screen becomes black or flashes, or cannot work anymore, contact your dealer or service center to fix it. Do not repair the screen by yourself! Conventions used in this guide W A R N I N G : Information to prevent injury to - Asus MW201U | User Guide - Page 7
for product and software updates. 1. ASUS websites The ASUS websites worldwide provide updated information on ASUS hardware and software products. Refer to http://www.asus.com 2. Optional documentation Your product package may include optional documentation, such as warranty card, that may have been - Asus MW201U | User Guide - Page 8
viii - Asus MW201U | User Guide - Page 9
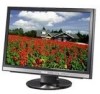
. The ASUS® MW221/MW201 Series LCD monitor gives you a full view of documents and web pages, and saving you the trouble of having MW221/MW201 Series brings you! 1.2 Package contents Check your MW221/MW201 Series LCD package for the following items: LCD monitor User manual CD Quick start guide - Asus MW201U | User Guide - Page 10
introduction 1.3.1 Front of the LCD monitor Stereo speaker Base 1 2 3 4 5 6 1. H e a d p h o n e p o r t . This port connects a headphone with a stereo mini-plug (3.5mm). clock, and phase by pressing this button for 2-4 seconds. 3. Button: • Press this button to decrease the value of the - Asus MW201U | User Guide - Page 11
this button to turn the monitor on/off • The color definition of the power indicator is as the below table. Status Blue Amber OFF Description ON Standby mode OFF 1.3.2 Rear of the LCD monitor Rear A p o r t . This 15-pin port is for PC VGA connection. ASUS LCD Monitor MW221/MW201 Series 1-3 - Asus MW201U | User Guide - Page 12
1-4 Chapter 1: Product introduction - Asus MW201U | User Guide - Page 13
instructions: • To connect the audio cable: connect one end of the audio cable to the monitor's Turning the monitor on Gently touch the power sensor . See page 1-3 for the location of the power sensor. The power indicator lights up in blue to show that the monitor is ON. ASUS LCD Monitor MW221 - Asus MW201U | User Guide - Page 14
, we recommend that you look at the full face of the monitor, then adjust the monitor to the angle that is most comfortable for you. • Hold the stand to prevent the monitor from falling when you change its angle. • You can adjust the monitor's angle from -5º to 20º. -5º~20º It is normal that the - Asus MW201U | User Guide - Page 15
. 4. Push Button 2 to remove the VESA cover. • We recommend that you cover the table surface with soft cloth to prevent damage to the monitor. VESA cover Rear cover Button 1 Screws Button 2 The VESA wall mount kit (100 mm x 100 mm) is purchased separately. ASUS LCD Monitor MW221/MW201 Series - Asus MW201U | User Guide - Page 16
2-4 Chapter 2: Setup - Asus MW201U | User Guide - Page 17
and to navigate through the functions. Highlight and activate the desired function by pressing the MENU button. If the function selected has a sub-menu, press + and - again to navigate Mode: advance for dark-display use with SPLENDID™ Video Enhancement. ASUS LCD Monitor MW221/MW201 Series 3-1 - Asus MW201U | User Guide - Page 18
modes including Cool, Normal, Warm, sRGB, and User mode. • Skin Tone: contains three color modes including Reddish, Natural, and Yellowish. In the User mode, colors of R (Red), G (Green), and B (Bluee) are userconfigurable; the adjusting range is from 0-100. 3-2 Chapter 3: General Instruction - Asus MW201U | User Guide - Page 19
your selection, including English, German, Italian, French, Dutch, Spanish, Russian, Traditional Chinese, Simplified Chinese, Japanese, and Korean. • Information: shows the monitor information. • R e s e t : "Yes" allows you to revert to the preset mode. ASUS LCD Monitor MW221/MW201 Series 3-3 - Asus MW201U | User Guide - Page 20
bounces or a wave pattern is present in the image Screen image has color defects (white does not look white) Screen image is blurry or fuzzy No sound or sound is low Possible Solution • Press the button to check if the monitor is in the ON mode. • Check if the power cord is properly - Asus MW201U | User Guide - Page 21
65.00MHz 75.00MHz 78.75MHz 108.00MHz 135.00MHz 108.00MHz 106.00MHz 146.25MHz * Modes not listed in the table may not be supported. For optimal resolution, we recommend that you choose a mode listed in the table above. ASUS LCD Monitor MW221/MW201 Series 3-5 - Asus MW201U | User Guide - Page 22
3-6 Chapter 3: General Instruction
-
 1
1 -
 2
2 -
 3
3 -
 4
4 -
 5
5 -
 6
6 -
 7
7 -
8
-
9
-
10
-
11
-
12
-
13
-
14
-
15
-
16
-
17
-
18
-
19
-
20
-
21
-
22
 |
 |
MW221/MW201 Series
LCD Monitor
User Guide