Asus P5G41-M LX2 User Manual - Page 39
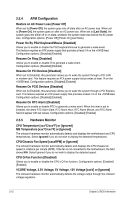
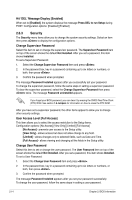
Hit 'DEL' Message Display [Enabled], Change Supervisor Password, User Access Level [Full Access], - does not post
 |
View all Asus P5G41-M LX2 manuals
Add to My Manuals
Save this manual to your list of manuals |
Page 39 highlights
Hit 'DEL' Message Display [Enabled] When set to [Enabled], the system displays the message Press DEL to run Setup during POST. Configuration options: [Disabled] [Enabled] 2.6.3 Security The Security menu items allow you to change the system security settings. Select an item then press to display the configuration options. Change Supervisor Password Select this item to set or change the supervisor password. The Supervisor Password item on top of the screen shows the default Not Installed. After you set a password, this item shows Installed. To set a Supervisor Password: 1. Select the Change Supervisor Password item and press . 2. In the password box, key in a password containing up to six letters or numbers, or both, then press . 3. Confirm the password when prompted. The message Password Installed appears after you successfully set your password. To change the supervisor password, follow the same steps in setting a supervisor password. To clear the supervisor password, select the Change Supervisor Password then press twice. The message Password uninstalled appears. If you forget your BIOS password, you can clear it by erasing the CMOS Real Time Clock (RTC) RAM. See section 1.6 Jumpers for information on how to erase the RTC RAM. After you have set a supervisor password, the other items appear to allow you to change other security settings. User Access Level [Full Access] This item allows you to select the access restriction to the Setup items. Configuration options: [No Access] [View Only] [Limited] [Full Access] [No Access] - prevents user access to the Setup utility. [View Only] - allows access but does not allow change to any field. [Limited] - allows changes only to selected fields, such as Date and Time. [Full Access] - allows viewing and changing all the fields in the Setup utility. Change User Password Select this item to set or change the user password. The User Password item on top of the screen shows the default Not Installed. After you set a password, this item shows Installed. To set a User Password: 1. Select the Change User Password item and press . 2. In the password box, key in a password containing up to six letters or numbers, or both, then press . 3. Confirm the password when prompted. The message Password Installed appears after you set your password successfully. To change the user password, follow the same steps in setting a user password. 2-14 Chapter 2: BIOS information
-
 1
1 -
2
-
3
-
4
-
5
-
6
-
7
-
8
-
9
-
10
-
11
-
12
-
13
-
14
-
15
-
16
-
17
-
18
-
19
-
20
-
21
-
22
-
23
-
24
-
25
-
26
-
27
-
28
-
29
-
30
-
31
-
32
-
33
-
 34
34 -
 35
35 -
 36
36 -
 37
37 -
 38
38 -
 39
39 -
 40
40
 |
 |