Asus PA238Q User Guide - Page 13
Detaching the arm/stand for VESA, wall mount
 |
View all Asus PA238Q manuals
Add to My Manuals
Save this manual to your list of manuals |
Page 13 highlights
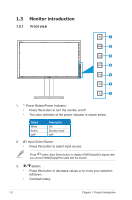
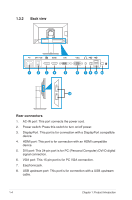
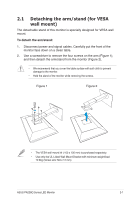
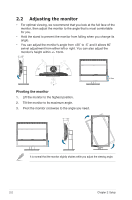
2.1 Detaching the arm/stand (for VESA wall mount) The detachable stand of this monitor is specially designed for VESA wall mount. To detach the arm/stand: 1. Disconnect power and signal cables. Carefully put the front of the monitor face down on a clean table. 2. Use a screwdriver to remove the four screws on the arm (Figure 1), and then detach the arm/stand from the monitor (Figure 2). • We recommend that you cover the table surface with soft cloth to prevent damage to the monitor. • Hold the stand of the monitor while removing the screws. Figure 1 Figure 2 • The VESA wall mount kit ( 100 x 100 mm) is purchased separately. • Use only the UL Listed Wall Mount Bracket with minimum weight/load 12.8kg (Screw size: M4 x 12 mm). ASUS PA238Q Series LED Monitor 2-1
-
 1
1 -
2
-
3
-
4
-
5
-
6
-
7
-
 8
8 -
 9
9 -
 10
10 -
 11
11 -
 12
12 -
 13
13 -
 14
14 -
 15
15 -
 16
16 -
 17
17 -
 18
18 -
19
-
20
-
21
-
22
-
23
-
24
-
25
-
26
-
27
 |
 |