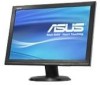
Asus VW192S User Manual
Asus VW192S - 19" LCD Monitor Manual
 |
UPC - 610839217465
View all Asus VW192S manuals
Add to My Manuals
Save this manual to your list of manuals |
Asus VW192S manual content summary:
- Asus VW192S | User Manual - Page 1
VW192 Series LCD Monitor E2682 V1 July 2006 User Guide - Asus VW192S | User Manual - Page 2
LCD monitor 1-4 Chapter 2: Setup 2.1 Adjusting the monitor 2-1 2.2 Detaching the arm/stand (for VESA wall mount 2-2 Chapter 3: General Instruction 3.1 OSD (On-Screen Display) menu 3-1 3.1.1 How to reconfigure 3-1 3.1.2 OSD Function Introduction 3-1 3.2 Troubleshooting (FAQ 3-4 3.3 Supported - Asus VW192S | User Manual - Page 3
. This equipment generates, uses and can radiate radio frequency energy and, if not installed and used in accordance with manufacturer's instructions, may cause harmful interference to radio communications. However, there is no guarantee that interference will not occur in a particular installation - Asus VW192S | User Manual - Page 4
slots on the monitor cabinet. • To ensure satisfactory operation, use the monitor only with UL listed computers which have appropriate configured receptacles marked between 100-240V AC. • If you encounter technical problems with the monitor, contact a qualified service technician or your retailer - Asus VW192S | User Manual - Page 5
can turn off the Power Switch for hours. • When the screen becomes black or flashes, or cannot work anymore, contact your dealer or service center to fix it. Do not repair the screen by yourself! Conventions used in this guide W A R N I N G : Information to prevent injury to yourself when trying to - Asus VW192S | User Manual - Page 6
to the following sources for additional information and for product and software updates. 1. ASUS websites The ASUS websites worldwide provide updated information on ASUS hardware and software products. Refer to http://www.asus.com 2. Optional documentation Your product package may include optional - Asus VW192S | User Manual - Page 7
package for the following items: LCD monitor User manual 1 x Power cord 1 x VGA cable 1 x DVI cable (Only for VW192T) 1 x Audio cable (Only for VW192T and VW192S) 1 x Rear cover If any of the above items is damaged or missing, contact your retailer immediately. ASUS LCD Monitor VW192 Series 1-1 - Asus VW192S | User Manual - Page 8
base: 1. Connect the base with the monitor. A click shows that the base has been connected successfully. 2. Tighten the screw as the drawing shows to fix the base. 3. Adjust the monitor to the angle that is most comfortable for you. • We recommend that you cover the table surface with soft cloth - Asus VW192S | User Manual - Page 9
LCD monitor Base 1 2 3 4 5 6 1. S P L E N D I D B u t t o n : • Use this hotkey to switch from five video preset modes (Game Mode, Night View Mode, Scenery Mode, Standard Mode, Theater Mode) with SPLENDID • This is also a hotkey for Brightness adjustment. ASUS LCD Monitor VW192 Series 1-3 - Asus VW192S | User Manual - Page 10
Status Blue Amber OFF Description ON Standby mode OFF 1.4.2 Rear of the LCD monitor Rear connectors Rear connectors (from left to right) 1. P W R u d i o - i n p o r t . This port connects PC audio source by the bundled audio cable. (Only for some models) 1-4 Chapter 1: Product introduction - Asus VW192S | User Manual - Page 11
that you look at the full face of the monitor, then adjust the monitor to the angle that is most comfortable for you. • Hold the stand to prevent the monitor from falling when you change its angle. • You can adjust the monitor's angle from -5º to 20º. -5º~20º ASUS LCD Monitor VW192 Series 2-1 - Asus VW192S | User Manual - Page 12
the arm/stand (for VESA wall mount) The detachable stand of the VW192 Series LCD monitor is specially designed for VESA wall mount. To detach the arm/stand: 1. Remove the rear cover. 2. Have the front of the monitor face down on a table. 3. Use a screwdriver to remove the two screws on the stand - Asus VW192S | User Manual - Page 13
On-Screen Window use with SPLENDID™ Video Enhancement. • Theater Mode: advance for movie use with SPLENDID™ Video Enhancement. • Game Mode: advance for game use with SPLENDID™ Video Enhancement. • Night View Mode: advance for dark-display use with SPLENDID™ Video Enhancement. ASUS LCD Monitor - Asus VW192S | User Manual - Page 14
Phase adjusts the phase of the pixel clock signal. With a wrong phase adjustment, the screen shows horizontal disturbances. • Clock (pixel frequency) controls the number of pixels scanned by one B (Bluee) are userconfigurable; the adjusting range is from 0-100. 3-2 Chapter 3: General Instruction - Asus VW192S | User Manual - Page 15
S e l e c t In this function, you can select either VGA or DVI input source. (For the models with a DVI port) 5. S y s t e m you can adjust the OSD timeout from 10 to 120. • Language: there are ten monitor information. • R e s e t : "Yes" allows you to revert to the preset mode. ASUS LCD Monitor - Asus VW192S | User Manual - Page 16
Phase and Clock settings via OSD. • Ensure that the audio cable is properly connected to the monitor and the computer • Adjust the volume settings of both your monitor and computer. • Ensure that the computer sound card driver is properly installed and activated. 3-4 Chapter 3: General Instruction - Asus VW192S | User Manual - Page 17
3.3 Supported operating modes Standard Resolution Horizontal Frequency Vertical Frequency Pixel Frequency DOS VGA SVGA * Modes not listed in the table may not be supported. For optimal resolution, we recommend that you choose a mode listed in the table above. ASUS LCD Monitor VW192 Series 3-5 - Asus VW192S | User Manual - Page 18
3-6 Chapter 3: General Instruction
-
 1
1 -
 2
2 -
 3
3 -
 4
4 -
 5
5 -
 6
6 -
 7
7 -
8
-
9
-
10
-
11
-
12
-
13
-
14
-
15
-
16
-
17
-
18
 |
 |

VW192 Series
LCD Monitor
User Guide
E2682 V1
E2682 V1
E2682 V1
E2682 V1
E2682 V1
July 2006
July 2006
July 2006
July 2006
July 2006