Asus VivoMini UN42 VivoMini memory wireless card and solid state driveSSD inst
Asus VivoMini UN42 Manual
 |
View all Asus VivoMini UN42 manuals
Add to My Manuals
Save this manual to your list of manuals |
Asus VivoMini UN42 manual content summary:
- Asus VivoMini UN42 | VivoMini memory wireless card and solid state driveSSD inst - Page 1
drive (SSD) installation guide Your VivoMini comes with the following items. Please contact ASUS Service Center if you cannot find the following items: • 4 pcs holed rubber foot • 3 pcs 3mm round screws, 1 hexagon screw IMPORTANT! • It is recommended that you install or upgrade the memory - Asus VivoMini UN42 | VivoMini memory wireless card and solid state driveSSD inst - Page 2
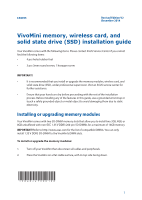
screw head that would be enough for you to hold. 5. Hold the screw then gently pull out the cover from the bottom side of the VivoMini. Use your other free hand to hold the - Asus VivoMini UN42 | VivoMini memory wireless card and solid state driveSSD inst - Page 3
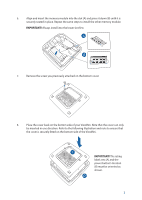
into the lower slot first. 7. Remove the screw you previously attached on the bottom cover. 8. Place the cover back on the bottom side of your VivoMini. Note that the cover can only be inserted in one direction. Refer to the following illustration and note to ensure that the cover is securely - Asus VivoMini UN42 | VivoMini memory wireless card and solid state driveSSD inst - Page 4
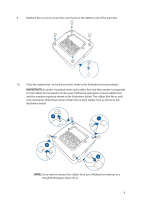
9. Reattach the screws to secure the cover back on the bottom side of the main box. 10. Place the rubber foot on each screw hole. Refer to the illustration for more details. IMPORTANT! A number is printed under each rubber foot and this - Asus VivoMini UN42 | VivoMini memory wireless card and solid state driveSSD inst - Page 5
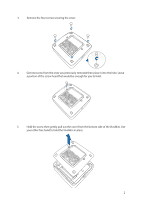
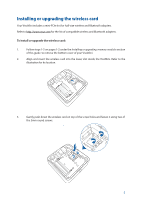
to http://www.asus.com for the list of compatible wireless and Bluetooth adapters. To install or upgrade the wireless card: 1. Follow steps 1-5 on pages 1-2 under the Installing or upgrading memory modules section of this guide to remove the bottom cover of your VivoMini. 2. Align and insert - Asus VivoMini UN42 | VivoMini memory wireless card and solid state driveSSD inst - Page 6
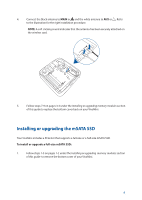
memory modules section of this guide to replace the bottom cover back on your VivoMini. Installing or upgrading the mSATA SSD Your VivoMini includes a PCIe slot that supports a full-size or a half-size mSATA SSD. To install or upgrade a full-size mSATA SSD: 1. Follow steps 1-5 on pages - Asus VivoMini UN42 | VivoMini memory wireless card and solid state driveSSD inst - Page 7
under the Installing or upgrading memory modules section of this guide to replace the bottom cover back on your VivoMini. To install or upgrade a half-size mSATA SSD: 1. Follow steps 1-5 on pages 1-2 under the Installing or upgrading memory modules section of this guide to remove the bottom - Asus VivoMini UN42 | VivoMini memory wireless card and solid state driveSSD inst - Page 8
SSD on top of the screw hole and fasten it using one of the 3mm round screw. Refer to the illustration for the location of the screw hole. 5. Follow steps 7-9 on pages 3-4 under the Installing or upgrading memory modules section of this guide to replace the bottom cover back on your VivoMini - Asus VivoMini UN42 | VivoMini memory wireless card and solid state driveSSD inst - Page 9
Guide d'installation de modules mémoire, d'adaptateur sans fil et de lecteur SSD pour VivoMini Votre ordinateur VivoMini est livré avec les éléments suivants. Contactez le service client ASUS si l'un des éléments est manquant ou endommagé. • 4 patins en caoutchouc • 3 vis rondes de 3mm, 1 vis - Asus VivoMini UN42 | VivoMini memory wireless card and solid state driveSSD inst - Page 10
d'ordinateur de sorte à pouvoir la prendre en main. 5. Tirez d'une main sur la vis pour désengager le couvercle. Utilisez votre autre main pour maintenir le VivoMini en place. 10 - Asus VivoMini UN42 | VivoMini memory wireless card and solid state driveSSD inst - Page 11
être inséré que dans un seul sens. Consultez l'illustration ci-dessous pour vous assurer que le couvercle est bien placé sur le boîtier du VivoMini. IMPORTANT ! L'étiquette listant les tensions (A) ainsi que le bouton d'alimentation (B) doivent être orientés tel qu'illustré ci-contre. 11 - Asus VivoMini UN42 | VivoMini memory wireless card and solid state driveSSD inst - Page 12
9. Replacez les vis pour sécuriser le couvercle au boîtier principal. 10. Placez les patins en caoutchouc. Reportez-vous à l'illustration pour plus de détails. IMPORTANT ! Faites attention à l'orientation de chacun des patins en caoutchouc ainsi que du - Asus VivoMini UN42 | VivoMini memory wireless card and solid state driveSSD inst - Page 13
://www.asus.com pour consulter la liste des adaptateurs Wi-Fi et Bluetooth compatibles. Pour installer ou mettre à niveau un adaptateur sans fil : 1. Suivez les instructions 1 à 5 des pages 1-2 de la section Installer des modules mémoires de ce guide pour retirer le couvercle de votre VivoMini - Asus VivoMini UN42 | VivoMini memory wireless card and solid state driveSSD inst - Page 14
connectée à l'adaptateur sans fil. 5. Suivez les instructions des étapes 7 à 9 des pages 3-4 de la section Installer des modules mémoire de ce guide pour réinstaller le couvercle de votre VivoMini. Installer un lecteur SSD au format mSATA Votre VivoMini intègre un slot PCIe permettant - Asus VivoMini UN42 | VivoMini memory wireless card and solid state driveSSD inst - Page 15
7 à 9 des pages 3-4 de la section Installer des modules mémoire de ce guide pour réinstaller le couvercle de votre VivoMini. Pour installer ou mettre à niveau un lecteur SSD mSATA de demi-hauteur : 1. Suivez les instructions 1 à 5 des pages 1-2 de la section Installer des modules mémoires de ce - Asus VivoMini UN42 | VivoMini memory wireless card and solid state driveSSD inst - Page 16
son emplacement. 4. Alignez les pas de vis du lecteur SSD mSATA avec ceux de l'emplacement dédié à son installation à l'intérieur du VivoMini, puis sécurisez le tout à l'aide d'une des vis rondes de 3mm incluses. 5. Suivez les instructions des étapes 7 à 9 des pages 3-4 de la section Installer
-
 1
1 -
 2
2 -
 3
3 -
 4
4 -
 5
5 -
 6
6 -
 7
7 -
8
-
9
-
10
-
11
-
12
-
13
-
14
-
15
-
16
 |
 |

1
CA9955
Revised Edition V2
December 2014
VivoMini memory, wireless card, and
solid state drive (SSD) installation guide
Your VivoMini comes with two SO-DIMM memory slots that allow you to install two 2GB, 4GB, or
8GB unbuffered with non-ECC 1.35 V DDR3 204-pin SO-DIMMs for a maximum of 16GB memory.
IMPORTANT!
Refer to http://www.asus.com for the list of compatible DIMMs. You can only
install 1.35 V DDR3 SO-DIMM to the VivoMini’s DIMM slots.
IMPORTANT!
•
It is recommended that you install or upgrade the memory modules, wireless card, and
solid state drive (SSD), under professional supervision. Visit an ASUS service center for
further assistance.
•
Ensure that your hands are dry before proceeding with the rest of the installation
process. Before installing any of the features in this guide, use a grounded wrist strap or
touch a safely grounded object or metal object to avoid damaging them due to static
electricity.
Installing or upgrading memory modules
To install or upgrade the memory modules:
1.
Turn off your VivoMini then disconnect all cables and peripherals.
2.
Place the VivoMini on a flat stable surface, with its top side facing down.
Your VivoMini comes with the following items. Please contact ASUS Service Center if you cannot
find the following items:
•
4 pcs holed rubber foot
•
3 pcs 3mm round screws, 1 hexagon screw
15060-4790R100