Asus WL-700GE Quick Start Guide
Asus WL-700GE - Wireless Router Manual
 |
UPC - 610839727780
View all Asus WL-700GE manuals
Add to My Manuals
Save this manual to your list of manuals |
Asus WL-700GE manual content summary:
- Asus WL-700GE | Quick Start Guide - Page 1
® Wireless Router WL-700gE Quick Start Guide (For 802.11g and 802.11b wireless network) ASUS Wireless Router i - Asus WL-700GE | Quick Start Guide - Page 2
Connecting WL-700gE from a wirless client 6 2.4 USB auto copy function ...7 2.5 Wireless data sharing ...7 2.6 Using Download Master...9 2.7 Sharing your photos on your Website 11 2.8 Setting up the Message Board 13 2.9 Setting up DDNS...15 2.10 Setting up shared printer ...18 3 Troubleshooting - Asus WL-700GE | Quick Start Guide - Page 3
of WL-700gE. Chapter 3: Troubleshooting This chapter provides solutions to possible problems you may encounter during setting up and using WL-700gE. Conventions in this guide To make sure that you perform certain tasks properly, take note of the following symbols used throughout this manual. Warning - Asus WL-700GE | Quick Start Guide - Page 4
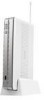
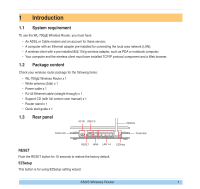
router package for the following items: • WL-700gE Wireless Router x 1 • White antenna (2dbi) x 1 • Power cable x 1 • RJ-45 Ethernet cable (straight-through) x 1 • Support CD (with full version user manual) x 1 • Router stand x 1 • Quick start guide x 1 1.3 Rear panel AC IN USB 2.0 Antenna - Asus WL-700GE | Quick Start Guide - Page 5
hard disk. COPY This button is for copying the data in your USB storage to the hard disk of WL-700gE. READY OFF ON Flashing slowly Flashing quickly No power The system is powered on and in ready state USB For connecting USB storage, such as USB hard disk and USB flash. ASUS Wireless Router 2 - Asus WL-700GE | Quick Start Guide - Page 6
. 2. Insert the support CD into the optical drive of your computer to run the utility installation program. Select your language and click Install ASUS Wireless Router Utilities to install. Follow the instructions to complete the utility installation. ADSL Modem WL-700gE Wireless Router WAN - Asus WL-700GE | Quick Start Guide - Page 7
WL-700gE Wireless Router. This action takes several seconds. 4. A window prompts out asking for the encryption mode you want to use. If you want to use WPA, select Yes; to use WEP, select No. 5. If it is the first time you set up the wireless router, the screen below appears. You can manually - Asus WL-700GE | Quick Start Guide - Page 8
information. 7. Select the connection type of your ISP service and click Next to fill in the ISP mass storage. Specify a drive letter for the hard disk in WL-700gE and check Create shortcut on desktop, then click Next. 9. 700gE share folder icon appears on desktop. ASUS Wireless Router 5 - Asus WL-700GE | Quick Start Guide - Page 9
panel -> Network connection, right-click the wireless icon -> Property -> Wireless Network tab. Select WL-700gE and click Connect button. 2. If you have setup WEP encryption for your wireless router, authentication, check Enable IEEE80.211X authentication to this network. ASUS Wireless Router 6 - Asus WL-700GE | Quick Start Guide - Page 10
.. 2. Login to the WL-700gE Web configuration interface. Login Name: admin; Password: admin (default). 3. Click Configuration to enter Web configuration page. Step 4 and 5 are for first configuration. Skip step 4 and 5 if you have configured the wireless router via EZSetup. ASUS Wireless Router 7 - Asus WL-700GE | Quick Start Guide - Page 11
default workgroup setting of WL-700gE is Workgroup. If your computer and WL-700gE are not within the same workgroup, you cannot find WL-700gE from your computer. Set WL-700gE within your workgroup by modifying the workgroup settings in Share Management -> Windows Setup page. ASUS Wireless Router 8 - Asus WL-700GE | Quick Start Guide - Page 12
to organize HTTP, FTP, and BT download tasks.. 1. Open Download Master from Start -> All Programs -> ASUS Utility -> WL-700gE Wireless Router -> Download Master. Click File -> Connect to associate with WL-700gE. 2. HTTP download (1) Right-click the download link on the Web page and select Download - Asus WL-700GE | Quick Start Guide - Page 13
If you select Download using ASUS Download, you can see the download task is added to the Transfer list. The blue bars indicate the progress of download folder to view or copy the finished files to your local hard disk. The incomplete tasks are kept in InComplete folder. ASUS Wireless Router 10 - Asus WL-700GE | Quick Start Guide - Page 14
2.7 Sharing your photos on your Website You can upload your photos to WL-700gE to share them with your friends. 1. Click Start -> All Programs -> ASUS Utility -> WL-700gE Wireless Router -> Photo Album Exporter to open the photo upload utility. 2. Name your new album and add descriptions to the - Asus WL-700GE | Quick Start Guide - Page 15
already added to you personal website. To view the photos, click the album. 11. Your friends can view these photos and leave comments to them. ASUS Wireless Router 12 - Asus WL-700GE | Quick Start Guide - Page 16
Login to enter the webisite home page again. 3. Click the Message Board tab and click New topic. 4. Input the subject for discussion and click Add. ASUS Wireless Router 13 - Asus WL-700GE | Quick Start Guide - Page 17
5. When finished, click Add Message to enter the subject and leave a message. 6. Input your information to the fields and write your message in the Message box. Click Submit to send out the message. 7. Your message board is ready. ASUS Wireless Router 14 - Asus WL-700GE | Quick Start Guide - Page 18
server because their IP addresses keep changing. To solve this problem, WL-700gE provides Dynamic DNS (DDNS) function. DDNS enables dynamic IP first register at DDNS service provider, such as DynDNS.org. 1. Enter the Web configuration page of WL-700gE and click Advanced Settings ASUS Wireless Router 15 - Asus WL-700GE | Quick Start Guide - Page 19
page and activate your account. 7. Click Login. 8. Input username and password to login. 9. After logging in, you can see this welcome message. 10. Select Services tab. 11. Click Add Dynamic DNS Host. 12. Enter the host name then click Add Host. 13. Your hostname is successfully created - Asus WL-700GE | Quick Start Guide - Page 20
14. Return to WL-700gE DDNS configuration page. Enable DDNS Client, set "Server" to WWW.DYNDNS.ORG and input your user name, password and host name account.dyndns.org and press Enter. If you get reply from a certain IP address, it means your host is accessible from Internet. ASUS Wireless Router 17 - Asus WL-700GE | Quick Start Guide - Page 21
the USB2.0 port of WL-700gE. Make sure the printer is powered ON. 2. Enter the Web configuration page of WL-700gE. Click Applications -> Printer. You can see your printer is recognized by WL-700gE. 3. Open a Web locate the driver. 6. The printer is ready for share. ASUS Wireless Router 18 - Asus WL-700GE | Quick Start Guide - Page 22
3 Troubleshooting 1. Power ON the WL-700gE Wireless Router and make sure the LED indicators light up normally. 2. Make sure the ASUS Wireless Router Utility is correctly installed. 3. Ping WL-700gE at your computer. Click Start on the desktop and select Run..., type cmd and press OK. Then type - Asus WL-700GE | Quick Start Guide - Page 23
AND SOFTWARE DESCRIBED IN IT. Copyright © 2006 ASUSTeK COMPUTER INC. All Rights Reserved. Note: Product warranty or service will not be extended if the serial number is defaced or missing. Product name: Manual version: Publication date: ASUS WL-700gE Wireless Router QE2393 / V1.0 February 2006 - Asus WL-700GE | Quick Start Guide - Page 24
enjoy two yearsʼ warranty subject to use within the warranty scope. Warranty scope ASUS provides two yearsʼ limited warranty subject to correct use and maintenance. ASUS can charge fee for repairation or maintenance if damage is caused by: 1). Force majeure; 2). Abnormal voltage; 3). Disassembling
-
 1
1 -
 2
2 -
 3
3 -
 4
4 -
 5
5 -
 6
6 -
 7
7 -
8
-
9
-
10
-
11
-
12
-
13
-
14
-
15
-
16
-
17
-
18
-
19
-
20
-
21
-
22
-
23
-
24
 |
 |

ASUS Wireless Router
i
Wireless Router
WL-700gE
Quick Start Guide
(For 802.11g and 802.11b wireless network)
®