Asus X401A User's Manual for English Edition - Page 91
Recovering Your Notebook PC, Using Recovery Partition - windows 8 drivers
 |
View all Asus X401A manuals
Add to My Manuals
Save this manual to your list of manuals |
Page 91 highlights
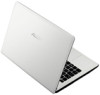
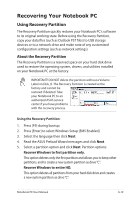
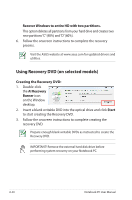
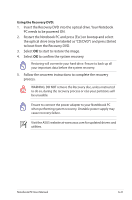
Recovering Your Notebook PC Using Recovery Partition The Recovery Partition quickly restores your Notebook PC's software to its original working state. Before using the Recovery Partition, copy your data files (such as Outlook PST files) to USB storage devices or to a network drive and make note of any customized configuration settings (such as network settings). About the Recovery Partition The Recovery Partition is a reserved space on your hard disk drive used to restore the operating system, drivers, and utilities installed on your Notebook PC at the factory. IMPORTANT! DO NOT delete the partition without a Volume Label on Disk_0. The Recovery Partition is created at the factory and cannot be restored if deleted. Take your Notebook PC to an authorized ASUS service center if you have problems with the recovery process. Using the Recovery Partition: 1. Press [F9] during bootup. 2. Press [Enter] to select Windows Setup [EMS Enabled]. 3. Select the language then click Next. 4. Read the ASUS Preload Wizard messages and click Next. 5. Select a partition option and click Next. Partition options: Recover Windows to first partition only. This option deletes only the first partition and allows you to keep other partitions, and to create a new system partition as drive "C". Recover Windows to entire HD. This option deletes all partitions from your hard disk drive and creates a new system partition as drive "C". Notebook PC User Manual A-19
-
 1
1 -
2
-
3
-
4
-
5
-
6
-
7
-
8
-
9
-
10
-
11
-
12
-
13
-
14
-
15
-
16
-
17
-
18
-
19
-
20
-
21
-
22
-
23
-
24
-
25
-
26
-
27
-
28
-
29
-
30
-
31
-
32
-
33
-
34
-
35
-
36
-
37
-
38
-
39
-
40
-
41
-
42
-
43
-
44
-
45
-
46
-
47
-
48
-
49
-
50
-
51
-
52
-
53
-
54
-
55
-
56
-
57
-
58
-
59
-
60
-
61
-
62
-
63
-
64
-
65
-
66
-
67
-
68
-
69
-
70
-
71
-
72
-
73
-
74
-
75
-
76
-
77
-
78
-
79
-
80
-
81
-
82
-
83
-
84
-
85
-
 86
86 -
 87
87 -
 88
88 -
 89
89 -
 90
90 -
 91
91 -
 92
92 -
 93
93 -
 94
94 -
 95
95 -
 96
96 -
97
-
98
-
99
-
100
-
101
-
102
-
103
-
104
-
105
-
106
-
107
-
108
-
109
-
110
-
111
-
112
-
113
-
114
-
115
-
116
-
117
-
118
-
119
-
120
-
121
-
122
 |
 |