Ativa AT220H Product Manual
Ativa AT220H Manual
 |
View all Ativa AT220H manuals
Add to My Manuals
Save this manual to your list of manuals |
Ativa AT220H manual content summary:
- Ativa AT220H | Product Manual - Page 1
140 mm 216 mm 22"Series Widescreen LCD Monitor User Manual Manual del usuario del monitor LCD de pantalla ancha de serie 22" Manuel de l'utilisateur écran géant LCD série 22" Model AT22OH Modelo AT22OH Modèle no AT22OH Call for technical support 1-877-777-4357 Llame para asistencia técnica 1-877- - Ativa AT220H | Product Manual - Page 2
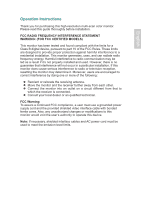
English Operation Instructions Thank you for purchasing this high-resolution multi-scan color monitor. Please read this guide thoroughly before installation. FCC RADIO FREQUENCY INTERFERENCE STATEMENT WARNING: (FOR FCC CERTIFIED MODELS) This monitor has been tested and found compliant with the - Ativa AT220H | Product Manual - Page 3
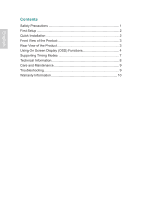
English Contents Safety Precautions 1 First Setup 2 Quick Installation 2 Front View of the Product 3 Rear View of the Product 3 Using On Screen Display (OSD) Functions 4 Supporting Timing Modes 7 Technical Information 8 Care and Maintenance 9 Troubleshooting 9 Warranty Information 10 - Ativa AT220H | Product Manual - Page 4
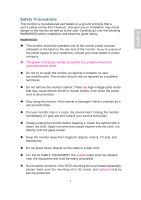
if the cabinet is damaged. Have it checked by a service technician. Put your monitor only in a clean, dry environment. Unplug the monitor immediately if it gets wet and consult your service technician. Always unplug the monitor before cleaning it. Clean the cabinet with a clean, dry cloth - Ativa AT220H | Product Manual - Page 5
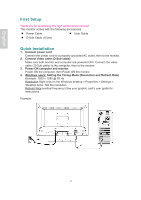
. 4. Windows users: Setting the Timing Mode (Resolution and Refresh Rate) Example: 1920 x 1080 @ 60 Hz Resolution Right-click on the Windows desktop > Properties > Settings > "Desktop Area". Set the resolution. Refresh Rate (vertical frequency) See your graphic card's user guide for instructions - Ativa AT220H | Product Manual - Page 6
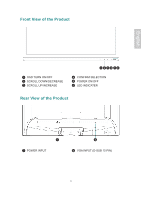
Front View of the Product English 1 OSD TURN ON/OFF 2 SCROLL DOWN/DECREASE 3 SCROLL UP/INCREASE 1 2 34 56 4 CONFIRM SELECTION 5 POWER ON/OFF 6 LED INDICATER Rear View of the Product 7 7 POWER INPUT 8 8 VGA INPUT (D-SUB 15 PIN) 3 - Ativa AT220H | Product Manual - Page 7
+ ▲ 1 +▼ 1 +▲ Display main menu. Exit from OSD menu. Auto adjust the image when not in main menu. Confirm the selection. Select the desired item OSD menu, it is shortcut to display the Contrast/ Brightness/DCR adjustment control screen. Select the desired item when in OSD menu. When not in - Ativa AT220H | Product Manual - Page 8
: See your graphic card user guide for more information about changing the resolution and refresh rate. Manual Image Adjust : To manually adjust the Horizontal Size, H./ V. position, Fine Tune ,Sharpness, Video Mode Adjust and OptiColor Mode. Horizontal Size : To adjust the width of the screen image - Ativa AT220H | Product Manual - Page 9
resolution (Non-16:9) for the full screen. So that images can be displayed. OptiColor Mode : Provides an optimum display environment depending on the contents displayed. It contains 6 user-selectable presets. User is for general windows environment and monitor and Brightness adjustment disabled when - Ativa AT220H | Product Manual - Page 10
English Supporting Timing Modes VGA VGA MAC VESA VESA VESA VESA VESA MAC VESA VESA VESA VESA MAC VESA VESA VESA VESA VESA VESA VESA VESA VESA Warning : Do not set the graphic card in your computer to exceed these maximum refresh rates. Doing so may result in permanent damage to your monitor. 7 - Ativa AT220H | Product Manual - Page 11
English Technical Information Technical Specification LCD Panel 21.5" TFT Power Management Energy Star compliant VESA DPMS compatible < 1 W Displayable Resolution Full HD 1920 x 1080 max. Vertical Frequency 60Hz max. Pixel Dimension 0.248 x 0.248 mm LCD Display Color 16.7M Tilt 0°~20° - Ativa AT220H | Product Manual - Page 12
try to repair your monitor yourself. Always call your service center or a qualified technician to fix it. Troubleshooting No power (Power indicator supplied with the monitor is tightly secured to the video output port on back of the computer. If not, tightly secure it. Adjust brightness. Wrong or - Ativa AT220H | Product Manual - Page 13
or a major credit card, a copy can be obtained from Office Depot's receipt retrieval department at 1-800-721-6592. If SAT be fulfilled in the form of an Office Depot Merchandise card. Claims fulfilled in this manner APPLY TO YOU. THIS WARRANTY GIVES YOU SPECIFIC LEGAL RIGHTS, AND YOU MAY ALSO HAVE - Ativa AT220H | Product Manual - Page 14
Français Instructions d'Utilisation Merci d'acheter ceci qu'un à haute résolution multi-balaye le contrôle de couleur. Veuillez lire attentivement ce guide avant l'installation. COMMUNIQUE D'AVERTISSEMENT DE LA FCC CONCERNANT LES INTERFERENCE DE FREQUENCE RADIO: (SEULEMENT POUR MODELES CERTIFIE PAR - Ativa AT220H | Product Manual - Page 15
Précautions de Sécurit 1 Première Installation 2 Installation Rapide 2 Vue avant du produit 3 Produit vu de dos 3 Utiliser les fonctions d'affichage d'écran (OSD 4 Support des modes minutage 8 Informations Technique 9 Soins et Maintien 10 En Cas de Problème 10 L'information de garantie 11 - Ativa AT220H | Product Manual - Page 16
causer un danger à l'appareil aussi bien que à l'utilisateur. Lisez attentivement les AVERTISSEMENTS suivants avant de commencer l'installation et gardez ce guide à portée de main. AVERTISSEMENTS: Ce moniteur ne doit être utilisé que en connexion avec les sources d'alimentation correctes, indiqu - Ativa AT220H | Product Manual - Page 17
: 1920 x 1080 @ 60 Hz Résolution Faites un clic droit de la souris sur le bureau de Windows > Propriétés >Paramètres > "Espace du bureau". Paramétrer la résolution :Vitesse de rafraîchissement (fréquence verticale) Voir le guide utilisateur de votre carte graphique pour les instructions. Example: 2 - Ativa AT220H | Product Manual - Page 18
Vue avant du produit Français 1 2 34 56 1 ACTIVER/QUITTER OSD 2 DEFILER VERS LE BAS/ DIMINUER DEFILER VERS LE HAUT/ 3 AUGMENTER 4 CONFIRMER LA SÉLECTION 5 SOUS TENSION/ HORS TENSION 6 INDICATEUR DEL Produit vu de dos 7 8 7 ENTREE DU CA 8 ENTREE VGA (D-SUB 15 BROCHES) 3 - Ativa AT220H | Product Manual - Page 19
Français Utiliser les fonctions d'affichage d'écran (OSD) 1 2 ▼ 1+▼ 1+▲ Afficher le menu principal. Quitter le menu OSD. Ajuster automatiquement l'image en dehors du menu OSD. Confirmer la sélection. Sélectionnez l'élément désiré quand vous êtes dans le menu OSD. Quand pas dans le menu d'OSD, - Ativa AT220H | Product Manual - Page 20
ordinateur. Remarque: Reportez-vous au guide de l'utilisateur de votre carte graphique pour avoir des informations supplémentaires concernant les modifications de la résolution et le taux de rafraîchissement. Réglage manuel de I'image (Manual Image Adjust) : Ajustez la Taille horizontale, Position - Ativa AT220H | Product Manual - Page 21
un signal non-Full HD (1920x1080) avec le bouton ▼ ou ▲. Video Mode Adjust : Pour sélectionner le mode vidéo parmi Full Screen, Over screen ou Format sélectionnables par l'utilisateur. Utilisateur est destiné à l'environnement de Windows général et le paramétrage du moniteur par défaut. seux - Ativa AT220H | Product Manual - Page 22
Français Interruption OSD (OSD Time Out) : Pour désactiver automatiquement l'affichage d'écran (OSD) après une durée prédéfinie. Arrière plan OSD (OSD Background) : Vous permet d'activer ou de désactiver l'arrière plan à l'écran. Rappel de mémoire (Memory Recall) : Pour rétablir les paramètres d' - Ativa AT220H | Product Manual - Page 23
Français Support des modes minutage VGA VGA MAC VESA VESA VESA VESA VESA MAC VESA VESA VESA VESA MAC VESA VESA VESA VESA VESA VESA VESA VESA - Ativa AT220H | Product Manual - Page 24
Français Informations Technique Spécifications Techniques Affichage LCD Gestion de l'alimentation électrique Résolution prise en charge Taille des pixels 21.5" TFT Energy Star conforme à VESA compatible avec DPMS < 1 W Full HD 1920 x 1080 max. Fréquence Verticale maximale de 60Hz 0.248 x 0.248 mm - Ativa AT220H | Product Manual - Page 25
Français Soins et Maintien Soins Evitez d"exposer le moniteur directement à la lumière du soleil ou à une autre source de chaleur. Placez votre moniteur détourné du soleil pour éviter des reflets. Placez votre moniteur dans un emplacement bien ventilé. Ne mettez pas d'objet lourd sur le - Ativa AT220H | Product Manual - Page 26
négligence, l'usage abusif, le non-respect des instructions, un nettoyage inapproprié ou autre circonstance non directement vous pouvez obtenir une copie de reçu auprès de Office Depot en composant le 1-800-721-6592. Si Swinton Avenue service, appelez svp 1-877-777-HELP (1-877-777-4357). 11 - Ativa AT220H | Product Manual - Page 27
guía minuciosamente antes de hacer la instalación. ACUERDO DE INTERFERENCIA DE RADIO FRECUENCIA PARA FCC ADVERTENCIA: (PARA MODELOS CERTIFICADOS COMO FCC) Este monitor ha sido probado y encontrado en regla con los límites para la clase B de mecanismos digitales, en conformidad con la parte 15 de - Ativa AT220H | Product Manual - Page 28
Español Contenido Precauciones de Seguridad 1 Instalación Rápida 2 Vista Frontal del Producto 3 Vista Trasera del Producto 3 Usando las funciones "On Screen Display(OSD 4 Tiempos soportados 8 Información Técnica 9 Mantenimiento y Cuidado 10 Solución de Problemas 10 Información de la garant - Ativa AT220H | Product Manual - Page 29
el principio de que la seguridad del usuario es lo primero. Sin embargo, el uso o la instalación impropia puede resultar de peligro para el monitor tanto como para el usuario. Lea cuidadosamente las siguientes ADVERTENCIAS antes de la instalación y conserve a mano esta guía. ADVERTENCIAS: u Este - Ativa AT220H | Product Manual - Page 30
(cable D-Sub) entre la salida D-Sub del equipo y la entrada D-Sub del monitor. 3. Encienda la computadora y después el monitor Encienda la computadora, después,encienda el monitor. 4. Usuarios de Windows: Configurar el Modo Cronometraje (Resolución e Índice de Renovación) Ejemplo: 1920 x 1080 @ 60 - Ativa AT220H | Product Manual - Page 31
Vista Frontal del Producto Español 1 2 34 56 1 ACTIVAR/SALIR OSD 2 DESPLAZAR ABAJO/DISMINUIR 3 DESPLAZAR ARRIBA/AUMENTAR 4 CONFIRMAR/AUTOCONFIGURAR 5 ENCENDER/APAGAR 6 INDICADOR LED Vista Trasera del Producto 7 7 ENTRADA AC 8 8 ENTRADA VGA (15 PIN D-SUB) 3 - Ativa AT220H | Product Manual - Page 32
Español Usando las funciones "On Screen Display(OSD)" 1 2 ▼ 1+▼ 1+▲ Muestra el menú principal. Sale del menú OSD. Auto ajusta la imagen cuando no está en el menú OSD. Confirma la selección. Seleccione el artículo deseado cuando en menú de OSD. Cuando no en menú de OSD, se direcciona para - Ativa AT220H | Product Manual - Page 33
más información acerca del cambio de resolución y velocidad de fotograma. Ajuste manual de la imagen (Manual Image Adjust) : Ajusta la Tamaño horizaontal, posición H./V., Sintonizar, Nitidez, Video Mode adjust y Tono Opticolor. Tamaño horizontal (Horizontal Size) : Ajusta la anchura. ▼ : disminuye - Ativa AT220H | Product Manual - Page 34
de una señal no Full HD (1920x1080) con el botón ▼ o ▲. Video Mode Adjust : Para seleccionar el modo vídeo de "Full Screen", "Over Screen" o "Proporción de . Usuario (User) es para el ambiente Windows en general y la configuración predefinida del monitor. Juego (Game) optimizado para el ambiente - Ativa AT220H | Product Manual - Page 35
Español Visualización de OSD (OSD Background) : Activar o desactivar el fondo de la presentación en pantalla. Restituir memoria (Memory Recall) : Para llamar las configuraciones de fábrica de vuelta para los controles Vídeo. Oprima el botón 2 . para seleccionar la opción de menú Memoria. 7 - Ativa AT220H | Product Manual - Page 36
configure la tarjeta gráfica de su ordenador de forma que exceda estas frecuencias máximas de refresco. Si lo hace podría dañar permanentemente su monitor. 8 - Ativa AT220H | Product Manual - Page 37
Español Información Técnica Especificaciones Técnicas Pantalla LCD Administración de energía Resolución admitida Tamaño de píxeles Colores Inclinación Área activa de la pantalla 21.5" TFT En conformidad con Energy Star Compatible con VESA DPMS compatible < 1 W Full HD máximo 1920 x 1080. - Ativa AT220H | Product Manual - Page 38
golpes eléctricos sobre el cuerpo humano. l Nunca trate de reparar su monitor usted mismo. Llame siempre a su servicio técnico o a un técnico imagen de pantalla l Asegúrese que el cable de video suministrado con el monitor esté bien conectado al puerto de salida de video en la parte de atr - Ativa AT220H | Product Manual - Page 39
de la tienda y realizó el pago mediante cheque o tarjeta de crédito, puede conseguir una copia a través del departamento de recuperación de recibos de Office Depot en el teléfono 1-800-721-6592. En el caso de que Swinton Avenue Trading decida reembolsar dicho producto, este reembolso se realizar
-
 1
1 -
 2
2 -
 3
3 -
 4
4 -
 5
5 -
 6
6 -
 7
7 -
8
-
9
-
10
-
11
-
12
-
13
-
14
-
15
-
16
-
17
-
18
-
19
-
20
-
21
-
22
-
23
-
24
-
25
-
26
-
27
-
28
-
29
-
30
-
31
-
32
-
33
-
34
-
35
-
36
-
37
-
38
-
39
 |
 |
20286_s1_100269_LCD_man_cvr.ai
07.10.09
140mm x 216 mm
Jean Co
Greg Smith
xx
MR
20286_LCD Monitor Jean Co
round 3
OUTPUT AT 100 % OF ACTUAL SIZE
FPO Dieline
FPO Callout
BLACK
Call for technical support
1-877-777-4357
Llame para asistencia técnica
1-877-777-4357
Appelez le soutien technique
1-877-777-4357
Before operating this unit, please read all instructions.
Lea atentamente las instrucciones antes de usar este producto.
Veuillez lire toutes les instructions avant d'utiliser ce produit.
Model
AT22OH
Modelo
AT22OH
Modèle no
AT22OH
22
"
Series Widescreen LCD Monitor User Manual
Manual del usuario del monitor LCD
de pantalla ancha de serie 22"
Manuel de l'utilisateur écran géant
LCD série 22
"
216 mm
140 mm