Audiovox D1810 Owners Manual
Audiovox D1810 - DVD Player - 8 Manual
 |
View all Audiovox D1810 manuals
Add to My Manuals
Save this manual to your list of manuals |
Audiovox D1810 manual content summary:
- Audiovox D1810 | Owners Manual - Page 1
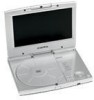
D1810 PORTABLE 8" LCD MONITOR AND DVD PLAYER 128-6925 - Audiovox D1810 | Owners Manual - Page 2
Notice: This Product Incorporates copyright protection technology that is protected by method claims of certain patents and other intellectual property rights owned by Macrovision Corporation and other rights owners. Use of this copyright protection technology must be authorized by Macrovision - Audiovox D1810 | Owners Manual - Page 3
Ratio) Liquid Crystal Dis play (LCD) monitor and a DVD player. The unit applies the latest state of the art electronics and is designed for use in cars, hotels, office, home or anywhere. The unit is constructed to provide years of reliable, trouble-free service, and is compact so that you can take - Audiovox D1810 | Owners Manual - Page 4
. Remove the disc from the unit and store it in its case after playing. Some playback operations of discs may be intentionally fixed DVD Player Combo 2. 1 x AC to DC Adapter 3. 1 x Rechargeable Battery 4. 1 x Remote Control 5. 1 x Instruction Manual 6. 1 x Audio/Video Cable 7. 1 x DC Power Adapter - Audiovox D1810 | Owners Manual - Page 5
9 Down Left Forward Scan Play/Pause Stop Reverse Scan Push Open LCD Cutoff SSwCiAtcNh Battery Pack Figure 1 19 DC IN 9V 20 S Video/Video 21 Audio 22 Headphone 26 23 Volume 24 Power LED Red/LED Green 25 Remote Control Sensor 26 Screen Lock * * NOTE: The Screen must be locked into position before - Audiovox D1810 | Owners Manual - Page 6
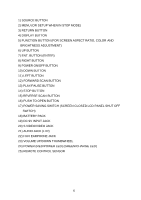
BUTTON 14) STOP BUTTON 15) REVERSE SCAN BUTTON 16) PUSH TO OPEN BUTTON 17) POWER SAVING SWITCH (SCREEN CLOSED LCD PANEL SHUT OFF SWITCH) 18) BATTERY PACK 19) DC 9V INPUT JACK 20) S VIDEO/VIDEO JACK 21) AUDIO JACK (L+R) 22) HI-FI EARPHONE JACK 23) VOLUME UP/DOWN THUMBWHEEL 24) POWER (RED - Audiovox D1810 | Owners Manual - Page 7
2. Remote Control View (Refer to Figure 3) Prog. Figure 3 7 - Audiovox D1810 | Owners Manual - Page 8
Remote Control Function Description Screen: Change the screen aspect ratio. Angle: Switch to a different angle if the DVD contains angle options. Mute: Mute speakers Setup: System setting Display: On screen display of the current disc status Vol. +/-: Volume adjustment 7: Reverse Scan at 2x, - Audiovox D1810 | Owners Manual - Page 9
tray. The unit will load the disc and go to the root menu. Start playback by pressing, "PLAY". 4. Rotate the VOLUME control to adjust the DVD player's volume. 5. To stop playing a disc press STOP. *NOTE: To turn off the unit, you must press and hold the power button for 2 seconds. G. Connecting to - Audiovox D1810 | Owners Manual - Page 10
TV White Red Yellow Black S VIDEO cable AUDIO / VIDEO cable (Not Supplied) Yellow OR Amplifier Player(Right Side) Figure 4.-A Fiber Digital AUDIO cable (Not Supplied) White Red Player(Right Side) Stereo Sound AUDIO cable F Figure 4.-B 10 - Audiovox D1810 | Owners Manual - Page 11
H. SETUP Press 'SETUP' to display the Main menu of the SETUP Menu on the screen. Press 'RETURN' or 'SETUP' to exit the SETUP Menu Figure 5. Main SETUP Menu Screen 1) DISC MENU Select "DISC" using the Left /Right buttons, then press 'ENTER' to enter the DISC MENU screen Figure 6. DISC Menu Screen 11 - Audiovox D1810 | Owners Manual - Page 12
submenu. Select the desired Menu Language using the UP or DOWN buttons, then press 'ENTER' to confirm the setting. *Note: The selected language must be supported by the disc itself. 12 - Audiovox D1810 | Owners Manual - Page 13
and subtitle selection is only available for discs that are recorded in the above listed languages. If the selected language is not available, the player will play and display on the screen the original recorded language contained in the disc. d). Select 'RATING' using the UP or DOWN buttons, then - Audiovox D1810 | Owners Manual - Page 14
Figure 10. Rating Setting Screen 14 - Audiovox D1810 | Owners Manual - Page 15
setting. 2) VIDEO SETTING Select "VIDEO" using the Left/Right buttons, then press 'ENTER' to Enter the VIDEO MENU screen. REMARK: You can set up your Player to work with normal and wide screen televisions. If you are using a wide screen TV, set this option to 16:9 to match the aspect ratio - Audiovox D1810 | Owners Manual - Page 16
Figure 12. TV ASPECT Setting Screen b).TV OUTPUT TYPE Note: Model D1810 is NTSC only. Figure 13. TV OUTPUT TYPE Setting Screen 3) DOLBY DIGITAL SETTING Select "DOLBY DIGITAL" using the Left or Right buttons, then press ENTER - Audiovox D1810 | Owners Manual - Page 17
DOWN buttons, then press 'ENTER' to confirm the setting. Dolby Digital Figure 14. DOLBY DIGITAL Setting Screen 17 - Audiovox D1810 | Owners Manual - Page 18
4) DISPLAY SETTING Select "DISPLAY" by using the left or right buttons, then press ENTER to enter the submenu. Figure 15. Display Setting Screen Display a). Select MENU LANGUAGE Note: The system operation MENU LANGUAGE is set on ENGLISH only. b). Select 'ON SCREEN MESSAGE' using the UP or DOWN - Audiovox D1810 | Owners Manual - Page 19
5) OTHER SETTING Select "OTHER" by using the left or right buttons, then press ENTER to enter the submenu. Last Memory YES Figure 17. OTHER SETTING Screen Display a).Select 'LAST MEMORY' using the UP or DOWN buttons . Press ENTER to enter the submenu. Select NO or YES by using the UP or DOWN buttons - Audiovox D1810 | Owners Manual - Page 20
BASIC OPERATION POWER OPEN PLAY SLOW PAUSE STOP NEXT PREVIOUS FORWARD REVIEW UP/DOWN/LEFT /RIGHT ENTER NUMBERS RETURN MENU REPEAT A-B on the unit is the master volume control. The VOL + and VOL - buttons on the remote allow the volume to be raised and lowered up to the level of the master volume. - Audiovox D1810 | Owners Manual - Page 21
on the front panel when in the stop mode will display the Setup menu. Some DVDs only allow you to select disc playback options using the DVD menu. NOTE: Pressing menu on the main unit while in the stop mode will , press the Up or Down button to change the play angle (if supported on disc). 21 - Audiovox D1810 | Owners Manual - Page 22
battery, the Battery Icon is displayed with color; when using AC, the Battery Icon is displayed in gray. sCharger status: When the battery is connected and charging, the arrow will point up. When the battery is connected and the AC adapter *Some DVDs only allow access to this function through the - Audiovox D1810 | Owners Manual - Page 23
7. A-B REPEAT a).During playback press 'A-B' to set the Starting Point A. OFF Figure 23. A-B Repeat Screen Display b).Press 'A-B' a second time to set theending point B and the player will repeatedly play the part between point A and point B. Figure 24. A-B Repeat Ending Point Screen Display 23 - Audiovox D1810 | Owners Manual - Page 24
c).Press A-B a third time to cancel A-B repeat and resume playback from point A. Figure 25. A-B Repeat Cancel Screen Display 8. REPEAT a. During playback press 'REPEAT' once to display the current repeat status. Figure 26. Repeat Status Screen Display b. Press 'REPEAT' a second time to repeatedly - Audiovox D1810 | Owners Manual - Page 25
Press 'REPEAT' a 5th time to resume normal playback. 9. Screen display mode You can choose 3 types of Display modes for the built-in screen. Your Player features three Display Modes - Full, Wide and Normal. Full Mode The default Mode is FULL. Use this mode when viewing movies that have been recorded - Audiovox D1810 | Owners Manual - Page 26
solve this problem, use the NORMAL mode to convert the player's wide screen display to that of a Standard TV. 10. Forward/Review and Slow 2X à 1/4X à 1/8X normal speed. DVD 2X 8 Figure 30. Forward 2X Screen Display Note: During CD playback press Forward, player will play 2 seconds then jump to next - Audiovox D1810 | Owners Manual - Page 27
. Figure 32. CD program list Screen Display 12. Rechargeable Battery Installation and Use The player utilizes a set of long-life Li-ION batteries for portable power supply. The Li-ION battery pack is specially designed for your player, Li-ION batteries feature high storage capacity and low level of - Audiovox D1810 | Owners Manual - Page 28
the player to recharge your batteries. Do not use the car adapter to charge the batteries. 2. Recharge effectiveness will degrade when environmental temperatures drop below 50oF (10oC) or exceed 95oF (35oC). 3. Avoid unnecessarily recharging fully charged batteries. Installing the Battery Pack: (See - Audiovox D1810 | Owners Manual - Page 29
Figure 33. Installing the DVD Player Battery 29 - Audiovox D1810 | Owners Manual - Page 30
the Battery Pack: (See Fig 34.) 1. First, make sure the player is in the "Stop" mode and that the AC power supply has been disconnected. 2. Press the release tabs on the sides of the battery. 3. Pull the battery pack to disconnect it from the unit. Figure 34. Removing the DVD Player Battery 30 - Audiovox D1810 | Owners Manual - Page 31
96 kHz/24 bits ): 20Hz-44KHz DVD (PCM 48 kHz/16 bits): 20Hz-22KHz CD: 20Hz-20KHz Video output: 1.0Vp-p(at 75ohm) Video S/N: > 35dB Audio output: 2 X 0.5W Audio S/N: > 35dB Power source: DC 9V (Battery) / DC 12V (Car use) / AC 120V 60Hz (Adapter) Power consumption: - Audiovox D1810 | Owners Manual - Page 32
32
-
 1
1 -
 2
2 -
 3
3 -
 4
4 -
 5
5 -
 6
6 -
 7
7 -
8
-
9
-
10
-
11
-
12
-
13
-
14
-
15
-
16
-
17
-
18
-
19
-
20
-
21
-
22
-
23
-
24
-
25
-
26
-
27
-
28
-
29
-
30
-
31
-
32
 |
 |

D1810
PORTABLE 8" LCD MONITOR AND DVD PLAYER
128-6925