Audiovox DPF710K User Guide
Audiovox DPF710K - Digital Photo Frame Manual
 |
UPC - 044476050848
View all Audiovox DPF710K manuals
Add to My Manuals
Save this manual to your list of manuals |
Audiovox DPF710K manual content summary:
- Audiovox DPF710K | User Guide - Page 1
DPF710K - Audiovox DPF710K | User Guide - Page 2
Contents Important Safety Instructions 3 Introduction 4 Product Features 5 What's in the Box 6 Installation 7 homebase Refrigerator Installation 7 homebase Countertop Installation 8 homebase Wall Mount Installation Using the Wall Mount Bracket 9 homebase Wall Mount Installation - Audiovox DPF710K | User Guide - Page 3
a marked change in performance or does not operate normally. 12. Servicing: The user should not attempt to service the unit beyond those methods described in the User's Manual. Service methods not covered in the operating instructions should be referred to qualified service personnel. DPF710K 3 - Audiovox DPF710K | User Guide - Page 4
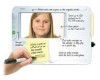
Introduction Your homebase allows you to: Display your digital photos from its internal memory, a memory card, or USB memory devices Record and retrieve audio messages Use the calendar to set audio and/or event reminders Display time and date Use a timer, set an alarm Leave a written message on the - Audiovox DPF710K | User Guide - Page 5
and reminders • 3-key navigation for simple operation • Multiple mounting options: refrigerator, wall and countertop. • Supports SD/MMC, MS, xD, and CF memory cards and USB flash drives • Interactive Calendar and Digital Clock • Digital clock with alarm • Countdown timer DPF710K 5 - Audiovox DPF710K | User Guide - Page 6
What's in the Box? homebase Wall Mount Bracket (1) Angle Mount Bracket (2) AC to DC Power Adapter (1) Post-It ® Note Pad (1) Dry Erase Marker System (3) (Black, White, Clear) Plastic Wall Anchor (2) Flat-Head Self-Tapping Screw (2) Double-Sided Tape (1) 6 Mounting Hole Template (1) DPF710K - Audiovox DPF710K | User Guide - Page 7
the two adhesive pads and position them on the back of the wall mount bracket as shown. 2. Clean the homebase mounting area on the refrigerator with isopropyl alcohol; do not use a glass cleaner. 3. Place the wall mount of the power adapter wire as the refrigerator door opens and closes. DPF710K 7 - Audiovox DPF710K | User Guide - Page 8
each angle mount bracket towards the top of the homebase until the upper mounting tab engages the mounting hole slot; when the bottom of the angle bracket contacts the homebase, the tab on the bottom of the angle bracket snaps into place. 7. Place the homebase in the desired location. 8 DPF710K - Audiovox DPF710K | User Guide - Page 9
the wall bracket mounting tabs, and slide the homebase down until the mounting tabs engage the mounting hole slots. 8. Cover the power adapter wire with the clear, black or white wire cover; seal the cover using the double-sided tape and dress the wire, adhering it to the wall surface. DPF710K 9 - Audiovox DPF710K | User Guide - Page 10
the rear of the homebase. 5. Choose the homebase down until each mounting tab engages the mounting hole slot. 8. Cover the power adapter wire with the clear, black or white wire cover; seal the cover using the double-sided tape and dress the wire, adhering it to the wall surface. 10 DPF710K - Audiovox DPF710K | User Guide - Page 11
slide the left side under the lip by the control buttons. 8. The battery backup feature should now be operational. Control Buttons Protruding Lip (Left Side) Protruding Lip (Right Side) Battery Compartment homebase Front Panel DPF710K Battery Compartment Cover Button-Type Battery (CR2032) 11 - Audiovox DPF710K | User Guide - Page 12
( ) Navigation Button 8. MEMO Button 9. LCD Display 10. LED Indicator 11. Memo Writing Surface 12. Microphone 13. Speakers 14. - Volume + Control 15. DC Input Connector 12 DPF710K - Audiovox DPF710K | User Guide - Page 13
Accessory Placement Note Pad Storage Receptacle Post-It® Note Pad homebase DPF710K Marker Storage Receptacle Dry Erase Marker 13 - Audiovox DPF710K | User Guide - Page 14
battery operation. Connecting the Power. Power to the homebase Notch Wall Outlet homebase (Rear View) homebase and can consist of a USB Flash Memory, Compact Flash (CF) Memory Card, Multi-Media Card (MMC), Memory Stick (MS) Card, Secure Digital Memory homebase (Rear View) Secure Digital (SD), Memory Stick - Audiovox DPF710K | User Guide - Page 15
homebase position. In a few seconds, the homebase logo appears on the LCD screen, followed about device is connected; otherwise, the homebase demonstration (demo) slide show will start connected when power is applied, the Homebase logo remains on the screen until audiovox Slide show begins audiovox - Audiovox DPF710K | User Guide - Page 16
memo calendar timer photo settings Or press Record is active------ record review keep / exit record function, e.g., review, keep / exit, record again, cancel review keep / exit 1/2 memo 5 (00/00/00) saving memo ----- review keep / exit record again cancel Highlight the desired memo - Audiovox DPF710K | User Guide - Page 17
and holding up/down buttons ( / ) for 2 seconds advances to the next month. timer photo setting December 2008 Sun 1 Mon 2 Tue 3 Wed 4 Thu 5 Fri 6 Sat 7 8 on the calendar screen by the appropriate icon. DPF710K recording... ok button stop record review keep / exit record again Press OK to - Audiovox DPF710K | User Guide - Page 18
Calendar Memos (Cont) 2. Reviewing Calendar Memos Highlight calendar in the main menu using the up/down buttons ( / ) exit meemmoo calendar timer photo setting -----and press OK----- Note: Use the up/down buttons ( / ) Anniversary Reminder Icon Birthday Reminder Icon Holiday Reminder Icon DPF710K - Audiovox DPF710K | User Guide - Page 19
) exit memo calendar timer photo setting ----and press OK display appears, the hours (h) digits are flashing and 10 minutes is indicated. OK. d. The minutes digit decreases by 1 and the seconds (s) digits begin to count down up! appears above the digits, the display automatically returns to the - Audiovox DPF710K | User Guide - Page 20
meemmoo calendar timer photo settings Highlight photo library using the up/down buttons ( / ) and press OK to access photos stored in the library file. If none exists, this feature is not supported. (See Photo Library Menu) Select slide show order slide show time 5 secs 10 secs 30 secs DPF710K - Audiovox DPF710K | User Guide - Page 21
Photo Library Menu Slide show thumbnail display appears when input device connected Use the up/down buttons ( / ) to highlight and select desired picture - Advances to the next slide in order after pressing the OK button. 4. Rotate - Rotates the selected image in 90 degree increments. DPF710K 21 - Audiovox DPF710K | User Guide - Page 22
picture is copied into internal memory Press OK yes/no options appear. If yes is selected, all slide pictures are copied into internal memory 22 DPF710K - Audiovox DPF710K | User Guide - Page 23
the up/down buttons ( / ) exit general setup time / date setup alarm clock display and press OK 1. Photo Mode - Select between normal mode and wide screen. 2. Activation Time - Set a time for the unit's display all images and memos in memory. 4. Default - Restore all factory settings. DPF710K 23 - Audiovox DPF710K | User Guide - Page 24
) and press OK. b. The time / date display appears with the hour digit(s) flashing. c. Use the up/down buttons ( / ) to set the hour and press OK. d. The minutes digits are now flashing; use the up/down buttons ( / ) to set the minutes highlighted. Wednesday - Dec. 17th, 2008 am 10:00 24 DPF710K - Audiovox DPF710K | User Guide - Page 25
) and press OK a. The time / date display appears with the hour digit(s) flashing. b. Use the up/down buttons ( / ) to set the hour and press OK. c. The minutes digits are now flashing; use the up/down buttons ( / ) to set the on the screen in each of the clock presentations described. DPF710K 25 - Audiovox DPF710K | User Guide - Page 26
am Wednesday - Dec. 17th, 2008 am 10:00 Clock icon displayed in center of screen 26 Clock icon displayed at left in split screen configuration DPF710K - Audiovox DPF710K | User Guide - Page 27
Internal microphone for digital audio recording Internal speakers (2) with separate volume control 3 keys Green LED The memo for: LED will light when there is an unheard voice memo or an activated calendar voice memo Internal backup battery data Info .....etc. Battery type CR2032 JPEG DPF710K 27 - Audiovox DPF710K | User Guide - Page 28
WARRANTY Applies to Audiovox Video Products AUDIOVOX ELECTRONICS CORP. ( antenna problems, to costs incurred for installation, removal or reinstallation of the product, or to damage to digital memory/ from state to state. Audiovox Electronics Corporation, 150 Marcus Blvd., Hauppauge, New York 11788 • - Audiovox DPF710K | User Guide - Page 29
Notes DPF710K 29 - Audiovox DPF710K | User Guide - Page 30
Notes 30 DPF710K - Audiovox DPF710K | User Guide - Page 31
Notes DPF710K 31 - Audiovox DPF710K | User Guide - Page 32
DPF710K Audiovox Electronics Corp. 150 Marcus Boulevard Hauppauge, NY 11788 128-8269B
-
 1
1 -
 2
2 -
 3
3 -
 4
4 -
 5
5 -
 6
6 -
 7
7 -
8
-
9
-
10
-
11
-
12
-
13
-
14
-
15
-
16
-
17
-
18
-
19
-
20
-
21
-
22
-
23
-
24
-
25
-
26
-
27
-
28
-
29
-
30
-
31
-
32
 |
 |

DPF710K