Audiovox FPE1705 User Manual
Audiovox FPE1705 Manual
 |
View all Audiovox FPE1705 manuals
Add to My Manuals
Save this manual to your list of manuals |
Audiovox FPE1705 manual content summary:
- Audiovox FPE1705 | User Manual - Page 1
FPE1705 LCD TV Operating Manual Before connecting, operating or adjusting this product, please read the manual completely. FOR ASSISTANCE CALL 1-800-619-3848 OR VISIT US AT WWW.AUDIOVOX.COM 1287353 - Audiovox FPE1705 | User Manual - Page 2
recommend that you read this manual thoroughly before use to fully enjoy the many functions and excellent features of this unit. Keep this manual in an easily accessible location in VGA/YbPr mode 33 18 TV troubleshooting 35 Main on-screen-display (OSD) introduction 19 Specifications 36 2 - Audiovox FPE1705 | User Manual - Page 3
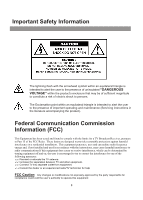
Exclamation point within an equilateral triangle is intended to alert the user to the presence of important operating and maintenance (Servicing instructions in the literature accompanying the product). Federal Communication Commission Information (FCC) This Equipment has been tested and found to - Audiovox FPE1705 | User Manual - Page 4
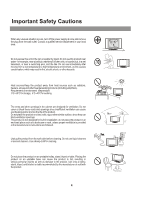
at once and remove the plug from the wall outlet. Contact a qualified service department in your local area. Do not expose this unit in the rain or rack, unless proper ventilation is provided or the manufacturer's instructions are followed. Unplug this product from the wall outlet before cleaning - Audiovox FPE1705 | User Manual - Page 5
Important Safety Cautions Important Information Regarding use of Video Games, Computer, captions or other fixed images displays The extended use of a fixed image program material can cause permanent "Shadow Image" on the LCD panel. The background image is viewable on normal programs in the form of - Audiovox FPE1705 | User Manual - Page 6
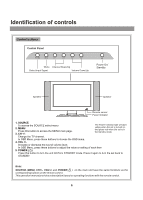
. Note: SOURCE, MENU, CH+/-, VOL+/- and POWER( ) on the main unit have the same functions as the corresponding buttons on the remote control. This operation manual provides a description based on operating functions with the remote control. 6 - Audiovox FPE1705 | User Manual - Page 7
your PC. 2. HDTV input (Y, Pb, Pr, Audio L, R) Connect to the Y/Pb/Pr (or Y/Cb/Cr) and audio output jacks of a Set-Top Box or DVD player. 3. Headphone 3.5mm jack 4. AV outputs (Video, Audio L, R) Connect to the VCR input jacks to record programs. 5. AV inputs (Video, Audio L, R) Receive video/audio - Audiovox FPE1705 | User Manual - Page 8
Remote Control Power on/standby Volume up/down selector; In the menu operation, adjust the selected item Access the menu Select OSD menu position Change audio to mono, stereo or SAP Auto correct picture Select picture mode between Bright, Nature, Soft & User Select the input signal source Adjust - Audiovox FPE1705 | User Manual - Page 9
Preparing the Remote Control Please install the batteries before using the remote control. Batteries for the Remote Control If the remote control fails to operate the LCD TV functions, replace the batteries in the remote control. 1 Open the battery cover. 2 Insert two size-AAA batteries. 3 - Audiovox FPE1705 | User Manual - Page 10
eyestrain. Soft and indirect lighting is recommended for comfortable viewing. Antenna connections OUTDOOR VHF/UHF ANTENNA CONNECTION (ANTENNA NOT INCLUDED) Follow the instructions for the type of antenna system you intend to use. If using Cable or satellite, see the next page. Combination VHF/UHF - Audiovox FPE1705 | User Manual - Page 11
for normal viewing requires the use of a descrambler device which is generally provided by the cable company. FOR SUBSCRIBERS TO BASIC CABLE TV SERVICE For basic cable service not requiring a converter/descrambler box, connect the CATV 75 ohm coaxial cable to the VHF/UHF jack on the rear of the TV - Audiovox FPE1705 | User Manual - Page 12
Installation(continued) Power connection Household power outlet Plug into AC outlet. AC cord bottom view 1. Connecting the female plug to the AC socket on the unit. 2. Connecting the male plug to the wall outlet as illustrated. Note: - Audiovox FPE1705 | User Manual - Page 13
Installation(continued) Elevation adjustment You can adjust the angle of the LCD TV as follows. The elevation can be adjusted from -5o to +10o average. 10 -5 13 - Audiovox FPE1705 | User Manual - Page 14
making any connections. 2. Loose connectors will result in image or color problems. Make sure that all connectors are securely inserted into their terminals. the unit to a DVD or VCR to enjoy playback with high quality picture and sound. Please refer to the instruction manual of the equipment to - Audiovox FPE1705 | User Manual - Page 15
Installation(continued) The PC input signal connection Connect the VGA(D-sub) input interface on the TV to the output of PC equipment through Min D-sub 15 pin cable as illustrated.For the audio connection,use an audio cord that matches the audio output terminal on the computer. If you select PC - Audiovox FPE1705 | User Manual - Page 16
Installation(continued) AV OUT connection VGA PC-AUDIO Y Pb Pr R AUDIO L PHONE VIDEO L AUDIO R VIDEO L AUDIO R S-VIDEO RF HDT V IN AV OUT AV IN Y Yellow (video) w White (audio, L) R Red (audio, R) Y To video output WR To audio outputs VCR for recording To video input Y To audio - Audiovox FPE1705 | User Manual - Page 17
Audio cable G B RR W HDTV OUT ANT Y Pb Pr AV OUT R AUDIO L AUDIO R AUDIO L VIDEO S-VIDEO Rear of the STB, DVD Set-Top Box, DVD player, etc. (Not Supplied) Notes: The Y, Pb, Pr outputs on your DVD player are sometimes labeled Y, Cb, Cr. If so, connect the cables to like colors. 17 - Audiovox FPE1705 | User Manual - Page 18
. Press VOL+/- or wait for about 4 seconds and the desired signal SOURCE TV AV SVIDEO YPbPr/YCbCr VGA TV Note: All buttons shown in the manual are located on the remote control unless otherwise indicated. 18 - Audiovox FPE1705 | User Manual - Page 19
Main On-Screen-Display (OSD) introduction 1 Press MENU button to display menu screen. 2 Press VOL+/- to select the menu. 3 Press CH6 to access the menu. 4 Press CH5/6 to select the item. 5 Press VOL+/- to adjust the item. 6. Press EXIT button twice to exit the menu. TV/AV/S-VIDEO MODE Picture - Audiovox FPE1705 | User Manual - Page 20
Operations Picture adjustment 1 Access Picture Setting menu by pressing MENU. 2 Press CH5/6to select the item brightness 50 that you want to adjust. contrast 50 color 19 sharpness 32 tint 0 3 Press VOL+/- to adjust selected item. Item Function Range S.M brightness To adjust - Audiovox FPE1705 | User Manual - Page 21
Operations (continued) System setting 耋晤憮 S.M blue screen setting 1 Access the System Setting menu. 2 Press CH5/6to select blue screen item. blue screen on backlight 6 zoom mode fill all ccd mode settings CC 1 V-chip settings - - - - 3 Press VOL+/- to select off or on. If you select on, - Audiovox FPE1705 | User Manual - Page 22
ccd mode settings CC 1 V-chip settings - - - - 3 Press VOL+/- to select . You can select the caption data channel (CC1, CC2, CC3, CC4), the text service channel(text1, text2, text3, text4) or turn off the Closed Caption(Off). S.M Note: 1. Some TV programs may not be broadcast with closed caption - Audiovox FPE1705 | User Manual - Page 23
Operations (continued) System setting (V-Chip Sub-menu) Movie Blocking setting This function allows programs to be restricted and TV usage to be controlled based on program rating. It prevents children from watching violent or sexual scenes that may be harmful. Please enter the V-chip sub-menu ( - Audiovox FPE1705 | User Manual - Page 24
V-Chip enables parents to prevent their children from watching inappropriate material on TV. V-Chip reads the ratings for programming (except for news, sports, unedited movies on premium cable,and Emergency System signals ), then denies access to programming if the program's rating meets the - Audiovox FPE1705 | User Manual - Page 25
Operations (continued) System setting (V-Chip Sub-menu) Canadian French blocking setting Please enter the V-chip sub-menu first . 1 Press CH5/6button to select Canadian French blocking item. 2 Press VOL+/- button to select desired rating Vchip global setting enable movie blocking G TV blocking - Audiovox FPE1705 | User Manual - Page 26
Operations (continued) Audio Setting Selecting the MTS 1 Access the Audio Setting menu. 2 Press CH5/6 to select MTS item. 3 Press VOL+/- to select mono, stereo or SAP(secondary audio program). SRS MTS bass treble balance on off mono stereo SAP 0 0 0 You can also directly press STEREO - Audiovox FPE1705 | User Manual - Page 27
Operations (continued) Audio Setting Adjusting the bass/treble 1 Access the Audio Setting menu. 2 Press CH5/6to select bass or treble item. 3 Press VOL+/- to adjust the bass or treble. SRS MTS bass treble balance on off mono stereo SAP 0 0 0 S.M You can press the Bass+/- buttons on the - Audiovox FPE1705 | User Manual - Page 28
Operations (continued) Channel Setting Selecting antenna/cable 1 Access Channel Setting menu. 2 Press CH5/6to select antenna/cable item. 3 Press VOL+/- button to select antenna or cable. channel number 9 antenna/cable antenna cable add/erase add erase fine tune 48 channel search S.M - Audiovox FPE1705 | User Manual - Page 29
Operations (continued) Channel Setting Adding/Erasing Channels After the Channel SEARCH, you can Add/Erase channels that you watch when you press the CH5/6 to change channels. 1 Select the channel number which you want to erase using the keypad. 2 Access the Channel Setting S.M menu. channel - Audiovox FPE1705 | User Manual - Page 30
Operations (continued) Selecting channel Using Keypad buttons 1 To select one-digit channel numbers: Input the channel using the 0-9 number button, then press Channel Enter button to confirm. 2 To select two-digit channel numbers: Input the channel using the 0-9 number button, then press Channel - Audiovox FPE1705 | User Manual - Page 31
Operations (continued) OSD Setting Setting the language of the menu 1 Access the OSD Setting menu. 2 Press CH5/6 to select the language item. 3 Press VOL+/- to select an OSD language. English, Spanish and French can be selected. language English OSD position OSD background opaque translucent - Audiovox FPE1705 | User Manual - Page 32
Operations (continued) Timer setting 耋晤憮 S.M Using Sleep button Press SLP button to display sleep timer menu. Press CH5/6 or VOL+/- repeatedly to set sleep time between:0, 10, 20, 30, 60, 90, 120, 180, 240 minutes. If you select 0 minute, the sleep timer function is turned off. Press the SLP - Audiovox FPE1705 | User Manual - Page 33
Operations in VGA /YPbPr mode Select VGA/YPbPr mode 1 Press the SOURCE button on the unit or button on the remote control. The screen displays the menu shown as right. SOURCE TV AV SVIDEO 2 Press CH5/6 to highlight the VGA or YPbPr/YCbCr VGA YPbPr/YCbCr item. Press VOL+/- or VGA wait about 4 - Audiovox FPE1705 | User Manual - Page 34
Operations in VGA /YPbPr mode(continued) Picture Settings Adjusting Brightness/Contrast 1 Access the PICTURE menu. 2 Press CH5/6to select brightness or contrast item. 3 Press VOL+/- to adjust the selected item. brightness 50 contrast 50 color temp 5000K 7300K 9300K user customer temp setting - Audiovox FPE1705 | User Manual - Page 35
Troubleshooting Before calling for repair service is properly connected to the unit. ! Possible broadcast station trouble. Try another channel. ! Adjust the contrast and brightness your PC. ! Adjust Sound Balance. Note: If your problem is not solved, restart your TV by turning it off and then - Audiovox FPE1705 | User Manual - Page 36
) 17" TV system & channel coverage: SYSTEM VHF UHF NTSC-M 2-13 14-69 CATV 1-125 Color system: Speaker : NTSC 3W, 8W x 2 Accessories: Operating manual x1,Power cord x 1, AV cable x 1,Audio cable x 1, Remote control x 1, AAA batteries x 2, VGA Cable (15 pin D-Sub) x 1 Note: Design and - Audiovox FPE1705 | User Manual - Page 37
604-L20H33-02 PRINTED IN RECYCLED PAPER 604-L17H23-00
-
 1
1 -
 2
2 -
 3
3 -
 4
4 -
 5
5 -
 6
6 -
 7
7 -
8
-
9
-
10
-
11
-
12
-
13
-
14
-
15
-
16
-
17
-
18
-
19
-
20
-
21
-
22
-
23
-
24
-
25
-
26
-
27
-
28
-
29
-
30
-
31
-
32
-
33
-
34
-
35
-
36
-
37
 |
 |