Audiovox PCD163 Owners Manual
Audiovox PCD163 - AM/FM/CD RECEIVER 60 W Manual
 |
UPC - 043258304094
View all Audiovox PCD163 manuals
Add to My Manuals
Save this manual to your list of manuals |
Audiovox PCD163 manual content summary:
- Audiovox PCD163 | Owners Manual - Page 1
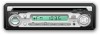
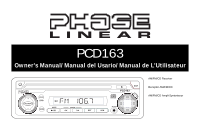
PCD163 Owner's Manual/Manual del Usario/Manual de L'Utilisateur SEL/MENU BAND LOUD MODE MUTE TRACK PCD163 DISP TUN RPT SCN AUX IN ING AM/FM/CD Receiver Receptor AM/FM/CD AM/FM/CD Ampli-Syntoniseur - Audiovox PCD163 | Owners Manual - Page 2
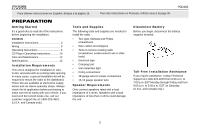
PCD163 PREPARATION Getting Started It's a good idea to read all of the instructions before beginning the installation. Contents Installation Instructions 3 Wiring 5 Operating Instructions 6 CD Player Operating Instructions 10 Care and Maintenance 12 Specifications car stereo support remove - Audiovox PCD163 | Owners Manual - Page 3
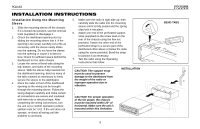
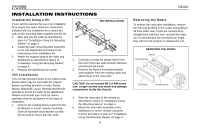
PCD163 INSTALLATION INSTRUCTIONS Installation Using the Mounting Sleeve 1. Slide the mounting sleeve off the chassis. If it is locked into position, use the removal tools (supplied) to disengage it. 2. Check the dashboard opening size by sliding the mounting sleeve into it. If the opening is too - Audiovox PCD163 | Owners Manual - Page 4
according to the instructions of the installation kit. 3. Attach the support strap to the radio your local car stereo specialty shop for assistance on this type of installation. 1. Remove the on page 3. 4 PCD163 Removing the Radio To remove the radio after installation, remove the trim ring by - Audiovox PCD163 | Owners Manual - Page 5
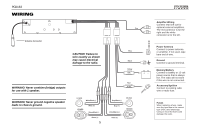
PCD163 WIRING Gray Antenna Connector CAUTION: Failure to wire exactly as shown may cause electrical damage to the radio. Blue Black Yellow 15A + WARNING! Never combine ( - Audiovox PCD163 | Owners Manual - Page 6
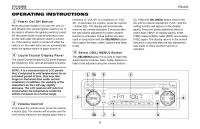
PCD163 OPERATING INSTRUCTIONS 1 Power On/Off Button Press the power button (1) to balance and fader levels. 4 Select (SEL/MENU) Button This SEL/MENU button (4) is used to select the audio function (volume, bass, treble, balance or fade) to be adjusted using the volume buttons (3). Press the SEL/ - Audiovox PCD163 | Owners Manual - Page 7
PCD163 OPERATING INSTRUCTIONS 4 Bass Control To adjust the bass level, press the SEL/MENU button (4) until "BAS" appears on the display panel. Within five seconds, press the volume +/ - - Audiovox PCD163 | Owners Manual - Page 8
PCD163 OPERATING INSTRUCTIONS 6 Manual Tuning Control Turn the manual TUNING control (6) clockwise to tune the display and you are receiving a clear signal. If the radio is tuned offfrequency, you could experience distorted audio, noise and other reception problems. 9 Audio Mute Press the MUTE ( - Audiovox PCD163 | Owners Manual - Page 9
PCD163 OPERATING INSTRUCTIONS 10 Display Selector (DISP) This unit can display either the clock time or radio frequency/CD player functions. Depending on your System Menu settings (see "System Menu" on page 7), the radio frequency, CD player track indication or clock may be displayed. Press the DISP - Audiovox PCD163 | Owners Manual - Page 10
PCD163 CD PLAYER OPERATING INSTRUCTIONS 11 Disc Slot With the label surface facing up, fully insert shown on the display panel. 12 , 13 Cue/Review Functions High-speed audible search to any section of the disc can be made by the Cue and Review functions. Press and hold the forward TRACK button (12 - Audiovox PCD163 | Owners Manual - Page 11
PCD163 CD PLAYER OPERATING INSTRUCTIONS 14 Repeat Play Selector (RPT) During disc play, press the RPT may be ejected with the vehicle ignition switch on or off. If an ejected disc is not removed from the disc slot within 10 seconds of being ejected, the disc will be reinserted automatically, - Audiovox PCD163 | Owners Manual - Page 12
. • When not using the disc player, always remove the compact disc. Do not leave an ejected disc sitting in the disc slot as this can expose it to sunlight and other causes of damage. • Do not attempt to open the unit chassis. There are no user-serviceable parts or adjustment points inside. • When - Audiovox PCD163 | Owners Manual - Page 13
Digital Audio) format "recorded/burned" onto a CD-R/RW. This unit does not support .MP3, .WMA, .WAV, .OGG or other formats. The CDDA format is the standard format of an "original store-bought" CD. When recording/burning a CD-R/RW make sure the CDDA format is selected. Technical Specifications CEA - Audiovox PCD163 | Owners Manual - Page 14
PCD163 14 - Audiovox PCD163 | Owners Manual - Page 15
PCD163 Manual del Usario - Audiovox PCD163 | Owners Manual - Page 16
instructions in English, refer to page 2. PREPARACIÓN Comenzando Es buena idea leer completamente las instrucciones antes de iniciar la instalación. Contenido Instrucciones De Instalación 17 Cableado 19 Instrucciones de Operación 20 Funcionamiento Del Lector de CD PCD163 para remover - Audiovox PCD163 | Owners Manual - Page 17
PCD163 INSTRUCCIONES DE INSTALACIÓN Instalación Utilizando una Manga de Montaje 1. o una inadecuada operación causada por vibraciones. INSTALACIÓN CUIDADO: Para una correcta operación del equipo de CD, el chasis debe estar montado dentro de los 20° de horizontalidad. Asegúrese de que la unidad - Audiovox PCD163 | Owners Manual - Page 18
tornillo de M5 x 9MM. Tornillos más largos pueden tocar y dañar componentes dentro del chasis. PCD163 4. Conecte los cables del nuevo radio al vehículo como se especifica en las instrucciones de Instalaci para liberar la unidad. CÓMO DESMONTAR EL RADIO Sleeve Removal Key Trim Ring Removal Key 18 - Audiovox PCD163 | Owners Manual - Page 19
PCD163 CABLEADO Conector para la Antena ¡CUIDADO! Nunca combine (hacer puente) las salidas para utilizar sólo 1 altavoz. ¡CUIDADO! Nunca tome a tierra las puntas negativas del altavoz - Audiovox PCD163 | Owners Manual - Page 20
botón de SEL/MENU (4) se utiliza para seleccionar la función de audio (volumen, sonidos graves, agudos, balance delanterotrasero e izquierdo-derecho) que de volumen o cuando se active otra función. 1 3a 5 2 DISP PCD163 TUN ING BAND 4 LOUD SEL/MENU 6 MODE MUTE TRACK RPT SCN AUX IN 3b - Audiovox PCD163 | Owners Manual - Page 21
PCD163 INSTRUCCIONES DE OPERACIÓN 4 Control de Graves Para ajustar el nivel de graves, presione el botón SEL/MENU (4) hasta que "BAS" aparezca en la pantalla del - Audiovox PCD163 | Owners Manual - Page 22
PCD163 INSTRUCCIONES DE OPERACIÓN 6 Control de Sintonía Manual Gire el control de sintonía manual (TUNING, 6) se active la función de audio mudo. 7 Botón de Modo (MODE) El botón MODE (7) le permite seleccionar entre reproducción de radio o disco. Cuando un CD se esté reproduciendo, al presionar - Audiovox PCD163 | Owners Manual - Page 23
PCD163 INSTRUCCIONES DE OPERACIÓN 10 Selector de Visualización (DISP) Esta unidad puede exhibir ya sea el reloj o la frecuencia del radio y las funciones de reproducción de CD. De acuerdo a las configuraciones del Menú de Sistemas (lea "Menú de Sistema" en la página 21), se pueden mostrar las - Audiovox PCD163 | Owners Manual - Page 24
PCD163 FUNCIONAMIENTO DEL LECTOR DE CD 11 Ranura para Disco Con el sello hacia arriba, inserte completamente un CD dentro de la ranura ( ada para pasar discos compactos estándar de 5" solamente (12 cm.). No intente utilizar CD simples de 3" (8 cm.) en esta unidad, con o sin adaptador, pues puede - Audiovox PCD163 | Owners Manual - Page 25
PCD163 FUNCIONAMIENTO DEL LECTOR DE CD 14 Selector de Reproducción con Repetición (RPT) Durante la reproducción de un disco, presione el botón RPT (14) para repetir la ejecución de una pista - Audiovox PCD163 | Owners Manual - Page 26
CD no requiere mantenimiento. Sin embargo, el entender cómo se lo utiliza y mantiene adecuadamente le ayudará a sacar el máximo provecho de sus capacidades. Recomendamos que conserve este manual lineamientos para cuidar de sus discos compactos: 26 PCD163 • Con cuidado limpie con un paño suave - Audiovox PCD163 | Owners Manual - Page 27
PCD163 ESPECIFICACIONES Dependiendo del tipo de medio y método de grabación, algunos CD-R/RW pueden ser incompatibles con esta unidad. Luego de grabar el CD Además, esta unidad solamente reconocerá el formato CDDA (Audio Digital de Disco Compacto) grabado en un CD-R/RW. Esta unidad no lee .MP3, .WMA, - Audiovox PCD163 | Owners Manual - Page 28
PCD163 28 - Audiovox PCD163 | Owners Manual - Page 29
PCD163 Manual de L'Utilisateur - Audiovox PCD163 | Owners Manual - Page 30
página 16. PCD163 PRÉPARATION Mise en Marche C'est une bonne idée de lire toutes les instructions avant de commencer l'installation. Table des Matières Instructions d'Installation 31 Câblage 33 Instructions d'Operation 34 Opération de la Platine CD 38 Soin et Entretien 40 Specifications 41 - Audiovox PCD163 | Owners Manual - Page 31
PCD163 INSTRUCTIONS D'INSTALLATION Installation en Utilisant un Manchon de Montage 1. Glissez le opération incorrecte à cause de la vibration. INSTALLATION AVERTISSEMENT : Pour une bonne opération de la platine CD le châssis doit être monté dans un angle de 20° de l'horizontal. Assurez vous que - Audiovox PCD163 | Owners Manual - Page 32
âssis de la nouvelle radio. Enlevez et jetez le cadre. 3. Enlevez les supports de montage et le matériel de la radio existante et attachezles à la blez la nouvelle radio au véhicule en suivant les instructions pour l'installation universelle. 32 PCD163 5. Montez l'ensemble de la nouvelle radio à - Audiovox PCD163 | Owners Manual - Page 33
PCD163 CÂBLAGE Connecteur de Antenne AVERTISSEMENT ! Ne combinez jamais des sorties (ponts) pour utilisation avec un haut parleur. AVERTISSEMENT ! Ne terrez jamais des fils de sortie né - Audiovox PCD163 | Owners Manual - Page 34
PCD163 INSTRUCTIONS D'OPERATION 1 Bouton de Puissance en Marche/en Arrêt Appuyez sur 4 Bouton de Sélection (SEL/MENU) Le bouton SEL/MENU (4) est utilisé pour sélectionner la fonction audio (volume, basse, aigu, balance, équilibreur) à être ajusté en utilisant l'enchiffreur rotatif. Appuyez une - Audiovox PCD163 | Owners Manual - Page 35
PCD163 INSTRUCTIONS D'OPERATION 4 Contrôle de Basse Pour ajuster le niveau de basse, appuyez sur le bouton SEL/MENU (4) jusqu'à ce que BAS apparaisse sur le panneau d' - Audiovox PCD163 | Owners Manual - Page 36
PCD163 INSTRUCTIONS la radio est syntonisée hors de fréquence, vous pouvez avoir de l'audio déformé, du bruit et d'autres problèmes de réception. 7 ) Le bouton MODE (7) vous permet de sélectionner entre la radio et la platine CD. Appuyez sur le bouton MODE, alors qu'un disque est en train de jouer, - Audiovox PCD163 | Owners Manual - Page 37
PCD163 INSTRUCTIONS D'OPERATION 10 Sélectionneur d'Affichage (DISP) Cet appareil peut afficher soit l'heure dans l'horloge ou la fréquence de radio/fonctions de la platine CD. Dependant de vos réglages Menu Système (voir "Menu Système" sur la page 35), la fréquence radio; l'indication de piste - Audiovox PCD163 | Owners Manual - Page 38
PCD163 OPÉRATION DE LA PLATINE CD 11 Fente du Disque Avec l'étiquette en haut, insérez un rapidement ou le bouton TRACK en arrière (13) pour reculer rapidement. 9 Sélectionneur de Reproduction CD/Faire Pause Appuyez sur le bouton reproduction/faire pause (9), alors que le disque est en train de - Audiovox PCD163 | Owners Manual - Page 39
PCD163 OPÉRATION DE LA PLATINE CD 14 Sélectionneur de répétition (RPT) Appuyez sur le bouton RPT (14) alors qu'un disque est en train de jouer pour répéter la reproduction d'une - Audiovox PCD163 | Owners Manual - Page 40
CD/radio n'a pas besoin d'être entretenu. Cependant, une compréhension correcte de son utilisation et manipulation vous aidera à obtenir une jouissance maximum de ses capacités. Nous recommandons que vous gardez ce guide entretenir vos disques compacts : 40 PCD163 • Essuyez des empreintes digitales, - Audiovox PCD163 | Owners Manual - Page 41
PCD163 SPECIFICATIONS Capacité CD-R et CD-RW Dépendant du type de média et des méthodes d'enregistrement quelques CD-R/RW peuvent être . En outre, cet appareil ne reconnaîtra le format CDDA (Compact Disc Digital Audio) enregistré sur un CDR/RW. Cet appareil n'est pas compatible avec les formats - Audiovox PCD163 | Owners Manual - Page 42
- Audiovox PCD163 | Owners Manual - Page 43
the product to the Company or a service center • Elimination of car static or motor noise • Defects in cosmetic, decorative or non-operative structural parts • Correction of antenna problems • Costs incurred for installation, removal or reinstallation of the product • Consequential damage - Audiovox PCD163 | Owners Manual - Page 44
Garantía Limitada Radios del CD o de los Multimedia NO RETORNE ESTE PRODUCTO A LA TIENDA Audiovox Electronics Corporation ("la Compañía) es una corporación favor, revea la sección "Cuidados y Mantenimiento" de su Manual de Instalación y Operación para obtener información adicional relacionada - Audiovox PCD163 | Owners Manual - Page 45
Limitée Radios CD ou Multimédia / Unités principales Audiovox Electronics Corporation (la Société) s'engage à la qualité et au service des clients, et naturelles externes Veuillez revoir la section Soin et Entretien de votre Guide d'Opération, pour avoir des informations supplémentaires quant à - Audiovox PCD163 | Owners Manual - Page 46
Audiovox Electronics Corporation 150 Marcus Boulevard Hauppauge, NY 11788 1-800-323-4815 www.audiovox.com ©2007 Audiovox v.070107
-
 1
1 -
 2
2 -
 3
3 -
 4
4 -
 5
5 -
 6
6 -
 7
7 -
8
-
9
-
10
-
11
-
12
-
13
-
14
-
15
-
16
-
17
-
18
-
19
-
20
-
21
-
22
-
23
-
24
-
25
-
26
-
27
-
28
-
29
-
30
-
31
-
32
-
33
-
34
-
35
-
36
-
37
-
38
-
39
-
40
-
41
-
42
-
43
-
44
-
45
-
46
 |
 |
PCD163
Owner's Manual/Manual del Usario/Manual de L'Utilisateur
AM/FM/CD Receiver
Receptor AM/FM/CD
AM/FM/CD Ampli-Syntoniseur
RPT
TRACK
SCN
LOUD
AUX IN
DISP
MODE
BAND
T
U
N
I
N
G
MUTE
PCD163
SEL/MENU