Audiovox VBP3000 Owners Manual
Audiovox VBP3000 - Video Cassette Player Manual
 |
UPC - 044476742583
View all Audiovox VBP3000 manuals
Add to My Manuals
Save this manual to your list of manuals |
Audiovox VBP3000 manual content summary:
- Audiovox VBP3000 | Owners Manual - Page 1
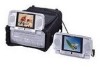
VBP3000 VIDEO IN A BAG SYSTEM WITH DETACHABLE 5" LCD TV/MONITOR AND VIDEO CASSETTE PLAYER - Audiovox VBP3000 | Owners Manual - Page 2
LCD TV/Monitor, VCP and the Bag are installed in accordance with the instructions and illustrations provided in this manual. 4. The "S" hooks and all straps must be fastened correctly to secure the system in the vehicle in the event of an accident. 5. Operate the "Video in a Bag" System with the Bag - Audiovox VBP3000 | Owners Manual - Page 3
INSTRUCTIONS C. Cautions and Warnings 1. Cleaning Video Head To prevent video head clogging, use only good quality VHS tapes and discard worn out tapes. If the heads become dirty over a period of time during normal operation of the VCP serviceable parts inside. Contact qualified service cable - Audiovox VBP3000 | Owners Manual - Page 4
Feature List 1.) One Video Cassette Player with Built In VHF/UHF/CATV Tuner system 2.) Two 5" LCD Monitors with AUX Inputs 3.) One Infra Red Remote Control 4.) One Bag (for carrying the unit and accessories) 5.) One Set of Straps for Mounting 6.) Two Pouches (for the detachable monitors) 7.) One DC - Audiovox VBP3000 | Owners Manual - Page 5
detached from the system by depressing the button below the screen with one hand and removing the monitor with the other (Refer to Figure 13 Item #13.). You may take the additional monitor from the bag. Take the AC/DC adapter from the lower compartment, plug one end into the DC IN 12V - Audiovox VBP3000 | Owners Manual - Page 6
, insert one end of the DIN cable into the MONITOR PORT on the side of the detached monitor, slide the cable through the slot in the bag and insert the other end into the MONITOR PORT on rear of the main unit. After plugging in the main unit, DC 12V power, Audio/Video and IR signals will all - Audiovox VBP3000 | Owners Manual - Page 7
and connect the latch to the upper metal ring on the left side of the bag. Attach the "S" hook to the same ring after looping the strap around the headrest and connect the latch to lower metal ring on the left side of the Bag. Attach the "S" hook to the same ring after looping the strap around the - Audiovox VBP3000 | Owners Manual - Page 8
the pouch. 4. Rotate the base of the second monitor backward so that it may be placed in an upright position on a flat surface. 5. Insert one end of the DIN cable into the MONITOR PORT on the side of the detached monitor, slide the cable through the slot in the bag, and insert the other end into the - Audiovox VBP3000 | Owners Manual - Page 9
of the strap while holding the buckle until the pouch is tightly secured. 3. Insert one end of the DIN cable into the MONITOR PORT on the left right side of the detached monitor, slide the cable through the slot in the bag and insert the other end into the MONITOR PORT on rear of the main unit. 9 - Audiovox VBP3000 | Owners Manual - Page 10
sewn on the front of the bag. Then secure and adjust the safety belt so that the unit is not free to move around. Finally uncover the attached monitor and adjust the screen for a desired viewing angle. Option 2 (Refer to Figure 11) Figure 11 1. Follow the installation instruction shown in the Option - Audiovox VBP3000 | Owners Manual - Page 11
angle. This can be done with or without the monitor inside its bag of its pouch. 3. Insert one end of the DIN cable into the MONITOR PORT on the side of the detached monitor. Slide the cable through the slot in the bag and insert the other end into the MONITOR PORT on rear of the main unit. 11 - Audiovox VBP3000 | Owners Manual - Page 12
2. 12V DC Input Jack for Monitor 3. Remote Control Sensor 4. Power LED Indicator for Monitor 5. Power Switch for Monitor 6. TV/VCP Select Switch 7. Brightness Up/Down Thumbwheel 8. Volume Up/Down Thumbwheel 9. Audio R Input Jack 10. Audio L Input Jack 11. Video Input Jack 12. Monitor Port (Input) 13 - Audiovox VBP3000 | Owners Manual - Page 13
POWER on the VCP to turn it on or off. Slide the POWER switch on the face of the monitor to turn it on or off. 3. Press (FAST) FORWARD or REWIND button to scan forward or backward and press it again to increase the speed. 4. Press PAUSE on the Remote Control to make the - Audiovox VBP3000 | Owners Manual - Page 14
the system, select the TV mode by sliding the TV/VCP switch on the face of the monitor to the TV position. 3. Press POWER on the VCP to turn on or off the TV. Push POWER on the face of the monitor to turn it on or off. 4. Press AUTO MEMORY on the remote control to automatically search and store - Audiovox VBP3000 | Owners Manual - Page 15
an authorized Audiovox dealer for information on ordering an additional external monitors (max number of two external monitors can be supported). Using the DIN cable, connect the external monitor to the MONITOR PORT on the rear of the main unit. The DIN cable supplies 12V DC power, Audio/Video and - Audiovox VBP3000 | Owners Manual - Page 16
OPERATING INSTRUCTIONS 90 DAY LIMITED WARRANTY AUDIOVOX CORPORATION (the Company) warrants to the original retail purchaser of this product that should this product or any part thereof, under normal use and conditions, be proven defective in material or workmanship within 90 days from the date of
-
 1
1 -
 2
2 -
 3
3 -
 4
4 -
 5
5 -
 6
6 -
 7
7 -
8
-
9
-
10
-
11
-
12
-
13
-
14
-
15
-
16
 |
 |

VBP3000
VBP3000
VBP3000
VBP3000
VBP3000
VIDEO IN A BAG SYSTEM WITH DETACHABLE 5" LCD
TV/MONITOR AND VIDEO CASSETTE PLAYER