Audiovox VE1040 Owners Guide
Audiovox VE1040 - Drop-Down LCD TV Manual
 |
UPC - 044476004926
View all Audiovox VE1040 manuals
Add to My Manuals
Save this manual to your list of manuals |
Audiovox VE1040 manual content summary:
- Audiovox VE1040 | Owners Guide - Page 1
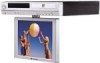
LOW PROFILE DVD/TV/SPEAKER PHONE OWNER'S/INSTALLATION GUIDE - DVD Player & 10.4" TFT LCD Monitor - Multi-Function Remote Control - Built-in Speaker Phone Mode - Cable Ready 125 Channel Tuner - Internal Stereo Speakers - Under Cabinet Mounting - A/V Input -1- 128-6451 - Audiovox VE1040 | Owners Guide - Page 2
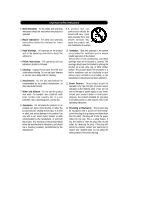
Audiovox dealer regarding this product. Model user to the presence of important operating and maintenance (servicing) instructions in the literature accompanying the VE1040 television reception, which can be determined by turning the equipment off and on, the user experienced radio/TV technicion for - Audiovox VE1040 | Owners Guide - Page 3
by the manufacturer, or sold with the product. Any mounting of the product should follow the manufacturer's instructions, and should use a mounting accessory recommended by the manufacturer. 10. Ventilation - Slots and openings in the cabinet are provided for ventilation and to ensure reliable - Audiovox VE1040 | Owners Guide - Page 4
instruction Manual for replacement of, or resetting the protective device. If replacement of the plug is required, be sure the service Code, ANSI/NFPA 70, provides information with regard to proper grounding of the mast and supporting to keep from touching such power lines or circuits as contact - Audiovox VE1040 | Owners Guide - Page 5
operating instructions. Adjust only those controls that are covered by the operating instructions, repairs to this product, ask the service technician to perform safety checks to determine that the product is in proper operating condition. 24. Wall or Ceiling Mounting - The product should be mounted - Audiovox VE1040 | Owners Guide - Page 6
unit from the outlet and refer servicing to qualified service personnel under the following conditions: a) If the unit has been exposed to water. b) If the unit does not operate normally when following the operating instructions. c) If the unit has been dropped or the cabinet has been damaged. "USE - Audiovox VE1040 | Owners Guide - Page 7
of Operation Using the Remote Control Functions Using the Setup Menu Definition of Terms Troubleshooting Check List Technical Specifications Table Of Contents Introduction 2 Important Safety Instructions 3 Table of Contents 7 Included in this Kit 8 Under Cabinet Installation 9 Operation And - Audiovox VE1040 | Owners Guide - Page 8
1. VE1040 DVD/TVPhone 2. Mounting Template 3. Hardware Bag A. 3/4" Mounting screws (4) B. 1-1/4" Mounting screws (4) C. 1-1/2" Mounting screws (4) D. 3/4" Spacer (4) E. 1/2" Spacer (4) F. 1/4" Spacer (4) Included in this kit 4. AM Antenna 5. Manual 6. Telephone Jack 7. FM Dipole Antenna 8. Remote - Audiovox VE1040 | Owners Guide - Page 9
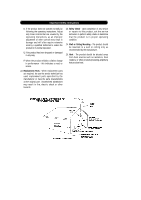
Installation FRONT VIEW SIDE VIEW 1) Choose an appropriate mounting location underneath a cabinet or shelf. Close proximity to an electrical outlet and a TV antenna or cable connection will facilitate a neat, easy installation. Do not mount the VE1040 above a range or oven. Be sure that the - Audiovox VE1040 | Owners Guide - Page 10
"4" in the Radio (TV or RADIO) Mode. 11. 5 : Play button in DVD play mode or User - Selected Preset Channel "5" in the Radio (TV or RADIO) Mode. 12. 6 : Open/Close button in DVD play mode or User -Selected Preset Channel "6" in the Radio (TV or RADIO) Mode. 13. Remote Infrared Sensor : This sensor - Audiovox VE1040 | Owners Guide - Page 11
the reception of FM broadcast signals. 3) AM ANTENNA - Allows the VE1040 to be connected to an external antenna for the reception of AM broadcast input power. 6) Stereo Output Terminal - Provides LEFT and RIGHT external speaker stereo output 7) Audio/Video (A/V) Input Connectors - Support stereo - Audiovox VE1040 | Owners Guide - Page 12
Functions 1 MENU Button - When pressed, the LCD control MENU is displayed. 2 SEL Button - Highlights the menu item to be changed using the UP ( ) / DOWN ( ) buttons. 3 UP ( ) Button - Scrolls upward through menu items, - Audiovox VE1040 | Owners Guide - Page 13
may also be rotated from side to side. Do not force the screen beyond its rotational limit. The VE1040 is now ready for use. Pressing the ON/OFF button on the TV or the remote will turn the system on or off. Remember to turn the unit off and pivot the screen to - Audiovox VE1040 | Owners Guide - Page 14
and can be reactivated whenever desired by performing steps 1) - 3) of the DEACTIVATING THE ALARM procedure. SETTING THE ALARM TONES 1) Press the SET button twice (power off). 2) Press the TEL button once to hear the alarm tone. NOTE : Alarm must be in the "Activated" mode to hear tones. 3) Pressing - Audiovox VE1040 | Owners Guide - Page 15
Remote Control Functions (1) OPEN/CLOSE (2) POWER (3) DVD (4) TV (5) AM/FM (6) A/V (7) Digit 0 -9 Select (8) ENTER (9) CLR (10) TEL (11) MUTE (12) VOL+/(13) STOP (14) PLAY (15) FUNCTION UP/DOWN Select (16) PREV., NEXT (17) SR (18) SF (19) PAUSE/STEP (20) FR (21) FF (22) ZOOM (23) A-B (24) AUDIO (25) - Audiovox VE1040 | Owners Guide - Page 16
Remote Control Functions DVD MENU (1) OPEN/CLOSE : Press this button to Open and Close the disc tray. (2) POWER : Press this button to turn power On and Off. (3) DVD : Press this button to select DVD . PLAY MODE control function-MP3 (31) SETUP : Displays setup menu for initial user settings. TV MENU - Audiovox VE1040 | Owners Guide - Page 17
Modes Of Operation SETTING THE CABLE TV MODE 1) With power off, press the SET button three times to enter the cable configuration mode. AIR appears on the display . Then press the 1 preset to button switch from broadcast TV(VHF or UHF) to cable TV.(CAbl will appear on the VFD.) 2) Press the SET - Audiovox VE1040 | Owners Guide - Page 18
Remote Control Functions Inserting and Ejecting the Disc 1. When the tray opens, insert the disc properly with the label facing up. 2. As the tray closes, playback is automatically executed. * Discs playable through DVD player - DVD commence play from the chapter number or time that it reads. - Audiovox VE1040 | Owners Guide - Page 19
Remote Control Functions Repetitive Playback-To Repeat a Specific Section. 1. Pressing the REPEAT button once, the current chapter or track will be replayed repetitively (CHPTER REPEAT ON). 2. Pressing the button twice, he currently playing title or CD will be played part of the DVD player display. - Audiovox VE1040 | Owners Guide - Page 20
Using the Remote Control FunctionS Viewing the Setup Menu 1. Pressing the SETUP button will display the setup menu. This allows the user to select DVD options (Languages, Display, Audio and Parental). 2. To return to a previous screen, press the SETUP button. Viewing the Playback Time, Title and - Audiovox VE1040 | Owners Guide - Page 21
Using The Setup Menu Using the setup menu allows the user to select the play mode settings. To use the SETUP menu : 1. Press the SETUP button to display the main menu. 2. Use the or buttons to highlight the desired menu item. 3. Press the ENTER ( ) button to display the sub-menu. 4. - Audiovox VE1040 | Owners Guide - Page 22
Setup Menu GENERAL SETUP TV DISPLAY : Select the aspect ratio of the playback picture. NORMAL/PS : Pan & scan display.(DEFAULT) NORMAL/LB : Letterbox display WIDE : Widescreen display TV user's TV supports both system. NTSC : Modifies the original image signal to NTSC system before playing playing DVD - Audiovox VE1040 | Owners Guide - Page 23
support. STEREO : Selected when listening to general stereo sound. DOLBY DIGITAL SETUP SPANISH, JAPANESE. LOCALE : Parental locality code. CHINA, FRANCE, HONG KONG, JAPAN 8 : ADULT PASSWORD : The user will be prompted to enter the Previous Password. FIRST TIME SETUP : enter the Default password = - Audiovox VE1040 | Owners Guide - Page 24
of the screen which shows translated dialogues. Up to 32 national languages can be supported when producing a Title. ANGLE TV images are generally represented through a viewpoint of camera. However, DVD allows a choice of up to 9 different camera angles by recording various simultaneous camera - Audiovox VE1040 | Owners Guide - Page 25
Check List When the power does not turn on TROUBLESHOOTING CHECKLIST * Check if the power cord is securely connected to the rear of the unit. * Check if the batteries of the remote control unit are not depleted. When the disc fails to play * Check if the disc is inserted properly into - Audiovox VE1040 | Owners Guide - Page 26
disc. Only discs that are compatible with the setup menu properties of the player can be played in the DVD player. When the TV MODE or TV TYPE functions do not work. * The DVD disc may not support this function. Technical Specification GENERAL Power Supply : AC100 - 240V, 50/60Hz , 40watts Operating - Audiovox VE1040 | Owners Guide - Page 27
-27 - - Audiovox VE1040 | Owners Guide - Page 28
-
 1
1 -
 2
2 -
 3
3 -
 4
4 -
 5
5 -
 6
6 -
 7
7 -
8
-
9
-
10
-
11
-
12
-
13
-
14
-
15
-
16
-
17
-
18
-
19
-
20
-
21
-
22
-
23
-
24
-
25
-
26
-
27
-
28
 |
 |

- 1 -
LOW PROFILE DVD/TV/SPEAKER PHONE
OWNER’S/INSTALLATION GUIDE
- DVD Player & 10.4” TFT LCD Monitor
- Multi-Function Remote Control
- Built-in Speaker Phone Mode
- Cable Ready 125 Channel Tuner
- Internal Stereo Speakers
- Under Cabinet Mounting
- A/V Input
128-6451