Audiovox VE726 Owners Manual
Audiovox VE726 - 7" LCD TV Manual
 |
UPC - 044476032110
View all Audiovox VE726 manuals
Add to My Manuals
Save this manual to your list of manuals |
Audiovox VE726 manual content summary:
- Audiovox VE726 | Owners Manual - Page 1
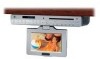
VE726 UNDER THE COUNTER 7" TV, AM/FM RADIO and DVD PLAYER OWNER'S and INSTALL MANUAL • Slot-in DVD Player & 7" TFT LCD Monitor • Multi-function Remote Control • Cable Ready 125 Channel TV Tuner • AM/FM Radio • 2 A/V Inputs • Internal Stereo Speakers • Under Cabinet / Table Top Mounting 0 - Audiovox VE726 | Owners Manual - Page 2
this product's enclosure and contact with any of these voltages will result in electric shock. This symbol alerts the user that important and maintenance (servicing) instructions in the literature accompanying the unit. To prevent electric shock: do not use this unit's polarized ac plug with - Audiovox VE726 | Owners Manual - Page 3
accordance with the manufacture's instructions. Failure to follow these instructions may cause or result in be determined by turning the equipment off and on, the user is encouraged to try to correct the interference by one or AUDIOVOX dealer regarding this product. MODEL No. SERIAL No. 2 - Audiovox VE726 | Owners Manual - Page 4
, bracket, or table recommended by the manufactures, or sold with the product. Mounting of this product should be in accordance the manufacture's instructions, and should use the mounting hardware provided with the unit by the manufacturer. 9. Carts - A product and cart combination should be moved - Audiovox VE726 | Owners Manual - Page 5
Code, ANSI/NFPA 70, provides information with regards to proper grounding of the mast, supporting . 19. Servicing - Do not attempt to service this product yourself as instructions. Adjust only those controls that are covered by the operating instructions, as an improper adjustment of other controls - Audiovox VE726 | Owners Manual - Page 6
or repairs to this product, ask the service technician to perform safety checks to determine that the product is in proper operating condition. 23. Mounting - The product should be mounted only as specified in this manual. 24. Heat - The product should be situated away from heat sources such as - Audiovox VE726 | Owners Manual - Page 7
TABLE OF CONTENTS Before You Begin Installation Remote Control Functions Modes of Operation Using the DVD Loader Technical Specifications Troubleshooting Check List Introduction 1 Important Safety Information 3 Table of Contents 6 Contents of package 7 Under Cabinet Installation 8 - Audiovox VE726 | Owners Manual - Page 8
CONTENTS OF PACKAGE 1. VE726 2. Hardware bag A. 2" Mounting screws (4) B. 2-1/2" Mounting screws (4) C. 3"Mounting screws (4) D. Foot (4) E. Hole cap (4) 3. Remote Control 4. Multi Height Spacer (4) 5. Batteries (AAA) 6. FM Dipole Antenna 7. Right Angle Coaxial Adaptor 8. FM Antenna Balun 9. AM - Audiovox VE726 | Owners Manual - Page 9
spacer height chosen. Select the shortest screw length, which will secure the VE726 to the bottom of the cabinet. 4) Cut out the template supplied and AM Antenna and position the antenna for the best reception. 9) Position the VE726 and mount it in place using the selected screws. NOTE: Do not over - Audiovox VE726 | Owners Manual - Page 10
surface. 2) Pivot the screen so that it is perpendicular to the front of the unit and then turn it sideways. 3) Remove the hinge guide covers (#1) using a flat blade screwdriver inserted into the removal slots. Unscrew the mounting screws (#2). Remove the connector from the unit (#3), be careful not - Audiovox VE726 | Owners Manual - Page 11
FRONT PANEL CONTROLS cm 1) ON/OFF BUTTON - Power ON/OFF. 2) SET BUTTON - Press this button to set the TIME, ALARM, TV Mode or Speaker Mode. 3) ADD BUTTON - Press - Audiovox VE726 | Owners Manual - Page 12
REMOTE INFRARED SENSORS-These sensors receive infrared command signals from the hand held remote control unit. 20) Disc Insertion Slot 21) Color Control- Use this control reception of FM broadcast signals. 5) AM ANTENNA - Allows the VE726 to be connected to an external antenna for the reception of AM - Audiovox VE726 | Owners Manual - Page 13
Functions 1. MENU Button - When pressed, the LCD control MENU is displayed. 2. SEL Button - Used to enter the picture menu. Highlight the menu item to be changed using the UP/DOWN buttons and then - Audiovox VE726 | Owners Manual - Page 14
8) BATTERY INSTALLATION (Rear View, Battery Size AAA) 13 - Audiovox VE726 | Owners Manual - Page 15
REMOTE CONTROL FUNCTIONS (1) EJECT (2) DVD (3) TV (4) SETUP (5) SEEK DN, SEEKUP (6) MENU (7) FR(WW) (8) STOP(■) (9) PREV (IWW) (10) Digit 0-9 Select (11) TITLE (12) DISPLAY (13) SUB TITLE (14) - Audiovox VE726 | Owners Manual - Page 16
DVD REMOTE FUNCTION (1) EJECT: Press this button to Eject and Load the disc tray. (2) DVD: Press this button to select DVD mode of operation. (4) SETUP: Displays setup menu for initial user settings. (5) SEEK DN/UP (21) CH+/-: For selecting item on menu. (6) MENU: For displaying the menu contained - Audiovox VE726 | Owners Manual - Page 17
memory. (34) Step (Add): Use to add a selected channel to memory. RADIO REMOTE FUNCTION (5) SEEK DN/UP: Use these buttons to advance to the next higher or lower active station. (19) AM/FM: Each time this button is pressed, the VE726 will alternate between the AM and FM radio bands. (21) CH +/-: Use - Audiovox VE726 | Owners Manual - Page 18
also be rotated from side to side. Do not force the screen beyond its rotational limit. The VE726 is now ready for use. Pressing the ON/OFF button on the unit or the remote will turn the system on or off. Remember to turn the unit off and pivot the screen to - Audiovox VE726 | Owners Manual - Page 19
SETTING and ACTIVATING the ALARM NOTE: The VE726 must be turned "OFF" when performing the following procedure. 1) Press the SET button twice to enter the alarm mode, press the P3 button to toggle - Audiovox VE726 | Owners Manual - Page 20
SETTING THE CABLE TV MODE 1) Press the SET button three times to enter the TV/Cable configuration mode. 2) CABLE or AIR will appear on the display. 3) Press the SEEK button to select Cable mode. 4) Press the CH UP/DOWN button(s) to select the desired cable mode (STD/IRC/HRC). 5) When the desired - Audiovox VE726 | Owners Manual - Page 21
USING THE DVD PLAYER Inserting and Ejecting the Disc 1. Set the unit to DVD mode (press source button until appears on the display. 2. Insert the disc with the label facing up. 3. The disc will begin playing automatically. If this is a DVD it will go to the DVD root menu. Press the PLAY button to - Audiovox VE726 | Owners Manual - Page 22
Repetitive Playback -To Repeat a Specific Section 1. Press the REPEAT button once to enable the REPEAT selection screen, follow by pressing the REPEAT button until REPEAT CHAPTER is displayed, the current chapter or track will be replayed repetitively (CHPTER REPEAT ON). 2. Repeat step 1 until - Audiovox VE726 | Owners Manual - Page 23
MENU button, depending on the type of disc being played Viewing the Playback Time, Title and Chapter Status 1. Pressing the DISPLAY button will allow the user to see the title, chapter number, and the elapsed time of the currently playing disc on the upper part of the screen, show the remaining - Audiovox VE726 | Owners Manual - Page 24
During playback press DISPLAY to display the current disc playback information. Press display again to remove the display. 1. The type of disc. 2. The number of current title. 3. The number of total titles. 4. The number of current chapter. 5. The elapsed time of title. 6. The number of total - Audiovox VE726 | Owners Manual - Page 25
PLAYING AUDIO CDS When playing an audio CD the display will automatically display the disc playback information. The options below show you what information is displayed. Press the 'DISPLAY' button to remove the display. 1. The current track. 2. The number of total tracks. 3. Playing time of the - Audiovox VE726 | Owners Manual - Page 26
1. Press the f or g button to choose a folder from the folder list on the left side of the screen. 2. Press ENTER to select the highlighted folder. All songs available under the selected folder will be listed. 3. Use f or g button to choose a song from the list, then press ENTER to play the selected - Audiovox VE726 | Owners Manual - Page 27
the photos vertically by pressing the "Down" button. 6. You can return the root Menu by pressing "MENU" key. SETUP The setup menu allows the user to select the play mode settings. Follow the basic steps below for each setup menu selection. The following options are available when in SETUP mode. - Audiovox VE726 | Owners Manual - Page 28
3. Use the f or g buttons to highlight the desired menu item. 4. Press ENTER button to display the sub-menu. 5. Each sub-menu item provides a number of option items to its right. Use the f or g buttons to highlight the desired option item for selection. 6. Press the ENTER button to select the option - Audiovox VE726 | Owners Manual - Page 29
VIDEO Menu 1. Press the SETUP button to display the main menu (see sample screen under LANGUAGE Menu) 2. Press the d button to highlight Video and press ENTER one time. Use the following screen to select screen aspect ratio. * 4:3 PS : When the player is connected to a normal TV, and a wide picture - Audiovox VE726 | Owners Manual - Page 30
parental level and change the password, you can record this default password in another area and delete it from this manual. Some discs can be limited depending on the age of users while some discs cannot. Load Factory To restore all of the options to the default settings select 'LOAD FACTORY' using - Audiovox VE726 | Owners Manual - Page 31
TECHNICAL SPECIFICATIONS GENERAL Power Supply Operating Temperature Operating Humidity Body Size Weight DISPLAY LCD Illumination Backlighting Life Expectancy Resolution Screen : AC100-240V ~50/60Hz 40watts : 0°~40°C / 32°~104°F : 10% ~ 75% : 400 X 280 X 56mm / 15.8" x 11.0" x 3.25" Inches : 3.4 Kg - Audiovox VE726 | Owners Manual - Page 32
TROUBLESHOOTING CHECK LIST Problem Power does not turn on • • Disc fails to play • Camera angles cannot be • changed • Subtitles cannot be changed • • Vocal languages (AUDIO) • cannot be changed • No sound output • • • Remote control doesn't work • • • Setup menu does not - Audiovox VE726 | Owners Manual - Page 33
and repair labor. A game controller, if supplied, is similarly to correction of antenna problems, to costs incurred factory serial number/bar code label(s). THE EXTENT LIABILITY EXCEED THE PURCHASE PRICE PAID BY PURCHASER FOR state to state U.S.A. : AUDIOVOX ELECTRONICS CORPORATION, 150 MARCUS BLVD
-
 1
1 -
 2
2 -
 3
3 -
 4
4 -
 5
5 -
 6
6 -
 7
7 -
8
-
9
-
10
-
11
-
12
-
13
-
14
-
15
-
16
-
17
-
18
-
19
-
20
-
21
-
22
-
23
-
24
-
25
-
26
-
27
-
28
-
29
-
30
-
31
-
32
-
33
 |
 |

•
Slot-in DVD Player & 7” TFT LCD Monitor
•
Multi-function Remote Control
•
Cable Ready 125 Channel TV Tuner
•
AM/FM Radio
•
2 A/V Inputs
•
Internal Stereo Speakers
•
Under Cabinet / Table Top Mounting
VE726
UNDER THE COUNTER 7” TV,
AM/FM RADIO and DVD PLAYER
OWNER’S and INSTALL
MANUAL